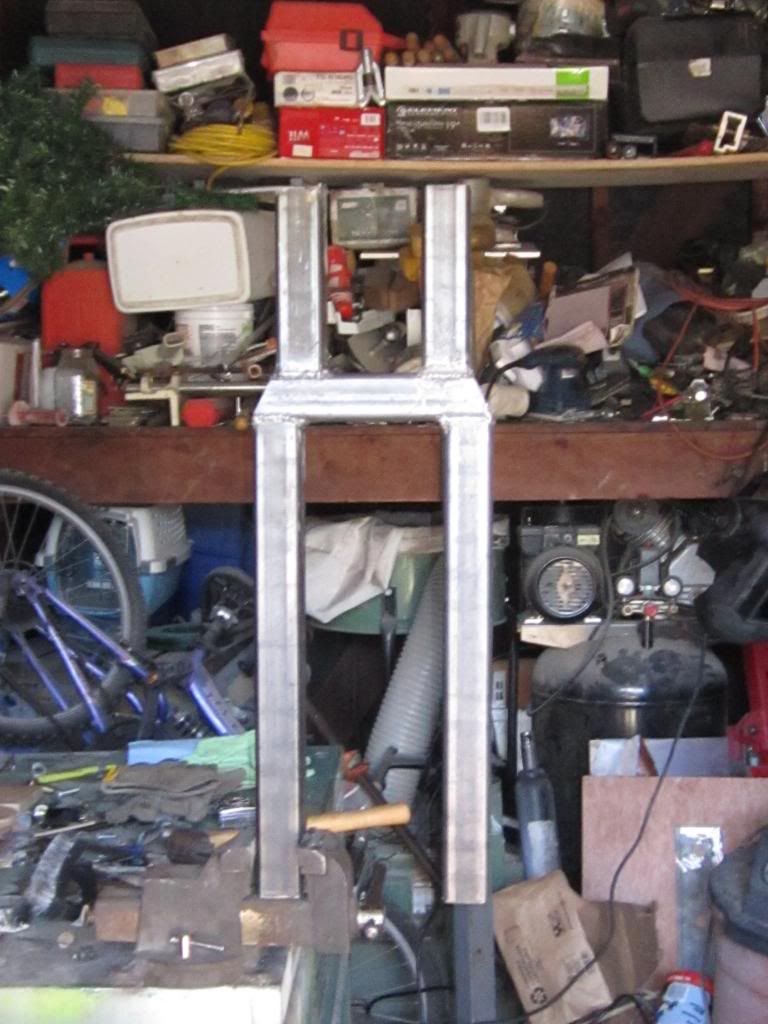
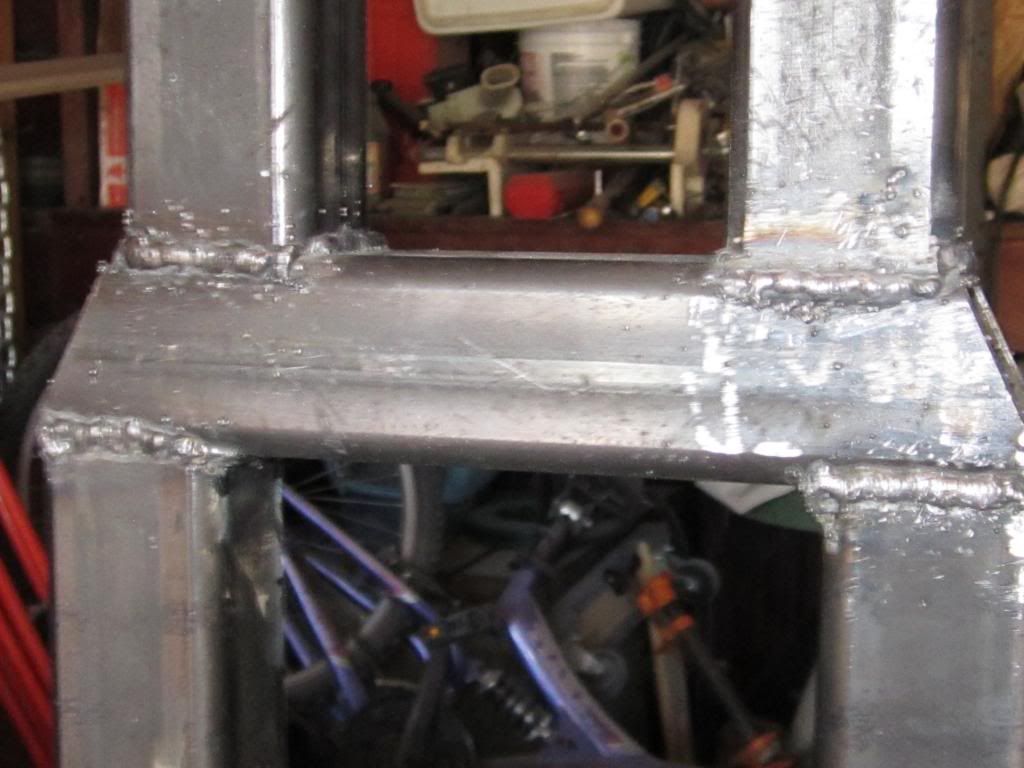
What welding projects are you working on? Are you proud of something you built?
How about posting some pics so other welders can get some ideas?
How about posting some pics so other welders can get some ideas?
Update. The tube bender broke when I tried to bend .065. No problem with EMT. EMT is about .042. I called around and found a company that sells .048. Perfect! It's not EMT, but, steel tube. 7/8", 66 cents a foot. The tube bender will bend this easily. I just have to remake the small follower piece. I've redesigned the bender to bend 180 deg. I'll take some photos this weekend.
After searching the internet, I found a tube bender that will do the job. It also will bend 180 deg, which is what I really want. I'm starting on this Wed.
http://s1207.beta.photobucket.com/user/ ... sort=6&o=0
I'm breaking the other bender down and using some of the metal for this and other projects.
http://s1207.beta.photobucket.com/user/ ... sort=6&o=0
I'm breaking the other bender down and using some of the metal for this and other projects.
- weldin mike 27
-
Weldmonger

-
Posts:
-
Joined:Fri Apr 01, 2011 10:59 pm
-
Location:Australia; Victoria
Hey guys, I gotta question. I'm coming to a point where I'm starting to assemble my tube bender. I have an 8 ton hydraulic bottle jack that came with my engine hoist, but, it's manual. I'd like to convert it to automatic. I have a compressor for air, if that will work, but, I'd like to convert it to hydraulic. Anybody know how to convert to air or hydraulic?
delraydella
- delraydella
-
Weldmonger

-
Posts:
-
Joined:Mon Apr 25, 2011 7:35 pm
-
Location:Detroit, MI
Just guessing, but you would probably have to buy an air powered hydraulic pump and fit it to the jack.
I suppose if you had an air powered motor and gearbox, you could attach an offset cam to it and use that to drive the pump handle......
Harbor Freight also sells an air powered hydraulic jack
http://www.harborfreight.com/20-ton-air ... 95553.html
Other Steve
I suppose if you had an air powered motor and gearbox, you could attach an offset cam to it and use that to drive the pump handle......
Harbor Freight also sells an air powered hydraulic jack
http://www.harborfreight.com/20-ton-air ... 95553.html
Other Steve
Welding☞Syncrowave 250,Millermatic 252,30a Spoolgun Cutting☞12" Hi-speed Cutoff Saw, 9x 12 Horizontal Bandsaw Milling☞Gorton 8d Vertical Mill Turning☞Monarch EE Precision Lathe Grinding ☞Brown & Sharpe #5 Surface Grinder
I asked around and it would cost just as much to convert the manual to an automatic as it would just to buy an automatic. Anyway, Harbor Freight is having a Black Friday sale and I'm gonna see then if that jack will be on sale. It's on sale now, 10 bucks off.
delraydella
- delraydella
-
Weldmonger

-
Posts:
-
Joined:Mon Apr 25, 2011 7:35 pm
-
Location:Detroit, MI
This is a picture of a flat stock bender i made. It can bend a piece of steel up to 3/8ths of an inch thick and it does it pretty easily, a lot easier than putting the piece in a vise and beating the crap out of it! It's made out of 2" x 2" x3/8" square tube, 2" x 2" x 1/2" and 2" x 2 1/2" bar stock, and some 3/4" oil hardened drill rod. The small horizontal pipe on the farthest right hand side drill rod is for a tight bend adapter that i haven't finished yet. Right now it will only bend the piece to the radius of the drill rod, the adapter will bend it without a radius.
Just to be honest, I didn't design this, I got the plans from a machinists magazine who got them from a magazine from the 1950's.
Other Steve
Just to be honest, I didn't design this, I got the plans from a machinists magazine who got them from a magazine from the 1950's.
Other Steve
- Attachments
-
- IMG_7271.JPG (64.57 KiB) Viewed 2388 times
Welding☞Syncrowave 250,Millermatic 252,30a Spoolgun Cutting☞12" Hi-speed Cutoff Saw, 9x 12 Horizontal Bandsaw Milling☞Gorton 8d Vertical Mill Turning☞Monarch EE Precision Lathe Grinding ☞Brown & Sharpe #5 Surface Grinder
Del, that is so cool. Well, tomorrow is payday and I'm headed to Gardena welding to get my tank filled. Does anybody know where I can get some ideas for some Christmas projects to make some stuff out of metal? I looked online but there wasn't much. Some simple stuff would be great.
delraydella
- delraydella
-
Weldmonger

-
Posts:
-
Joined:Mon Apr 25, 2011 7:35 pm
-
Location:Detroit, MI
If you know anybody that likes to garden, there are lots of things you could make for them out of metal. Plant stem holder uppers, trellises, plant tag holders, any number of garden type sculptures, hanging plant hooks......a stop at a garden supply store should give you a lot of ideas.
There is a guy by me who collects the metal rod that holds up those campaign lawn signs, and there are thousands of those leftover now. He takes those and makes all sorts of garden and outdoor small sculptures out of them and sells them at local farmers markets. He takes care of the problem of geting rid of the signs once the elections are over, he gets 99% of his materials for free, and he does pretty good selling what he makes.
Other Steve
Welding☞Syncrowave 250,Millermatic 252,30a Spoolgun Cutting☞12" Hi-speed Cutoff Saw, 9x 12 Horizontal Bandsaw Milling☞Gorton 8d Vertical Mill Turning☞Monarch EE Precision Lathe Grinding ☞Brown & Sharpe #5 Surface Grinder
Del, thanks. That's not a bad idea. I've noticed at Lowe's and Home Depot, that the metal water cans are expensive. I was thinking of designing one and making them. Since I'm also a woodworker, I was thinking of combining the two.
I finally got around to finishing the bending tower. It was really hard. It took me three tries. The bending rods have to be parallel. And I mean straight. If they're off, even a little bit, the tube will slip off the backing block.
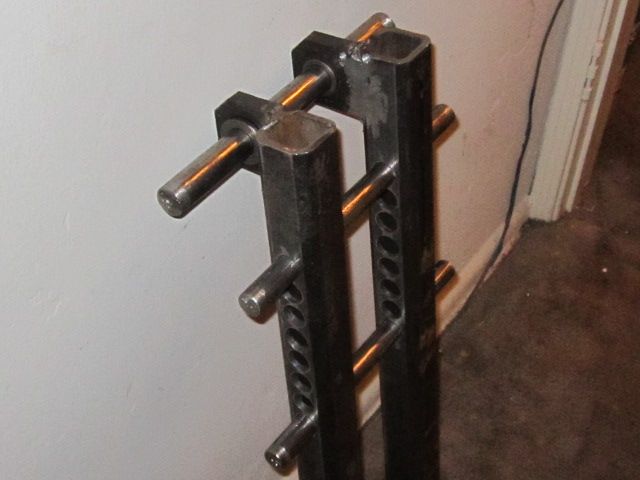
I basically put the two smaller rods in the holes and welded the tabs parallel to the front part of the tower. That's where the swing arm will pivot. You can see where I ground the inside of the tab so it won't interfere with the arm. If the pivot arm is not in line, it has to be re-welded. There is a little bit of margin for error, but, not much. Tomorrow, I will assemble the rest.
What would be a good color? Black?
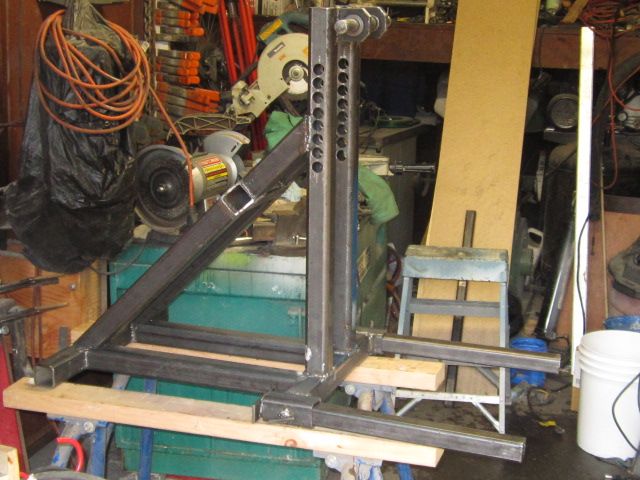
Over the weekend I Welded most of the joints and still need to weld a few more. The extension legs are on, now, and I made the locking bolts. I cut the tops and threads off a long bolt and made a turn screw out of it and it works great. This Wednesday I get paid and depending on finances, I'll go to Metal depot and get the material for the swing arm. I was there last week and the 1/2" x 3" scrap was cheap, so, looks like I'll start that soon. I'll still have to wait 'till after the holidays to get the bottle jack.
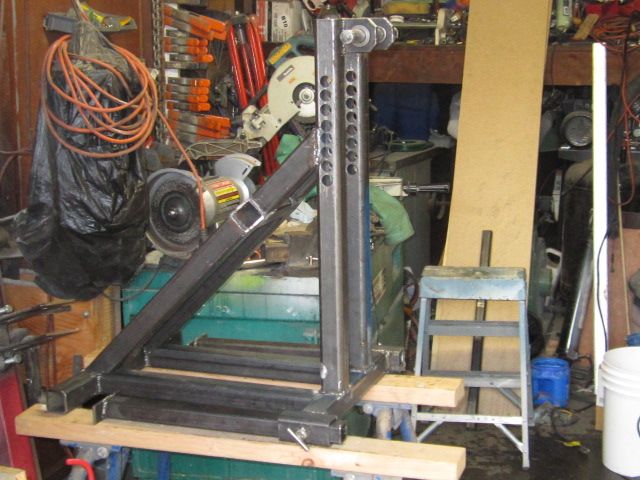
Legs retracted.
Legs extended.
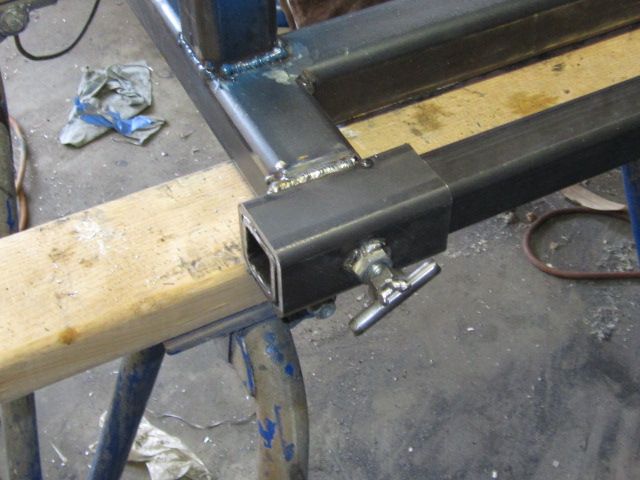
Locking bolt. There are roller wheels that go on the ends of the extension legs, so, the unit can be picked up and wheeled around.

Legs retracted.

Legs extended.

Locking bolt. There are roller wheels that go on the ends of the extension legs, so, the unit can be picked up and wheeled around.
delraydella
- delraydella
-
Weldmonger

-
Posts:
-
Joined:Mon Apr 25, 2011 7:35 pm
-
Location:Detroit, MI
looking good!
Welding☞Syncrowave 250,Millermatic 252,30a Spoolgun Cutting☞12" Hi-speed Cutoff Saw, 9x 12 Horizontal Bandsaw Milling☞Gorton 8d Vertical Mill Turning☞Monarch EE Precision Lathe Grinding ☞Brown & Sharpe #5 Surface Grinder
I talked to the guy who sells the bending dies. Seems I was wrong. The bending die that I want is a 240 degrees that will bend a 180 degrees. The die will bend several different radii for one die! There are a series of holes in the die that makes this possible. The guy who engineered this bender really knew what he was doing. I can't wait to start.
A note concerning oak for dies. I have used it before but it was white oak and was made up of a laminate of 1/4" layers with the grain reversed like plywood is or heart wood. I have a chunk of white oak heart wood that I got from a pallet that is about 3"x2"x16" that I have been using for a whapper for about 12 years by now. I have wailed on weldments with this wood and you can barely dent it. Black Locust or Osage Orange are other woods that are nearly indestructible. I can't imagine damaging a piece of black locust bending a piece of metal around it, maybe even sched 40.
Miller ABP 330, Syncrowave 250, Dynasty 300 DX.
Honorary member of the Fraternity of Faded Tee Shirts.
Honorary member of the Fraternity of Faded Tee Shirts.
TamJejj, thanks for the post. About a month ago, I downloaded a set of plans to build a unique tube bender. Well, it's now finished. I'm gonna stop at this point, and wait 'till after the first of the year. Money is the major issue. The Bending die is $200 and the bottle jack is $80. With Christmas gifts I want to buy, it's better I wait 'till later. Here is the finished product.
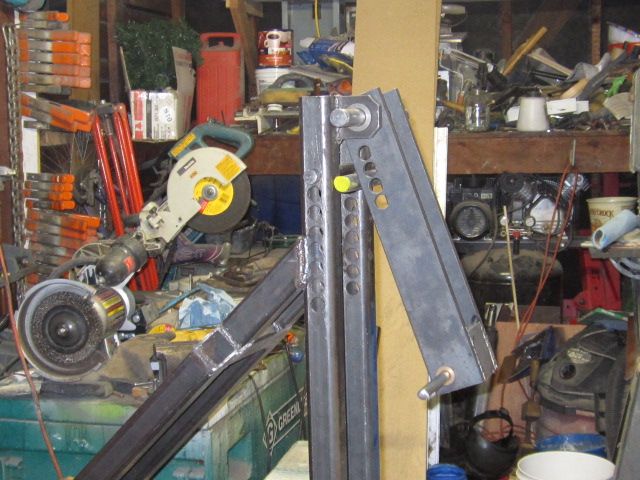
I propped a steel bar in the swing arm to see it better. The die pivots on the the upper pin and the arm holes are for the pin that goes thru the lower part of the die. The bottom pin is for the jack arm. As it swings up, the die pulls the tube along a follower in the tower tubes. When the jack arm is fully extended, you remove the arm pin, lower the arm and reinsert the arm pin in a different position on the die. This is repeated until the desired angle is met.
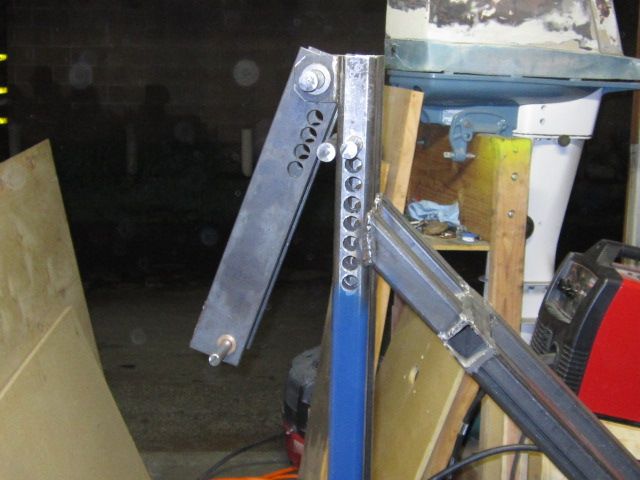
Here's a better picture. You can see the upper pin, the tower pin, the arm pin, and the jack arm pin. The arm pin is actually not in.
When I get everything together, I'm gonna make a video. As I was reading the instructions, I read about how Frank constructed this bender. He says that no mater how perfect the holes line up, when you weld, the metal tends to warp, expand and whatever, and he consistently re-drilling the holes, so the pins will line up. Ain't that the truth.

I propped a steel bar in the swing arm to see it better. The die pivots on the the upper pin and the arm holes are for the pin that goes thru the lower part of the die. The bottom pin is for the jack arm. As it swings up, the die pulls the tube along a follower in the tower tubes. When the jack arm is fully extended, you remove the arm pin, lower the arm and reinsert the arm pin in a different position on the die. This is repeated until the desired angle is met.

Here's a better picture. You can see the upper pin, the tower pin, the arm pin, and the jack arm pin. The arm pin is actually not in.
When I get everything together, I'm gonna make a video. As I was reading the instructions, I read about how Frank constructed this bender. He says that no mater how perfect the holes line up, when you weld, the metal tends to warp, expand and whatever, and he consistently re-drilling the holes, so the pins will line up. Ain't that the truth.
Neat looking bender  I need to make something like that... hmmm another project
  have you checked on CL for the air over hyd rams? I see there is one on there now http://detroit.craigslist.org/wyn/tls/3389167326.html guy wants 75 bucks for it... wish it was closer to me


Rons11, it looks like this guy was using it for a bender, too. There is a metal box welded to the bottom exactly like the one I'm supposed to make. I'm not going to make the mounting box until I get the jack first. I just hope everything works ok after all this prep. There's a video of Frank actually bending a 2" pipe. From what the guy at Pro-tools says, that it's easier to bend thick wall, than thin wall. There's not enough metal in thin wall to stretch or crimp, so, it kinks causing a flat spot. It's all new to me. When I finally get the die, I'm gonna make a video. That bottle jack on CL is in Garden City. Way too far.
That's what I do every day just about is bend pipe and tubing, thin and thick. I even at times use the up sized dies for larger pipe sizes so that I can match radii with the smaller pipes where they are along side their larger counterparts. Imagine a pipe bent to a 90 degrees, without the walls of it's corresponding die to subdue it's shape. First is knowing the nature of the composition of the metal. I have a pro tools one shot pneumatic, which is a draw bender, an enerpac ram bender, and one of those bottle jack ram benders. I use all three. If I were to make my own bender, I would probably figure out a way to adapt the dies from the cheaper bottle jack types. I bought mine, with dies from 3/4 to 2" for around $149. The advantage to the bottle jack types, is you can make your own attachments for it to break and curve sheet metal and plate for what you don't use of it for bending pipe.
Here is an example. I needed something to curve these mounting pads at times. Pretty often, actually. So I made a male/female die to do so. I just line the dies with that clear eisenglass (sp?) plastic material like they use for rear windows in convertible car tops to keep from marring the anodized.

Also, you have to know the alloy's bend rate. Some you can put right into the bender and floor the pedal and just let it rip. Some, like in the case with using dies on smaller pipes meant for larger sizes, you can sneak up on it. Bump it, let the metal relax, imagine the molecules stretching. Do they get work hardened or softened? Where is the stress point going to focus and can you subdue it there? Perhaps you may need to heat or anneal the alloy? There is a lot of different ways. You have an advantage when you only have to do it once in awhile or not for a living. Some tactics make no sense in a production environment so many things that work cannot be done cost effectively when there is already a feasible mechanical solution that can be bought for the task like some of those mandrel benders we see in exhaust shops etc that just does it quickly and consistently in a hurry.
Here is an example of a smaller tube bent in a larger die. The little wedge bar feature on this chair is 3/4" sched 40. I wanted the radius to match the 1" pipe below it. It just looks odd to me to have bends side-by-side with different radii. So I bent the 3/4 in the 1" die. I have bent 3/4" in the 1-1/2" die also.

Here is a 3/4" back rest bar, that was bent to 90 degrees in a 1-1/4" die. I just ever so slowly sneak it through the bend cycle. I watch the side walls for the signs of collapse. Yes, this is aluminum, but I have done this with steel tubing. In one instance, I actually used a split piece of pvc thin wall and encased the smaller tubing in it and bent it that way and it was just enough support to get it through.
Just some ideas that you may need when you start bending tubing, especially odd sizes you may not have the correct dies for at times. I used to have to bend thin wall aluminum, which can also have it's gremlins.
Here is an example. I needed something to curve these mounting pads at times. Pretty often, actually. So I made a male/female die to do so. I just line the dies with that clear eisenglass (sp?) plastic material like they use for rear windows in convertible car tops to keep from marring the anodized.

Also, you have to know the alloy's bend rate. Some you can put right into the bender and floor the pedal and just let it rip. Some, like in the case with using dies on smaller pipes meant for larger sizes, you can sneak up on it. Bump it, let the metal relax, imagine the molecules stretching. Do they get work hardened or softened? Where is the stress point going to focus and can you subdue it there? Perhaps you may need to heat or anneal the alloy? There is a lot of different ways. You have an advantage when you only have to do it once in awhile or not for a living. Some tactics make no sense in a production environment so many things that work cannot be done cost effectively when there is already a feasible mechanical solution that can be bought for the task like some of those mandrel benders we see in exhaust shops etc that just does it quickly and consistently in a hurry.
Here is an example of a smaller tube bent in a larger die. The little wedge bar feature on this chair is 3/4" sched 40. I wanted the radius to match the 1" pipe below it. It just looks odd to me to have bends side-by-side with different radii. So I bent the 3/4 in the 1" die. I have bent 3/4" in the 1-1/2" die also.

Here is a 3/4" back rest bar, that was bent to 90 degrees in a 1-1/4" die. I just ever so slowly sneak it through the bend cycle. I watch the side walls for the signs of collapse. Yes, this is aluminum, but I have done this with steel tubing. In one instance, I actually used a split piece of pvc thin wall and encased the smaller tubing in it and bent it that way and it was just enough support to get it through.

Just some ideas that you may need when you start bending tubing, especially odd sizes you may not have the correct dies for at times. I used to have to bend thin wall aluminum, which can also have it's gremlins.
Miller ABP 330, Syncrowave 250, Dynasty 300 DX.
Honorary member of the Fraternity of Faded Tee Shirts.
Honorary member of the Fraternity of Faded Tee Shirts.
Don't overlook other seemingly too simple solutions for bending tubing, especially if you have the capacity to heat it. In the case of the minibikes you show, much of that is aesthetic more than structural. I have bent 90 degrees to around a 4 or 6" radius in half inch tubing using a hip bender block bolted down to a table top. You can't just throw it in there and pull it around but you can work it around the bend having a reference pattern to follow. Using thick walled for that what you show is not going to add a lot of weight. That is certainly an option.

This was all shaped using that hip bender in the photo above. Once you get the feel for bending and the alloys, the possibilities are endless. Also, in many cases, you can order materials that are designated for bending.


This was all shaped using that hip bender in the photo above. Once you get the feel for bending and the alloys, the possibilities are endless. Also, in many cases, you can order materials that are designated for bending.

Miller ABP 330, Syncrowave 250, Dynasty 300 DX.
Honorary member of the Fraternity of Faded Tee Shirts.
Honorary member of the Fraternity of Faded Tee Shirts.
- Otto Nobedder
-
Weldmonger

-
Posts:
-
Joined:Thu Jan 06, 2011 11:40 pm
-
Location:Near New Orleans
Again, nice work!
I wanted to mention an old mechanic's trick for thin-wall tubing---
Pack it with sand. For larger tubes, pack with damp sand (the finer, the better). If you cut your stock a bit long, you can tack end caps (scrap plate) to contain the sand. You can produce near-mandrel-bent profiles in thin materials this way, cut the caps off, wash the sand out, and cut to finished length.
Steve S
- Otto Nobedder
-
Weldmonger

-
Posts:
-
Joined:Thu Jan 06, 2011 11:40 pm
-
Location:Near New Orleans
Re-reading TamJeff's posts, I'm reminded of how many little quirks there are to metal working.
We've all cut something too short, and had some smart-ass say, "get the pipe stretcher."
That tool exists.
In some atmospheric gas/liquified gas processes (and other industries, no doubt), copper is common as instrument tubing. It arrives as coils of soft copper tubing which are uncoiled, placed in a stretcher, pulled straight, then strechted by 10% of the original length. This work-hardens it into surprisingly rigid tubing. I'm told the tubing makes a peculiar sound as you reach 10%, telling the operator when to stop.
Steve S
That's where the feel for it comes into play and a lot of people will not, or cannot relay such information. I already see solutions to the bike designs posted. Even as a full on pipe and tube fab shop, we cannot go buy a die for every purpose, many of which will maybe be seen once or twice in so many years. A lot of it is switching between the left and right brain of approaches.Otto Nobedder wrote:Re-reading TamJeff's posts, I'm reminded of how many little quirks there are to metal working.
We've all cut something too short, and had some smart-ass say, "get the pipe stretcher."
That tool exists.
In some atmospheric gas/liquified gas processes (and other industries, no doubt), copper is common as instrument tubing. It arrives as coils of soft copper tubing which are uncoiled, placed in a stretcher, pulled straight, then strechted by 10% of the original length. This work-hardens it into surprisingly rigid tubing. I'm told the tubing makes a peculiar sound as you reach 10%, telling the operator when to stop.
Steve S
A lot of the time, specified designs will be incorporated around a set of dies the designer already has. I have used the sand trick numerous times. I have also put a tube within a tube. Some sizes fit like that. Not only for to keep from kinking the bend, but to create a laminate with regard to bend stress, for the likelihood of stress cracks not having a clear path to follow through separate walls, even though the obvious solution might just be to use a thicker walled tube.
Miller ABP 330, Syncrowave 250, Dynasty 300 DX.
Honorary member of the Fraternity of Faded Tee Shirts.
Honorary member of the Fraternity of Faded Tee Shirts.
Return to “Welding Projects - Welding project Ideas - Welding project plans”
Jump to
- Introductions & How to Use the Forum
- ↳ Welcome!
- ↳ Member Introductions
- ↳ How to Use the Forum
- ↳ Moderator Applications
- Welding Discussion
- ↳ Metal Cutting
- ↳ Tig Welding - Tig Welding Aluminum - Tig Welding Techniques - Aluminum Tig Welding
- ↳ Mig and Flux Core - gas metal arc welding & flux cored arc welding
- ↳ Stick Welding/Arc Welding - Shielded Metal Arc Welding
- ↳ Welding Forum General Shop Talk
- ↳ Welding Certification - Stick/Arc Welding, Tig Welding, Mig Welding Certification tests - Welding Tests of all kinds
- ↳ Welding Projects - Welding project Ideas - Welding project plans
- ↳ Product Reviews
- ↳ Fuel Gas Heating
- Welding Tips & Tricks
- ↳ Video Discussion
- ↳ Wish List
- Announcements & Feedback
- ↳ Forum News
- ↳ Suggestions, Feedback and Support
- Welding Marketplace
- ↳ Welding Jobs - Industrial Welding Jobs - Pipe Welding Jobs - Tig Welding Jobs
- ↳ Classifieds - Buy, Sell, Trade Used Welding Equipment
- Welding Resources
- ↳ Tradeshows, Seminars and Events
- ↳ The Welding Library
- ↳ Education Opportunities


