mig and flux core tips and techniques, equipment, filler metal
RookieWelder
  • Posts:
  • Joined:
    Tue Oct 14, 2014 8:33 am
  • Location:
    Raleigh, NC

Welding Bear wrote:Hi guys, thanks for your input.

...

The only other thing I can think.....

I am using an extension lead. A cheap one at that. Any bearing on it?
I'd try to get rid of the extension cord -- or move up to as heavy a gauge wire as you can find. Voltage drop can be a real problem with light gauge wire, especially if it is longer than necessary.

Dwight
GreinTime
  • Posts:
  • Joined:
    Fri Nov 01, 2013 11:20 am
  • Location:
    Pittsburgh, PA

If you bought the machine brand new, most MIG welders are set up factory to run Flux core and it's up to the end user (or your welding store if they are savvy enough to ask you what you are doing with it) to change it over. It could be as simple as switching your ground and torch lead around, or as complex as taking the panel off and changing the orientation of the cables them selves.
#oneleggedproblems
-=Sam=-
User avatar
  • Posts:
  • Joined:
    Sat Jul 06, 2013 11:16 am
  • Location:
    Near Pittsburgh,Pennsylvania. Steel Buckle of the Rust Belt

WB,
I just thought of an issue I had when I first got my Mig welder that caused me fits. Check to make sure that your gun is fully seated into the machine, if not it will restrict your gas flow and cause issues.

Len
Now go melt something.
Instagram @lenny_gforce

Len
Welding Bear
  • Posts:
  • Joined:
    Wed Dec 10, 2014 1:39 pm

Guys, thanks so much for the info.

I'm off to watch the rugby today and wont get a chance to weld 'til probably Thursday. But thanks to you lads I know I got to:

Check polarity
Check gun seated in to the machine
Get rid of the extension and hook up to the mains
Grind down the nozzle
Get new gas regulator

Then...we'll see how we go :)

I did have a think last night and I remember my first go at welding. Sure, it was on real thin 0.8mm car body panel and couldn't stop blowing holes.....and for that first go I wasn't using the extension!!!!

At least all of the above things apart from the regulator aint going to cost me anything :D
User avatar
  • Posts:
  • Joined:
    Sat Jul 06, 2013 11:16 am
  • Location:
    Near Pittsburgh,Pennsylvania. Steel Buckle of the Rust Belt

WB,
GreinTimes high school team was the 2010 Pennsylvania state champs in rugby, we love the sport even though it not real popular here in the states.

Len
Now go melt something.
Instagram @lenny_gforce

Len
soutthpaw
  • Posts:
  • Joined:
    Thu Sep 18, 2014 12:14 pm
  • Location:
    Sparks, NV

Being that this is WTaT Forum, here is a good video about inductance might help you. http://youtu.be/rS136Y-yvJ8
Your entry level machine probably does not have an inductance setting so it's preset at the factory for one or the other gas mixes or at some value that is a balance between the two. Most machines in the US tend to favor a 75/25 setting. A Miller passport is set for 100%CO2 with on-board tank. You might have to call the manufacturer to find out what it's set for..
Mostly I see consistency and technique issues. Just more seat time. You generally don't want to be grinding down your weld beads unless it's for a fit-up need.
User avatar
  • Posts:
  • Joined:
    Thu Jan 06, 2011 11:40 pm
  • Location:
    Near New Orleans

Welding Bear wrote: ...Check polarity
Check gun seated in to the machine
Get rid of the extension and hook up to the mains
Grind down the nozzle
Get new gas regulator

Then...we'll see how we go :)...
I'll comment that there are longer tips with the same thread, however it may be easier for your experiments to grind the nozzle. I prefer the tip just flush to the nozzle, but that's a personal thing. Some prefer a recess, some prefer it "proud".

When checking the lead being fully seated to the machine, pull it free and make sure both o-rings are present and undamaged. They likely are, but this is a good opportunity to learn the architecture of your machine.

Steve S
Welding Bear
  • Posts:
  • Joined:
    Wed Dec 10, 2014 1:39 pm

Thanks for the input guys, as always really appreciate it.

I've got no doubt that it's mostly a technique issue. But at the same time if my machine isn't performing like others e.g. Because of tip issues, polarity issues, voltage drop etc. then I'm never going to get the chance to get good until I sort that.

As said I'll check all the things this week and report back :)

Ps, braehill, here's a link to my teams website. . . .

Northamptonsaints.co.uk

And here's a link to one of many of Courtney Lawes's famed bone crunchers :D :D :D he usually Optus in at least one a game.

http://m.youtube.com/watch?v=mo49xmc8BYU
GreinTime
  • Posts:
  • Joined:
    Fri Nov 01, 2013 11:20 am
  • Location:
    Pittsburgh, PA

That dude got crushed!
#oneleggedproblems
-=Sam=-
User avatar
  • Posts:
  • Joined:
    Sat Jul 06, 2013 11:16 am
  • Location:
    Near Pittsburgh,Pennsylvania. Steel Buckle of the Rust Belt

I think when the ball squirted out the top a little something squirted out the bottom too. He took it full on.


Sent from my iPhone using Tapatalk
Now go melt something.
Instagram @lenny_gforce

Len
Welding Bear
  • Posts:
  • Joined:
    Wed Dec 10, 2014 1:39 pm

Haha! Yeah it's pretty brutal.

But in fairness to those that get smashed, most of them get back up and carry on..... i say 'most' :D :D :D

I watch a bit of American Footy. But to be honest we dont get a lot of coverage unless you can afford Sky Sports :cry:

Two tackles that stick out in my mind if you have a look on YT..... Josh Lewsey tackle on Matt Rogers in the World Cup Final.

And Shane Williams playing for Wales agaist Australia. Gets up-ended and does a mid air 360 :D
Welding Bear
  • Posts:
  • Joined:
    Wed Dec 10, 2014 1:39 pm

Evening chaps, hope you're well.

Got home from work and popped out to the garage to check polarity on the machine as part of my trouble shooting process....

Simply put, you can't change it! lol

I've seen on loads of machines where you simply undo the nuts and swap from - to + and vice versa. But looking in the door of my Clarke 135te there's none of this. There's no area to swap from - to + and vice versa so am I to assume that this is only set up as a gas welder and therefore I shouldn't pursue this as a problem and move on?

OR.

Is it worth pulling the mechanism off and the back plate to get to the internals to check the polarity's correct?
Welding Bear
  • Posts:
  • Joined:
    Wed Dec 10, 2014 1:39 pm

Hi guys,

So, after thinking about it and re-watching those vids and re-reading comments, i think the polarity is not a problem as my welder is set up as definitely ''gas only'' and id have to get reet in to the internals to change it (which i obviopusly dont want to do lol

i think this stick out is one of my biggest problems as well as personal technique obviously lol

Had a look at the pipe cutters for trimming down my nozzle but cant seem to find the right thing. Am i ok to just get a cut off disc on my angle grinder and cut a bit off as straight and true as i can...then grind it down to be flush with no sharp edges with a grinding disc? going to go for a couple mil of contact tip sticking out the tip i think.

Worst case scenario... i mess it up and have to get a new nozzle haha
RookieWelder
  • Posts:
  • Joined:
    Tue Oct 14, 2014 8:33 am
  • Location:
    Raleigh, NC

Did you try eliminating the extension cord? I was surprised just how much effect voltage drop can have when using air compressors and chop saws on too long a cord. Granted, those involve motors, but still - quick and easy to eliminate that as a source of trouble.

Dwight
Welding Bear
  • Posts:
  • Joined:
    Wed Dec 10, 2014 1:39 pm

Thanks Dwight,

Yep, definitely going to do that on my next welding session (Thursday).

Great thing is, oncve all these things are eliminated if i'm producing gorilla welds still ill 100% know that its down to my technique an i can then improve.

Just got to get this nozzle shortened :)
jwright650
  • Posts:
  • Joined:
    Wed Dec 03, 2014 3:27 pm

Welding Bear wrote:Evening chaps, hope you're well.

Got home from work and popped out to the garage to check polarity on the machine as part of my trouble shooting process....

Simply put, you can't change it! lol

I've seen on loads of machines where you simply undo the nuts and swap from - to + and vice versa. But looking in the door of my Clarke 135te there's none of this. There's no area to swap from - to + and vice versa so am I to assume that this is only set up as a gas welder and therefore I shouldn't pursue this as a problem and move on?

OR.

Is it worth pulling the mechanism off and the back plate to get to the internals to check the polarity's correct?
Did you look inside the door where you put the roll of wire on the machine? This is where many of these small welders have the cables attached and marked with a (+ and -)

That would bug me if there is no way to change polarity....DC machines need to be able to run in both directions.
John Wright
AWS Certified Welding Inspector
NDT Level II UT, VT, MT and PT
NACE CIP Level I Coating Inspector
Welding Bear
  • Posts:
  • Joined:
    Wed Dec 10, 2014 1:39 pm

I certainly did look in the door mate.

Definitley no + or - leads. the gun goes to the wire. and the ground lead goes to inside the machine out of site. no area to change polarity.

Well, at least its one more thang to cross off my list lol
jwright650
  • Posts:
  • Joined:
    Wed Dec 03, 2014 3:27 pm

polarity on Clark welder.jpg
polarity on Clark welder.jpg (23.46 KiB) Viewed 1251 times
Here^^ is a snap shot out of the clark manual about where the polarity can be changed.
John Wright
AWS Certified Welding Inspector
NDT Level II UT, VT, MT and PT
NACE CIP Level I Coating Inspector
Welding Bear
  • Posts:
  • Joined:
    Wed Dec 10, 2014 1:39 pm

Thanks for that mate. However, that is for ''EN'' gasless models only (i had a good read through the book before i went out also lol) not the TE models
jwright650
  • Posts:
  • Joined:
    Wed Dec 03, 2014 3:27 pm

Welding Bear wrote:Thanks for that mate. However, that is for ''EN'' gasless models only (i had a good read through the book before i went out also lol) not the TE models
Ahhh, OK...wrong model. Shucks.
John Wright
AWS Certified Welding Inspector
NDT Level II UT, VT, MT and PT
NACE CIP Level I Coating Inspector
Welding Bear
  • Posts:
  • Joined:
    Wed Dec 10, 2014 1:39 pm

No worries mate i really appreciate you looking at that for me :)

To be honest, all these ''checks'' are great anyways cos they're not costing me anything and i'm making sure its all spot on

ill update when i have bodged my nozzle haha! :)
Welding Bear
  • Posts:
  • Joined:
    Wed Dec 10, 2014 1:39 pm

Just a quick update...

I sawed off the end of my nozzle ::) in an effort to reduce stick out

Been out this morning with new shortened nozzle and also plugged in to the mains as opposed to an extension lead. I started off welding 3mm steel. I got to say, right from the off there feels like theres more power in this thing. placebo? not sure. however I thought id go right back to basics. I re-read everything everyones put and watched basics videos etc.

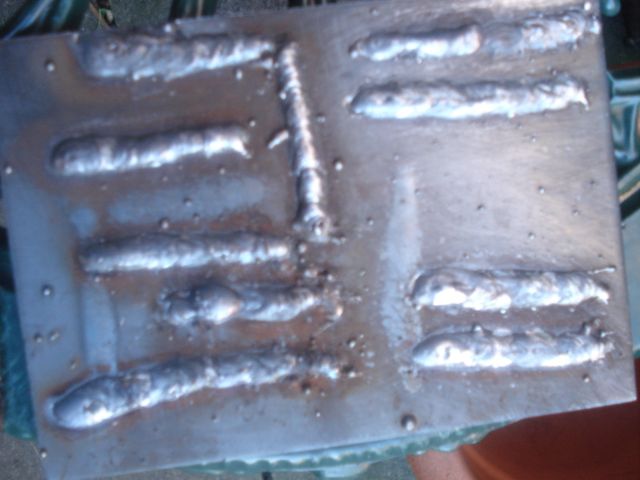
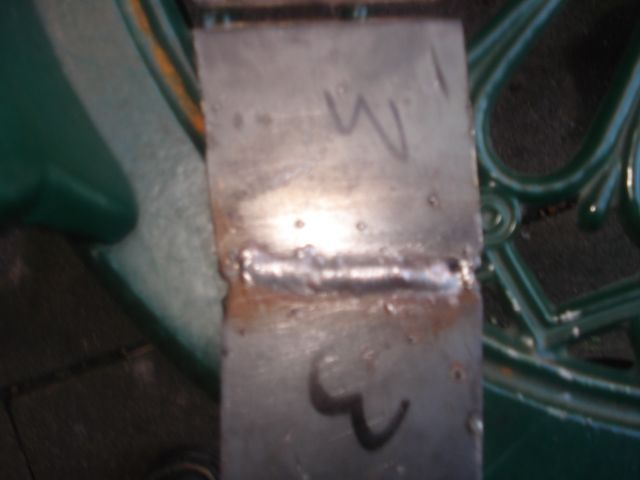
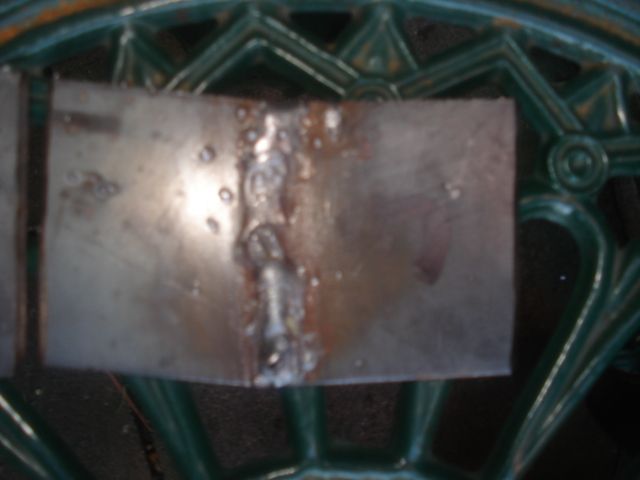
so started running beads on the 3mm and first one I did got real good penetration...so much so that it started coming through the other side as opposed to just a ''leech'' mark.

Ran a few more beads... no problem. then I started getting globules of molten on my tip. and then it kept happening. so I reduced WFS. That sorted it but obviously then started to only make occasional contact and the weld was crap. very frustrating. the only solution was to increase my tip distance to what felt like too much. but then I got the machine gun rattle.

I think I haven't been paying enough attention to my tip distance. some times I get globules on the tip. other times it would sound like a machine gun drive by shooting (too far away) haha. and then other times it would weld ok. I tried to listen for the bacon sizzling. got it a couple of times but it just didn't seem to ever last long.

finally, I got a much better view of the puddle with a 45 degree angle as opposed to the 20 degree youre supposed to have. andthat felt most comfy and the weld seemed to go a bit better when I did that so that's what I stuck to.

ill keep practising but I think I may have to invest in a course at my local college cos I really wanna get this down cos I do really enjoy it.

anyways a few piccies. what do you think? not great but not the worst ive ever seen

Image
Image
Image
Image
User avatar
  • Posts:
  • Joined:
    Fri Apr 01, 2011 10:59 pm
  • Location:
    Australia; Victoria

Not a placebo. By shortening the stickout, you increase arc voltage.
Welding Bear
  • Posts:
  • Joined:
    Wed Dec 10, 2014 1:39 pm

Thanks Mike.

From these pics is there anything good in there? :lol:
User avatar
  • Posts:
  • Joined:
    Fri Apr 01, 2011 10:59 pm
  • Location:
    Australia; Victoria

I see no porosity and no lack of fusion. All technique from now now on.
Post Reply