Page 1 of 1
Amps advice thick to thin?
Posted: Wed May 04, 2016 8:46 pm
by MosquitoMoto
Firstly, please excuse my crappy photos and crappier welding. I like to think this forum needs some comedy relief now and then...
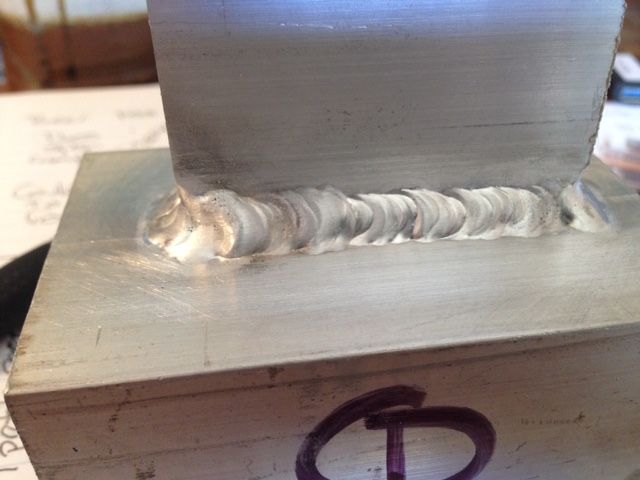
I am welding 5000 series aluminium, thick to thin - in this case 10mm plate to 3mm box section.
I'm using 120 amps @ 120Hz, square wave, 30% cleaning. 2.4mm 2% lanth electrode, #6 gas lens. 7 secs post flow, 2.4mm 5356 filler.
Puddle gets going fairly fast, the piece heats up quickly and so I back off the pedal. Obviously what I need most here is simply practise, but tell me:
1) Would I be better off using thicker filler such as 3.2mm?
2) How about amps? Hotter?
My own thinking is that slightly thicker filler material might help cool and control the puddle a bit, but I am open to suggestions. Happy that the part is strong (have destruction tested with bloody big hammer) but as always after neatness, something I find difficult with short runs like this.
Cheers,
Kym
Re: Amps advice thick to thin?
Posted: Thu May 05, 2016 7:49 am
by DLewis0289
For just starting out that's really pretty good. Yes you need more heat. Break it down......will enough current to form a puddle on the thin be enough current to start a puddle on the thick? Nope. Will enough current to form a puddle on the thick be enough current to melt and blow a nickel size hole in the thin? Absolutely. You want to focus heat on the thick and "wash into the thin". For the piece in the picture, put the thick in the horizontal position, weld the thick and let the puddle "bleed" into the thin......lol. Am I making any sense?
EDIT:
I was going stir crazy in my office so I ran down to the shop for a quick example for my poor explanation....don't judge just grabbed scrap and burnt it. This is a piece of 1/8" AL tube on a 3/8" AL PL. All of my heat was down and I washed up into the tube.
210 amps, 1/8" 2%LT, 3/32 filler

- IMG_3039a.jpg (17.76 KiB) Viewed 1903 times
Re: Amps advice thick to thin?
Posted: Thu May 05, 2016 5:24 pm
by Rituchim
had the same problem this week.
15 mm plate to 3 mm tube.
couple of things i do before i weld (learnd from weldingtipsantricks.com ).
1) dry run and position so u can run all the way stedy.
2) try to move 3 mm every second.
3) focus the arc on the thick part. if the thick part is the verticl one the puddle wil actualy flow better down but it means holding the torch twisted.
4) tight arc and push a little wire.
i set my pedal most of the time to go from 30 amp to 230 but some welder like to set it with in 50-80 amp differance-
if u weld it on about 160 amp than go from 120 to 200.
basicaly the smaller the range the larger control u have on amps......
hope it helps
Re: Amps advice thick to thin?
Posted: Thu May 05, 2016 6:33 pm
by MosquitoMoto
Thanks for the advice guys.
I think that re-positioning the part and bumping up the amps is definitely something I'll try. I always do dry runs, a classic Jody tip for sure.
One of you says thick piece vertical, the other says thick horizontal. Shall I split the difference and put the part at 45 degrees?

I'll wind up the amps and blast the 10mm, then wash on to the 3mm as advised.
I struggle with short runs! This part is only 60mm (2 and a half inches) long and I find that by the time I've settled into a rhythm, it's time to back off again. Given a run of say, 8 inches, my beads look a lot better because 90% of the bead has 'settled'. Mind you, that's just an excuse. Gotta learn to have that rhythm from the very first move, right?
EDIT - any tips on filler thickness? 2.4mm, or move up to 3.2mm? Seems if I'm winding up the amps, thicker filler might be a good idea?
I can do decent work on, say, joints using 2mm plate - most of the aluminium I weld is thin - but this is my first try with what, to me, is very thick stuff.
Thanks again for your tips. Will post progress shots when I get a sec.
Kym
Re: Amps advice thick to thin?
Posted: Thu May 05, 2016 7:06 pm
by Rituchim
the position of the pieces is relavant to your comfort. do on verticl and on horisantal.... and one 45

.....see what works for you. no one true way.
as far as filler i would stay with 2.4
if u have better beeds on longer runs try to go extre slow at first, dab filler only to keep the puddle stable a will heat the part nicly.
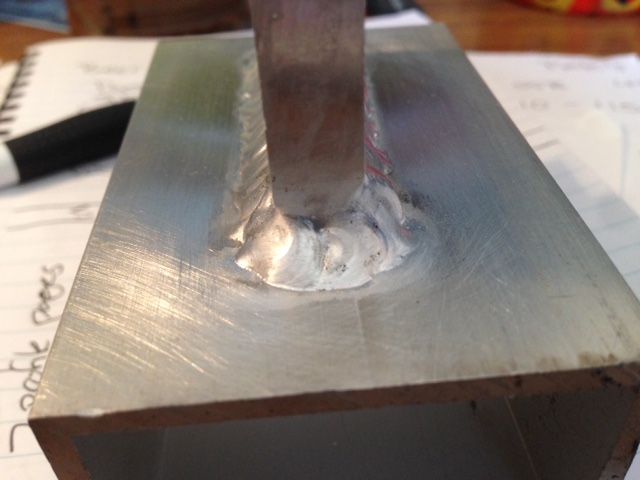
this is 15 mm plate to 3 mm tubing i stated from the right side of the tube to the left and continued to the suport and plate -
5 mm to 15 mm.
i stayed at the start for at least 6 seconds before moving.
hope it helps.

- 2.jpg (29.11 KiB) Viewed 1856 times
Re: Amps advice thick to thin?
Posted: Thu May 05, 2016 7:11 pm
by MosquitoMoto
Rituchim wrote:the position of the pieces is relavant to your comfort. do on verticl and on horisantal.... and one 45
.....see what works for you. no one true way.
as far as filler i would stay with 2.4
if u have better beeds on longer runs try to go extre slow at first, dab filler only to keep the puddle stable a will heat the part nicly.
this is 15 mm plate to 3 mm tubing i stated from the right side of the tube to the left and continued to the suport and plate -
5 mm to 15 mm.
i stayed at the start for at least 6 seconds before moving.
hope it helps.
2.jpg
Saw your post with these parts - well done, great work. 15mm to 3mm is pretty extreme. Lovely beads.
Yes, I think I'll mix up a few angles and try them all. And hanging around at the start is an interesting proposition, will give that a shot.
So, I'm using 120 amps, 10mm plate to 3mm box tube. Any recommendations on amps? Much higher?
Really appreciate the feedback and advice, you guys are the best.
Kym
Re: Amps advice thick to thin?
Posted: Thu May 05, 2016 7:29 pm
by LtBadd
Hey Kym, I think you're really close and you'll soon have this licked. If the arc isn't focused enough I say try going higher on the Hz, 120hz isn't very high, not sure what the high limit of your machine is. This isn't going to make or break doing the weld but you do need the control with thick to thin.
Re: Amps advice thick to thin?
Posted: Thu May 05, 2016 7:34 pm
by Rituchim
i started on 230 the lowerd to apx 180. ac balance 95%en 60Hz freq. 120Hz is a good all around seting, i use higher onli on 1 mm and evan than mostly if its corner joint. 1 mm is hard on low Hz.
foot control. not a must but helps alot!!!!!!
try 180 190 when its cold and u can lower the amp for the back side to 160.
the number dont matter much... every machine is different (strange ah? amp is amp?! but true ) but you do need to go hotter than whats on those pics
Re: Amps advice thick to thin?
Posted: Thu May 05, 2016 7:47 pm
by MosquitoMoto
Lt and Ritu - thanks.
I love it when a thread like this gains momentum and the advice comes pouring in. Very helpful, appreciate it.
Lt, I can go to 250Hz if need be. Ritu, amp limit on machine is 220 so I can crank it up heaps higher - will try 180 for a start. I might try back the cleaning off from 30 to 25 or even 20, too...cleaning isn't a big problem on this material.
Yes, using foot pedal so can start out hotter and back off, no problems.
Funny, a lot of this is simply taking me back to what I learned when I first started welding aluminium - err on the side of hotter, focus the arc, get started fast, move on out and keep it even.
Thanks again,
Kym
Re: Amps advice thick to thin?
Posted: Sat Jun 25, 2016 6:24 am
by MosquitoMoto
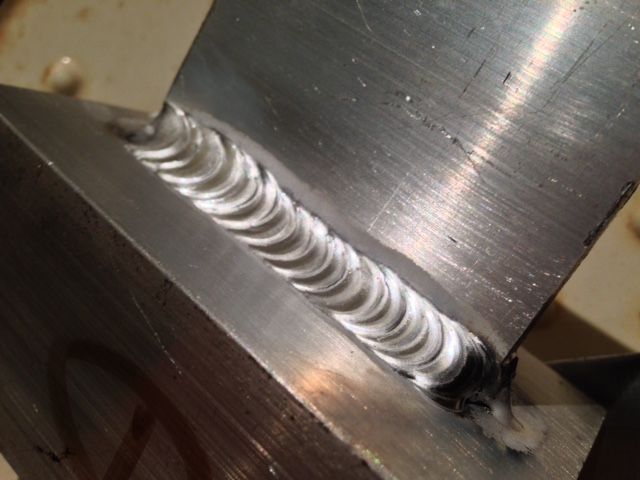
Okay, I've made a bit of progress. Still not where I need to be, but I think looking much better than my first photo in the original post.
Refresher - this is 10mm aluminium plate to 3mm box section.
Settings are now 20% cleaning, 100Hz AC frequency, 175 amps main pulse, pulse ratio 75%, pulse frequency 1 sec, base amps 60.
(EDIT: used 3.2mm filler this time as I am out of 2.4 for the moment...)
I cranked up the amps (can still go higher, need to feed faster) but the main breakthrough for me has been the 1 sec pulse frequency - it gives me a 'metronome' to set my pace and it seems to work. Is it cheating? Probably. But it helps.
Thanks again - more feedback welcome. I will update with another photo next time I improve!
Kym
Re: Amps advice thick to thin?
Posted: Sat Jun 25, 2016 7:55 am
by motox
kym
that looks pretty nice.
you are a quick study.
craig
Re: Amps advice thick to thin?
Posted: Sat Jun 25, 2016 8:34 am
by MosquitoMoto
motox wrote:kym
that looks pretty nice.
you are a quick study.
craig
Thanks Craig...the advice the wise ones on this forum give keeps me moving forward whenever I'm stuck. Feel like I'm getting just that little bit better and trying to put in regular seat time.
Will try to weld out the whole part in the next few days and post up a final pic. Really appreciate everyone's support.
Kym
Re: Amps advice thick to thin?
Posted: Sat Jun 25, 2016 9:11 am
by rick9345
That is a "You can do it weld"
Re: Amps advice thick to thin?
Posted: Sat Jun 25, 2016 9:52 am
by dmcnally
Settings are now 20% cleaning, 100Hz AC frequency, 175 amps main pulse, pulse ratio 75%, pulse frequency 1 sec, base amps 60.
Sorry, newbie question. You say that you have " pulse frequency 1 sec." I thought that pulse was only active in DC mode. Does your machine really do pulse in AC mode?
thanks,
Dave
Re: Amps advice thick to thin?
Posted: Sat Jun 25, 2016 10:25 am
by OzFlo
Looking good Kym!
Re: Amps advice thick to thin?
Posted: Sat Jun 25, 2016 12:31 pm
by RamboBaby
Your weld looks cold. Keep the torch angled toward the thick part rather than the center of the joint. Watch the toe of the weld tie into the thick piece and the toe on the thin piece will (usually) take care of itself.
MosquitoMoto wrote:Given a run of say, 8 inches, my beads look a lot better because 90% of the bead has 'settled'. Mind you, that's just an excuse.
Kym
That's because you're starting out too cold and slowly saturating the part with heat until it's at at the optimal temp for welding. What you should be doing is starting out with more heat and backing off the amperage as you begin to see the puddle wick out a bit. If you have enough amperage on tap then you should be puddling in three seconds or less. It's not that small shiny spot that balls up your rod when you try to dip it, its a real puddle that greedily accepts the filler wire. Usually, when you start out with enough heat, you will need to slowly begin backing off the peddle within about two or three inches of weld.
Closely watch the edges of the puddle (toes of the weld) because they will tell you whether or not you have enough heat. When you are hot enough, the edges blend smoothly. When you're slightly cold, the edges won't quite blend into the base metal. It is entirely possible to have adequate heat and still not see the toes want to tie in when first staring your bead. That's when you need to sweep your torch angle slightly to wash the puddle toward the cold side of the weld.
DLewis0289 wrote:For just starting out that's really pretty good. Yes you need more heat. Break it down......will enough current to form a puddle on the thin be enough current to start a puddle on the thick? Nope. Will enough current to form a puddle on the thick be enough current to melt and blow a nickel size hole in the thin? Absolutely. You want to focus heat on the thick and "wash into the thin". For the piece in the picture, put the thick in the horizontal position, weld the thick and let the puddle "bleed" into the thin......lol. Am I making any sense?EDIT:I was going stir crazy in my office so I ran down to the shop for a quick example for my poor explanation....don't judge just grabbed scrap and burnt it. This is a piece of 1/8" AL tube on a 3/8" AL PL. All of my heat was down and I washed up into the tube.210 amps, 1/8" 2%LT, 3/32 filler
IMG_3039a.jpg
The only thing that I would add to this is:
Do not let your arc move beyond the leading edge of the puddle because this is where you are going to run into real problems when welding thin to thick. Keeping your tungsten slightly behind the puddle's leading edge will keep you from blowing through the thin piece. Keeping the tungsten angled slightly toward the thick piece will also help. Note that you can sill overpenetrate without blowing through. So you still need to watch your amperage control. That formula of 1.1 amps per thousandth/inch of aluminum thickness does not apply when welding thin to thick. It's more in the neighborhood of .8 amps or less (at least with my welder) because you have far less quench than two thick pieces would have provided. Eventually you will learn to recognize when the aluminum is getting too hot, not because it is beginning to sink, but because it is welding funny. It looks like you're getting mig spatter all over the weld before it ever begins to cave in. Setting amperage properly on the machine helps to prevent this. It doesn't make you a hero to weld with full amperage on the peddle when you only need half of what your machine has got. It just makes it much easier to screw up.
I know that some of this sounds like I'm contradicting myself within the same post but I assure you that I am not. It's just a bit of a delicate balancing act.
Re: Amps advice thick to thin?
Posted: Sat Jun 25, 2016 2:36 pm
by LtBadd
dmcnally wrote:Settings are now 20% cleaning, 100Hz AC frequency, 175 amps main pulse, pulse ratio 75%, pulse frequency 1 sec, base amps 60.
Sorry, newbie question. You say that you have " pulse frequency 1 sec." I thought that pulse was only active in DC mode. Does your machine really do pulse in AC mode?
thanks,
Dave
For an inverter pulsing in AC or Dc is typical, sometimes the lower cost models will limit the pulsing range. This may or may not be true for some of the import units.
Re: Amps advice thick to thin?
Posted: Sat Jun 25, 2016 4:43 pm
by dmcnally
LtBadd wrote:dmcnally wrote:Settings are now 20% cleaning, 100Hz AC frequency, 175 amps main pulse, pulse ratio 75%, pulse frequency 1 sec, base amps 60.
Sorry, newbie question. You say that you have " pulse frequency 1 sec." I thought that pulse was only active in DC mode. Does your machine really do pulse in AC mode?
thanks,
Dave
For an inverter pulsing in AC or Dc is typical, sometimes the lower cost models will limit the pulsing range. This may or may not be true for some of the import units.
Thanks. I don't want to hijack this thread, but I'm still a little fuzzy on this. In looking at the above settings (AC at 100Hz) the electrode is pulsing (+ and -) at 100Hz. To then add another pulse (main and background amps) at 1Hz doesn't make sense to me. I do have a dual voltage inverter machine, but I haven't made an adapter to a dryer recepticle and have only been using the machine plugged into a 110 outlet for practice (125amps DCEN continuous). I guess I'll have make the adapter and try this out.
Dave
Re: Amps advice thick to thin?
Posted: Sat Jun 25, 2016 5:34 pm
by LtBadd
dmcnally wrote:Settings are now 20% cleaning, 100Hz AC frequency, 175 amps main pulse, pulse ratio 75%, pulse frequency 1 sec, base amps 60.
Thanks. I don't want to hijack this thread, but I'm still a little fuzzy on this. In looking at the above settings (AC at 100Hz) the electrode is pulsing (+ and -) at 100Hz. To then add another pulse (main and background amps) at 1Hz doesn't make sense to me. I do have a dual voltage inverter machine, but I haven't made an adapter to a dryer recepticle and have only been using the machine plugged into a 110 outlet for practice (125amps DCEN continuous). I guess I'll have make the adapter and try this out.
Dave
Dave, here's what I get from the above example
20% cleaning = 20% EP (electrode positive) and 80% EN
100Hz AC frequency = 60Hz is "normal" AC frequency for USA so he is +40Hz higher
175 amps main pulse = main amperage setting
pulse ratio 75% = On a typical Miller this is % on time, so at full pedal you would be at 175 amps 75% of the time
pulse frequency 1 sec = 1 pulse per second
base amps 60 = 60 amps background setting, so at full pedal you would be at 60 amps 25% of the time
Adding to that some inverters like the Dynasty will let you (in AC only of course) adjust the EN amperage AND the EP amperage independently
And the Dynasty also lets you choose from 4 different AC waveforms as the chart shows.
Re: Amps advice thick to thin?
Posted: Sat Jun 25, 2016 6:50 pm
by MosquitoMoto
Dave - yes, it pulses on AC. I think Richard mapped out my settings and what they mean really well.
Flo - thanks for the encouragement mate!
Richard, thanks for your help. Raymond, thanks heaps for your advice and tips, I will take that on board and give it a try, I am here to learn.
I love it when a thread like this prompts both questions and answers. This is a great forum!
Kym