Hey all.
I'm about to fabricate a front fairing mount for my race bike - the primary materials will be 3mm aluminium plate and 1.2mm wall thickness, 16mm OD aluminium tube. I don't know what specific alloys these are, just the stuff I get from my local metals shop. Have welded lots of this with 5356 and 4043, always works a treat, despite me being quite new to this - getting decent results on butt joints, laps, inside and outside corners, even thin stuff.
However...
Part of this job calls for me to lay the thin tube flat against the 3mm plate and weld it. I've tried every setting under the sun and I'm still struggling. The best I'm managing is a thick, ugly weld, but more often I'm melting through the thin tube.
I'm using a #9 torch with a #6 cup on a gas lens. 1.6mm 2% lanthanated electrode ground to blunt point. 8 litres per min argon. 30% cleaning. Have tried amps from 45 to 60, Hz from 33 to 120 and various pulse settings, too.
Main problems seem to be:
* That damn angle. So much tighter than an inside corner joint. By the time I have my tungsten at correct distance for the right arc length, it's virtually 'under' the tube. It has alu in front of it and also tight to each side. Arc all over the place as a result.
* No matter how much I try to give more heat to the 3mm plate, I often wind up also overheating the thin tube...which melts.
Haven't struggled this much in ages. Tube to plate seems to be my nemesis. Would I be better off simply buying some 3mm wall thickness tube? I'm a bike racer...I always favour the lighter option!
Any advice appreciated.
Kym
Tig welding tips, questions, equipment, applications, instructions, techniques, tig welding machines, troubleshooting tig welding process

- MosquitoMoto
-
Weldmonger

-
Posts:
-
Joined:Sat Aug 01, 2015 8:38 am
-
Location:The Land Down Under
kiwi2wheels
- kiwi2wheels
-
Ace

-
Posts:
-
Joined:Sun Feb 17, 2013 10:27 am
If poss, send a pic of what you're building / replicating. Off hand, I'd suggest going up in tube diameter and to 1.5/1.6 wall, and use 1.5/1.6 sheet and fold it with a 3T radius to gain rigidity and distribute the load over the weld area. 3 to 1.2 isn't going to live.
Without seeing how it mounts and what it supports ( and the weight ), it's difficult to give any real ideas.
Without seeing how it mounts and what it supports ( and the weight ), it's difficult to give any real ideas.
- MosquitoMoto
-
Weldmonger
-
Posts:
-
Joined:Sat Aug 01, 2015 8:38 am
-
Location:The Land Down Under
Thanks Kiwi - I'll post a pic asap.kiwi2wheels wrote:If poss, send a pic of what you're building / replicating. Off hand, I'd suggest going up in tube diameter and to 1.5/1.6 wall, and use 1.5/1.6 sheet and fold it with a 3T radius to gain rigidity and distribute the load over the weld area. 3 to 1.2 isn't going to live.
Without seeing how it mounts and what it supports ( and the weight ), it's difficult to give any real ideas.
All it will need to support is the top (screen section) of the race bike fairing as well as instruments, which weigh only a couple hundred grams.
But yes, I am seriously considering going out today and buying some 3mm wall tube, saying 'to hell with the extra weight' and seeing if I can finally get some welding done!
Kym
- MosquitoMoto
-
Weldmonger
-
Posts:
-
Joined:Sat Aug 01, 2015 8:38 am
-
Location:The Land Down Under
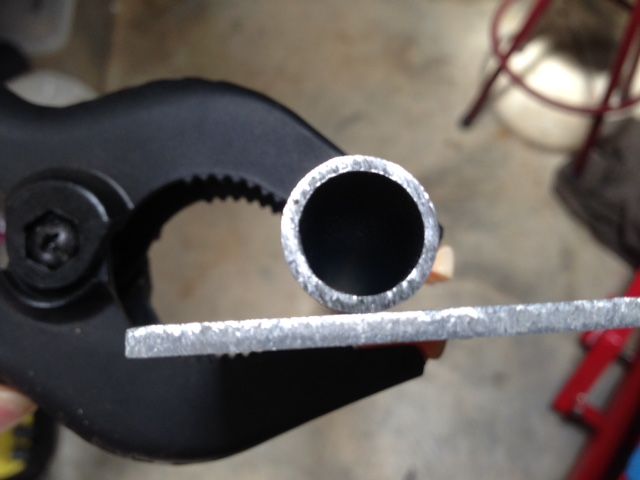
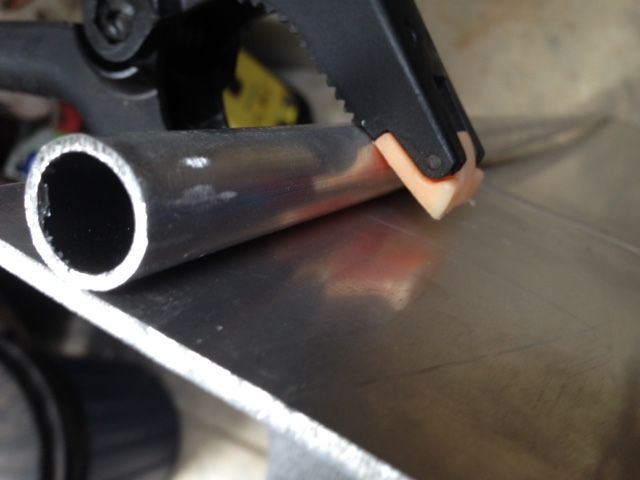
Pardon the crappy shots.
This isn't the actual setup, but this is the exact same tube size (16mm OD and 1.5mm wall thickness) that I'm trying to weld to the plate (3mm.)
So I'm looking to run the equivalent of, I guess, an 'inside corner joint' to the plate, on both sides of the tube. Proving to be a real challenge considering my limited skills.
Maybe worth just moving up to 3mm wall tube?
Anyone have any tips on controlling the arc in this situation, where the electrode tip is buried down deep there with metal on all sides?
Cheers,
Kym


Kiwi is right with moving up to the 1.5/1.6 at least. The vibration is going to wreck that thin stuff. It will be a tricky weld no matter what. That plate will need some heat so make sure your arc is focused mainly on the plate. Then move quickly toward the tube and get moving along your joint.You will probably do better moving around and letting areas cool down before trying to continue on down the weld. Unless your pretty talented with using a foot pedal. Once you see your puddle starting to widen things are getting to hot and your better stop or back off the amps. If you can weld in the flat position, so as to look down into the weld area as you weld, that will make it easier on you to. Kinda spot weld it a half inch to an inch at a time if your new at aluminum welding. Remember to back off the amps and move your tip around when you go to end your welds so they end nice and without a hole or crack. I would set my frequency to 60. Make sure your grinding your tips correctly. Set your pulse up with Jody's rule of 33's. He has a video on tig setting at that rule works great. Also if your not starting with enough amps and its taking to long to get a puddle your tube will heat up to much before your plate gets going. You need to hit that plate with a good 135 amps or so and get a quick puddle, get moving and stop when things start to widen. Your electrode size and cleaning % are good.
Last edited by Blaze659 on Wed Nov 04, 2015 10:37 pm, edited 1 time in total.
Everlast 250EX
Everlast I-Mig275 w/ Alum Spool Gun
Everlast Plasma60
Everlast 300 Water Cooler
Everlast I-Mig275 w/ Alum Spool Gun
Everlast Plasma60
Everlast 300 Water Cooler
- MosquitoMoto
-
Weldmonger
-
Posts:
-
Joined:Sat Aug 01, 2015 8:38 am
-
Location:The Land Down Under
Thanks Blaze.
While I'm still a relative newbie I haven't had any real trouble with aluminium until now. This is a difficult weld.
I will take the advice that you and Kiwi have given and move up an extra wall size on my tube - in fact I will step up to 3mm wall thickness tube so that I am welding '3mm to 3mm' as far as the tube and the plate are concerned.
Have tried Jody's 'rule of 33' pulse settings and they are indeed good, in fact they have probably brought me as close to success as anything thus far. I will continue down that road.
Again, thanks for your advice - 'sighting down the weld' in the flat position is another thing I'll try for sure.
It is good to know that at least this is accepted as a fairly tricky weld, because it's definitely giving me headaches. Everything in alu up until now has been easy by comparison.
Kym
Your welcome! Trying to do long welds on aluminum are tough until you get experience moving while adjusting your amps with a foot pedal at the same time. Remember to set your torch hand up and do some dry runs to set how far you can weld without having to adjust your hand on whatever your propping it on. Good luck!
Everlast 250EX
Everlast I-Mig275 w/ Alum Spool Gun
Everlast Plasma60
Everlast 300 Water Cooler
Everlast I-Mig275 w/ Alum Spool Gun
Everlast Plasma60
Everlast 300 Water Cooler
With steel and SS if you have 2 pieces of very different thicknesses / extreme you have to focus your heat and puddle mainly on the thicker of the two. Try a practice run where you try to keep the puddle on the thicker side and as you move the puddle just let the edge lick at the thinner piece. With some practice you'll learn how much to let it eat.
I have more questions than answers
Josh
Josh
- MosquitoMoto
-
Weldmonger
-
Posts:
-
Joined:Sat Aug 01, 2015 8:38 am
-
Location:The Land Down Under
It's interesting...because I can easily weld a piece of 3mm alu plate to the back side of a 1.2mm alu tube. The setup just makes it so much easier to manage heat.Poland308 wrote:With steel and SS if you have 2 pieces of very different thicknesses / extreme you have to focus your heat and puddle mainly on the thicker of the two. Try a practice run where you try to keep the puddle on the thicker side and as you move the puddle just let the edge lick at the thinner piece. With some practice you'll learn how much to let it eat.
I have done lots of practise on this alu tube-to-plate joint, including initially concentrating my heat on the 3mm plate before moving towards the 1.5mm tube. I think a critical point (as I believe may have been pointed out earlier in this thread by Blaze) is that I have initially started at too low an amp setting, so that instead of quickly puddling the 3mm plate I instead wind up heating absolutely everything as I slowly work towards a puddle.
Will practise some more this evening and share my thoughts on whatever progress I might make.
Kym
- Metal_pig2001
-
Active Member

-
Posts:
-
Joined:Sat Aug 16, 2014 3:21 am
-
Location:Rotorua, New Zealand
Hi Kym
how about plug welding the sheet to the tube?
Or how about laying a bead on the sheet, flatten the top of the bead slightly and then place the tube onto it? That should give you a bit more space to weld into.
Regards
Ralph
how about plug welding the sheet to the tube?
Or how about laying a bead on the sheet, flatten the top of the bead slightly and then place the tube onto it? That should give you a bit more space to weld into.
Regards
Ralph

- weldin mike 27
-
Weldmonger
-
Posts:
-
Joined:Fri Apr 01, 2011 10:59 pm
-
Location:Australia; Victoria
I was thinking similar to Mpig, but running a two beads along the tube, to increase the tangent, then fitting it to the plate and making your weld between the bead and the plate.
Mick
Mick

This is how I do this type
First only arc on the plate
Add filler on plate only.
When you get some height wiggle the torch slightly towards the tube while adding filler. The puddle will wet in nice since, as you already noticed, the tube has heated up good from the surrounding.
Not the best pic but an example:
First only arc on the plate
Add filler on plate only.
When you get some height wiggle the torch slightly towards the tube while adding filler. The puddle will wet in nice since, as you already noticed, the tube has heated up good from the surrounding.
Not the best pic but an example:
- IMG_20151105_58845.jpg (26.91 KiB) Viewed 2126 times
- IMG_20151105_065422.JPG (45.25 KiB) Viewed 2126 times
Pictures from my scrap collection:
http://forum.weldingtipsandtricks.com/v ... f=9&t=5677
http://forum.weldingtipsandtricks.com/v ... f=9&t=5677
- MosquitoMoto
-
Weldmonger
-
Posts:
-
Joined:Sat Aug 01, 2015 8:38 am
-
Location:The Land Down Under
Hey, NOW I'm starting to see a way forwards!
These are great tips. Thanks so much for these, guys. I was utterly lost but you've given me some great ideas to try. I'm pretty optimistic I can make this work once I've burned a few practise pieces.
Thanks again. This forum is a goldmine of good info.
Kym
These are great tips. Thanks so much for these, guys. I was utterly lost but you've given me some great ideas to try. I'm pretty optimistic I can make this work once I've burned a few practise pieces.
Thanks again. This forum is a goldmine of good info.
Kym

- big gear head
-
Ace
-
Posts:
-
Joined:Thu May 07, 2015 11:46 am
-
Location:KY.
I was also going to recommend plug welds. Fillet welds on the sides of the tubes is going to cause the sheet to draw toward the weld and it will no longer be flat. You could plug weld it and keep the sheet fairly flat. You would want to make quite a few plug welds to give it strength. You could also cut slots in the sheet instead of drilling holes to make the welds longer.
Freddie
- Braehill
-
Weldmonger
-
Posts:
-
Joined:Sat Jul 06, 2013 11:16 am
-
Location:Near Pittsburgh,Pennsylvania. Steel Buckle of the Rust Belt
Kym,
Check out this post from awhile back and see if there's anything you can garner from it, maybe something useful. I offered a tip about adding gussets up the sides of the tubing to eliminate the need for this type of weld. It will add a little weight but it should be very little, maybe less than going to a heavier tube.
http://forum.weldingtipsandtricks.com/v ... ing#p50253
Len
Now go melt something.
Instagram @lenny_gforce
Len
Instagram @lenny_gforce
Len
- MosquitoMoto
-
Weldmonger
-
Posts:
-
Joined:Sat Aug 01, 2015 8:38 am
-
Location:The Land Down Under
Thanks guys, more good advice.
BGH, by 'plug welding' do you mean drilling the back of the tube and plate, then welding through that?
Cheers,
Kym
BGH, by 'plug welding' do you mean drilling the back of the tube and plate, then welding through that?
Cheers,
Kym
- Braehill
-
Weldmonger
-
Posts:
-
Joined:Sat Jul 06, 2013 11:16 am
-
Location:Near Pittsburgh,Pennsylvania. Steel Buckle of the Rust Belt
Kym,
Yes plug welding on this part would be drill a hole through the plate and weld through it to the tube. I've found better results by cutting a slot with a grinder about an inch (25mm) long and weld it closed while penetrating the tube in this case. A good reason to buy that milling machine you've always wanted also, just saying, a milled slot would be perfect.
Len
Now go melt something.
Instagram @lenny_gforce
Len
Instagram @lenny_gforce
Len
- big gear head
-
Ace
-
Posts:
-
Joined:Thu May 07, 2015 11:46 am
-
Location:KY.
Don't drill through the tube. Just drill through the plate and weld through the hole so that the weld joins the tube and plate together. A slot would be better if you have a way of doing that. You could drill a series of holes close together and just melt through the material that is separating the holes. Make the holes large enough that you can get a good weld on the tube. You don't want to weld the hole shut and not get enough weld on the tube. I've done that several times.
Freddie
- MosquitoMoto
-
Weldmonger
-
Posts:
-
Joined:Sat Aug 01, 2015 8:38 am
-
Location:The Land Down Under
Thanks for that BGH.big gear head wrote:Don't drill through the tube. Just drill through the plate and weld through the hole so that the weld joins the tube and plate together. A slot would be better if you have a way of doing that. You could drill a series of holes close together and just melt through the material that is separating the holes. Make the holes large enough that you can get a good weld on the tube. You don't want to weld the hole shut and not get enough weld on the tube. I've done that several times.
Kym


Is the flat plate running the full length of the tube or are they just short bits of flat plate where it mounts to the chassis/screen fairing connection? If just short bits of flat plate/bar could you grind a flat on the tube say 1/4 the diameter so the bar/plate is notched in and a smaller angle between the tube and plate is formed? Not sure if I explained that very well.
Otherwise as others have mentioned you can can puddle up on the plate and build a bead with filler and with a little finesse just quickly wet it over to the tube then get the arc straight back to the plate.
Otherwise as others have mentioned you can can puddle up on the plate and build a bead with filler and with a little finesse just quickly wet it over to the tube then get the arc straight back to the plate.
Nowadays people know the price of everything and the value of nothing... Oscar Wilde
- MosquitoMoto
-
Weldmonger
-
Posts:
-
Joined:Sat Aug 01, 2015 8:38 am
-
Location:The Land Down Under
Thanks Rupes.
Lots of good tips here. I reckon I'll try a few of these out on the weekend, including a weld and 'destruction test' of the plug welding idea.
There is, of course, a stubborn part of me that just wants to be able to prove that I can run a neat bead right there on the tube/plate junction. Something tells me this is going to cost me a lot of filler, time and gas...but what the hell.
Kym
Wonder if you get some thick filler, 3.2mm or so, just lay it in that crevice and once you get the puddle going just pulse the pedal as you move to get the ripples. Bit easier than trying to bridge the bead over to that thin tube.
I'm a hack though, always looking for ways to cover up my lack of skill. I'd probably just do this ^

I'm a hack though, always looking for ways to cover up my lack of skill. I'd probably just do this ^
Nowadays people know the price of everything and the value of nothing... Oscar Wilde
- MosquitoMoto
-
Weldmonger
-
Posts:
-
Joined:Sat Aug 01, 2015 8:38 am
-
Location:The Land Down Under

- MosquitoMoto
-
Weldmonger
-
Posts:
-
Joined:Sat Aug 01, 2015 8:38 am
-
Location:The Land Down Under
Return to “Tig Welding - Tig Welding Aluminum - Tig Welding Techniques - Aluminum Tig Welding”
Jump to
- Introductions & How to Use the Forum
- ↳ Welcome!
- ↳ Member Introductions
- ↳ How to Use the Forum
- ↳ Moderator Applications
- Welding Discussion
- ↳ Metal Cutting
- ↳ Tig Welding - Tig Welding Aluminum - Tig Welding Techniques - Aluminum Tig Welding
- ↳ Mig and Flux Core - gas metal arc welding & flux cored arc welding
- ↳ Stick Welding/Arc Welding - Shielded Metal Arc Welding
- ↳ Welding Forum General Shop Talk
- ↳ Welding Certification - Stick/Arc Welding, Tig Welding, Mig Welding Certification tests - Welding Tests of all kinds
- ↳ Welding Projects - Welding project Ideas - Welding project plans
- ↳ Product Reviews
- ↳ Fuel Gas Heating
- Welding Tips & Tricks
- ↳ Video Discussion
- ↳ Wish List
- Announcements & Feedback
- ↳ Forum News
- ↳ Suggestions, Feedback and Support
- Welding Marketplace
- ↳ Welding Jobs - Industrial Welding Jobs - Pipe Welding Jobs - Tig Welding Jobs
- ↳ Classifieds - Buy, Sell, Trade Used Welding Equipment
- Welding Resources
- ↳ Tradeshows, Seminars and Events
- ↳ The Welding Library
- ↳ Education Opportunities