
Hello, noob here! Any thoughts on amperage settings for welding 4130 tube, coped joints, (roll cage) .083 wall cage to .056 wall support. Using Diversion 180, ER70-S6, E-3 tungsten. Having hell with blowing holes in either the thinner-wall 1-1/2" .056, or the edges of the 1-5/8" .083, which is notched to fit over the .056. Dealing with less than perfect fits, as well, in some places.
I have been attempting mid 70 settings.
Tig welding tips, questions, equipment, applications, instructions, techniques, tig welding machines, troubleshooting tig welding process
- jumpinjackflash
-
Guide

-
Posts:
-
Joined:Sun Feb 02, 2014 6:14 pm
-
Location:Near Mt Airy
I don't know much about welding....but my learning curve on .035" wall tube was lot different that what I thought. If it were me doing the cage...I would set the amps to 130 or so. Long needle pointed tungsten with a gas lens and 20 cfh. Puddle up on the thicker wall tube to start. Make a couple practice joints...very close fit ups are needed for nice welds. No gaps or mill scale allowed. Clean with acetone before tacking up....I will try and find some drops and put a junction together today. I would rather use ER70s-2....seeing as you are giving the weld area good cleaning...
But that's just how I would go at it....YMMV
But that's just how I would go at it....YMMV
Building an airplane is at times somewhat like a divorce.....with the exception that she doesn't leave
J.J. Flash
J.J. Flash

I'm no expert here but I do listen pretty well. You said you're blowing through the thin or burning off the thick edge. Both lead to the assumption that you're either too hot or dragging your feet running the bead. Either way your description sounds like too much heat build up. I know the Diversion doesn't have all the toys that other welders may have but I'd try keeping the settings as-is and moving faster... or dropping 5amps or so and giving it another go. Watch your heat and adjust accordingly. Maybe work on that fit-up a bit more to help keep what you're welding a consistent challenge instead of running into obsticles as you go along.
Let us know what you find out either way. A pic of what you're dealing with and what's happening could help us see what the problem is as well. Keep at it brother, where there is a will, there is a way.
Let us know what you find out either way. A pic of what you're dealing with and what's happening could help us see what the problem is as well. Keep at it brother, where there is a will, there is a way.
Distant planet of the Miller Galaxy.
The Blues Brothers:
Dynasty 300DX
Spectrum 375
Millermatic 180
Once you've had steak it's hard to go back to hotdogs. You can live off it but it takes like shit.
The Blues Brothers:
Dynasty 300DX
Spectrum 375
Millermatic 180
Once you've had steak it's hard to go back to hotdogs. You can live off it but it takes like shit.

i might try one size bigger fillerrod to help "cool" down the budle down while welding, i find it helpful if there is gaps. Small gap = small filler = nice looking. Big gap - too small filler = hard to make it look like there was no gap

His Diversion doesn't have it unfortunately. Nothing but a amperage knob.Cricket wrote:For me pulsing worked well on 0.032 stainless. It took a while to fugure out the settings and get use to it though.
Distant planet of the Miller Galaxy.
The Blues Brothers:
Dynasty 300DX
Spectrum 375
Millermatic 180
Once you've had steak it's hard to go back to hotdogs. You can live off it but it takes like shit.
The Blues Brothers:
Dynasty 300DX
Spectrum 375
Millermatic 180
Once you've had steak it's hard to go back to hotdogs. You can live off it but it takes like shit.

You could try "manual" pulse with the foot pedal. I know it's not the same as getting an instantaneous current change with actual pulse capabilities, but you could mimick it as best as you can. If it's a tight space you'll need a long taper on the tungsten, down to a needle point. Get as thin of a filler as you can get, and have it ready to dab it into the thinner side of the joint to absorb the heat once it starts to puddle.
I know, I know....easier said than done. I myself am still practicing this. If the pieces are relatively small/short, then you have to be careful with heat saturation. I myself have blown through thin walled pieces because of too much overall heat, which seems to be what you're dealing with. Let them cool, and try manually pulsing them with just enough amperage so that they puddle only at the "end" of the pedal movement, if that makes any sense.
I know, I know....easier said than done. I myself am still practicing this. If the pieces are relatively small/short, then you have to be careful with heat saturation. I myself have blown through thin walled pieces because of too much overall heat, which seems to be what you're dealing with. Let them cool, and try manually pulsing them with just enough amperage so that they puddle only at the "end" of the pedal movement, if that makes any sense.
- jumpinjackflash
-
Guide
-
Posts:
-
Joined:Sun Feb 02, 2014 6:14 pm
-
Location:Near Mt Airy
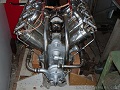
Here is a pic of the rear wing attach tube that was out of square and too close to the front tube as far as being correct for wing spar placement. It has bolt on wing spars....the bolt centerlines had to be as close to the lift strut bolt center line as humanly possible. I welded the tube as an assembly on the table then to the fuselage. Both side are 90 deg. true with respect of everything else. Bolt through tube is 7/16" x .078" wall and the main tube is 1" x .035" wall. Machine set to 125 amps. Thanks to all here who have helped more than anything it was no problems. Tacked up several places and took a couple of evenings to get things where they needed to be and a no gap fit up. It did not clock on me...that was my biggest fear. I guess with my learning the foot pedal I like some overhead power to get a puddle faster and back off to carry on. It helps me to keep from putting so much heat on the thin tube. But that is just my strange way. Super tight fit up really helps with different thickness tube....I mean reamer in the mill kind of fit. I found I can run a nice tight bead with no worry of blowing out. Helped me anyway... learning to fit parts tight and clean everything 3 times. 
- Attachments
-
- rear wing attach tube
- 004.JPG (48.98 KiB) Viewed 885 times
Building an airplane is at times somewhat like a divorce.....with the exception that she doesn't leave
J.J. Flash
J.J. Flash
- MinnesotaDave
-
Weldmonger

-
Posts:
-
Joined:Sun Oct 27, 2013 10:57 pm
-
Location:Big Lake/Monticello MN, U.S.A.
Some questions,janjon wrote:Hello, noob here! Any thoughts on amperage settings for welding 4130 tube, coped joints, (roll cage) .083 wall cage to .056 wall support. Using Diversion 180, ER70-S6, E-3 tungsten. Having hell with blowing holes in either the thinner-wall 1-1/2" .056, or the edges of the 1-5/8" .083, which is notched to fit over the .056. Dealing with less than perfect fits, as well, in some places.
I have been attempting mid 70 settings.
noob to this forum or to tig welding?
Can you tig perfectly on straight metal in all positions? If not, tubing is going to make you nuts.
"Cage to ...wall support" - are you building a roll cage for something?
Advice,
The thinner the metal you work with, the more critical the fit-up.
Get the joint perfect, practice on scrap both your fitting and your welding.
Dave J.
Beware of false knowledge; it is more dangerous than ignorance. ~George Bernard Shaw~
Syncro 350
Invertec v250-s
Thermal Arc 161 and 300
MM210
Dialarc
Tried being normal once, didn't take....I think it was a Tuesday.
Beware of false knowledge; it is more dangerous than ignorance. ~George Bernard Shaw~
Syncro 350
Invertec v250-s
Thermal Arc 161 and 300
MM210
Dialarc
Tried being normal once, didn't take....I think it was a Tuesday.


Return to “Tig Welding - Tig Welding Aluminum - Tig Welding Techniques - Aluminum Tig Welding”
Jump to
- Introductions & How to Use the Forum
- ↳ Welcome!
- ↳ Member Introductions
- ↳ How to Use the Forum
- ↳ Moderator Applications
- Welding Discussion
- ↳ Metal Cutting
- ↳ Tig Welding - Tig Welding Aluminum - Tig Welding Techniques - Aluminum Tig Welding
- ↳ Mig and Flux Core - gas metal arc welding & flux cored arc welding
- ↳ Stick Welding/Arc Welding - Shielded Metal Arc Welding
- ↳ Welding Forum General Shop Talk
- ↳ Welding Certification - Stick/Arc Welding, Tig Welding, Mig Welding Certification tests - Welding Tests of all kinds
- ↳ Welding Projects - Welding project Ideas - Welding project plans
- ↳ Product Reviews
- ↳ Fuel Gas Heating
- Welding Tips & Tricks
- ↳ Video Discussion
- ↳ Wish List
- Announcements & Feedback
- ↳ Forum News
- ↳ Suggestions, Feedback and Support
- Welding Marketplace
- ↳ Welding Jobs - Industrial Welding Jobs - Pipe Welding Jobs - Tig Welding Jobs
- ↳ Classifieds - Buy, Sell, Trade Used Welding Equipment
- Welding Resources
- ↳ Tradeshows, Seminars and Events
- ↳ The Welding Library
- ↳ Education Opportunities