
Hey thanks man, I appreciate the encouragement Otto. Sometimes you gotta get a little creative and fenagle something with what you have. Now that is the best looking of the welds, sometimes it took a little while to get the two pieces to melt together before I added metal. Do yall think maybe I should have went with a little more heat? 5 amps or so? Any criticism is welcome
Thanks folks!!
Tig welding tips, questions, equipment, applications, instructions, techniques, tig welding machines, troubleshooting tig welding process

- Otto Nobedder
-
Weldmonger

-
Posts:
-
Joined:Thu Jan 06, 2011 11:40 pm
-
Location:Near New Orleans
Nope... The color, and the size of the heat-affected zone seems spot-on for the repair you were doing. My only critique would be to feed a bit more rod with each dab, so the weld is not concave. Your goal should be for it to be at least flat, but preferably a bit convex, so the joint between the parts is "rounded over".FitNPipe wrote:Hey thanks man, I appreciate the encouragement Otto. Sometimes you gotta get a little creative and fenagle something with what you have. Now that is the best looking of the welds, sometimes it took a little while to get the two pieces to melt together before I added metal. Do yall think maybe I should have went with a little more heat? 5 amps or so? Any criticism is welcome
Thanks folks!!
Steve S
- Superiorwelding
-
Weldmonger
-
Posts:
-
Joined:Thu Jan 24, 2013 10:13 pm
-
Location:Eddy, TX
Steve,
If there is one thing I hate most its backing up! Oh well it looked good anyway! Always amazed.
-Jonathan
If there is one thing I hate most its backing up! Oh well it looked good anyway! Always amazed.
-Jonathan
Instagram- @superiorwelding/@learntotig
Twitter- @_JonathanLewis
https://www.learntotig.com
https://www.superiorweldandfab.com
https://www.youtube.com/+SuperiorWeldin ... ATHANLEWIS
Twitter- @_JonathanLewis
https://www.learntotig.com
https://www.superiorweldandfab.com
https://www.youtube.com/+SuperiorWeldin ... ATHANLEWIS
- Otto Nobedder
-
Weldmonger
-
Posts:
-
Joined:Thu Jan 06, 2011 11:40 pm
-
Location:Near New Orleans
OHHH yeah, I was grouchy all day. Lesson learned, though... If this repair comes up again, I promise you, I'll test the other weld before I put the sh!t back together. I fixed the known leak, found another, and in a fit of rage ground out the entire original weld to the part-line, and re-welded it.Superiorwelding wrote:Steve,
If there is one thing I hate most its backing up! Oh well it looked good anyway! Always amazed.
-Jonathan
- GEDC1427.JPG (162.03 KiB) Viewed 2076 times
I did, by the end of the day, make it back to the exact point I was at when I realized I had to cut it back out and apart...
So tomorrow, I'm out of "rewind" mode, and back to making progress. Fresh Start. That will make a better day.
Steve S
And this is where I wish there was a "like" button!Otto Nobedder wrote:FitNPipe,
This is one of those moments I wish this forum had a "like" button like facebook...
Li'l redneck engineering, li'l new welding skill, li'l new machine, and problem solved... Keep practicing, keep following Jody's videos, and keep up with us, and you'll be teaching your welder in no time...
Steve S
You are one of the guys I as a new member of this forum noticed as highly professional and displaying also things where you are not satisfied with your work.
And then encouraging us at the hobby level like that. I wish all forums on internet was that friendly.
Thumbs up to you as well as to to FitNPipe. If that smoker falls apart, it will not happen at those welds.
- Otto Nobedder
-
Weldmonger
-
Posts:
-
Joined:Thu Jan 06, 2011 11:40 pm
-
Location:Near New Orleans
Here's a li'l something I did today, with four hours involved. It looks simple...
It's actually a transition tee. The goal was to connect 3/4" sch. 160 pipe to two branches of .120-wall 1/2" tubing. The cross-piece of the tee is 3/4" XXS that has been reamed to 1/2" I.D. to fit the tubing. The leg is 3/4" sch. 160. I had to bore the tee to 1/2", then taper that hole to aprox. 5/8" to match the I.D. of the sch. 160. Then, cope the sch. 160 to the XXS, and bevel it to the shape of a weld-o-let for a full penetration weld. This all has to be rated based on 1.5X the MAWP of 8800 psi, so the fitting has to be rated to 13,200 psi. It will be service tested to 9600 psi after the installation is complete.
It was a fun project, figuring out how to accomplish all this with the minimal equipment we have. I could have shaved two hours off if we had a good milling machine...
I should add, I'm stuck waiting for "engineering" to approve my use of accepted materials and methods to do this, so I can build the other one just like it, and install them both. I would estimate that every day they delay my completion with their indecision costs them several thousand dollars. (And, no, I'm not exaggerating.)
Steve S
- GEDC1431.JPG (167.41 KiB) Viewed 2238 times
It was a fun project, figuring out how to accomplish all this with the minimal equipment we have. I could have shaved two hours off if we had a good milling machine...
I should add, I'm stuck waiting for "engineering" to approve my use of accepted materials and methods to do this, so I can build the other one just like it, and install them both. I would estimate that every day they delay my completion with their indecision costs them several thousand dollars. (And, no, I'm not exaggerating.)
Steve S
Bholcomb87
- Bholcomb87
-
New Member

-
Posts:
-
Joined:Mon Jul 07, 2014 10:41 pm
-
Location:Warner Robins, GA
I didn't do any real jobs today so I did a little practice with GTAW(TIG) on some plain mold steel in a T joint.
- Attachments
-
- image.jpg (18.04 KiB) Viewed 2223 times
-
- image.jpg (43.95 KiB) Viewed 2223 times
- Otto Nobedder
-
Weldmonger
-
Posts:
-
Joined:Thu Jan 06, 2011 11:40 pm
-
Location:Near New Orleans
- Otto Nobedder
-
Weldmonger
-
Posts:
-
Joined:Thu Jan 06, 2011 11:40 pm
-
Location:Near New Orleans
Well, we've made the assumption that my Tee design will be approved, and I've moved ahead. I like how the second one came out better than the first. In this picture, I've not even brushed it off, yet...

Here's the rather startling short cut to put it where it goes, and there's a peek at the root, as well...

And here's one (the first one, actually) in context, during a test fit.

Still waiting for engineering approval before I weld out the last bits...
Steve S
Here's the rather startling short cut to put it where it goes, and there's a peek at the root, as well...
And here's one (the first one, actually) in context, during a test fit.
Still waiting for engineering approval before I weld out the last bits...
Steve S

- Superiorwelding
-
Weldmonger
-
Posts:
-
Joined:Thu Jan 24, 2013 10:13 pm
-
Location:Eddy, TX
Justin,
Looking good there! I would wire wheel between each pass. Keep up the good work!
-Jonathan
Looking good there! I would wire wheel between each pass. Keep up the good work!
-Jonathan
Instagram- @superiorwelding/@learntotig
Twitter- @_JonathanLewis
https://www.learntotig.com
https://www.superiorweldandfab.com
https://www.youtube.com/+SuperiorWeldin ... ATHANLEWIS
Twitter- @_JonathanLewis
https://www.learntotig.com
https://www.superiorweldandfab.com
https://www.youtube.com/+SuperiorWeldin ... ATHANLEWIS
- Otto Nobedder
-
Weldmonger
-
Posts:
-
Joined:Thu Jan 06, 2011 11:40 pm
-
Location:Near New Orleans
FINALLY got my Tee design approved by engineering...
But, you know engineers, they have to earn their salary somehow, so there's one modification... I can't do the tube welds as sockets... I have to cut them back and do them open-root...
So be it... we've already met the x-ray requirement for the job, so, frankly, I could do whatever the hell I want to do and no one will know, but I'll do it "their" way. F#$king idiots did it socket-weld the first time, and the second time during the "fix" that wasn't adequate, and both times it passed Hydro.
Sensible choices by corporate committee? Sounds like Congress (the opposite of Progress)
Steve S
Bholcomb87
- Bholcomb87
-
New Member
-
Posts:
-
Joined:Mon Jul 07, 2014 10:41 pm
-
Location:Warner Robins, GA
I welded these gate frames a few days ago I thought I'd post them any way. I also built the fence. I'm a fence contractor and I welding and fabrication.
- Attachments
-
- image.jpg (44.22 KiB) Viewed 2071 times
-
- image.jpg (88.76 KiB) Viewed 2071 times
-
- This a flower pot holder that attaches to the railing of a deck. I had 6 that I had to cut off the bracket and turn it around 180 degrees. Tig them
- image.jpg (88.76 KiB) Viewed 2071 times

Steve,Otto Nobedder wrote:It's actually a transition tee. The goal was to connect 3/4" sch. 160 pipe to two branches of .120-wall 1/2" tubing. The cross-piece of the tee is 3/4" XXS that has been reamed to 1/2" I.D. to fit the tubing. The leg is 3/4" sch. 160. I had to bore the tee to 1/2", then taper that hole to aprox. 5/8" to match the I.D. of the sch. 160. Then, cope the sch. 160 to the XXS, and bevel it to the shape of a weld-o-let for a full penetration weld. This all has to be rated based on 1.5X the MAWP of 8800 psi, so the fitting has to be rated to 13,200 psi. It will be service tested to 9600 psi after the installation is complete.
What's the point behind bringing such a heavy-walled pipe out to a spot just to transition to thin-walled pipe? I.e., why not run the thinner pipe back to the last point that the heavier pipe is actually needed? Surely, it's not for pressure reasons; is it because the 160 will be packed in insulation wrap but the branch lines won't?
Curious,
Richard
Grinding discs... still my #1 consumable!
Bholcomb87
- Bholcomb87
-
New Member
-
Posts:
-
Joined:Mon Jul 07, 2014 10:41 pm
-
Location:Warner Robins, GA
I got a customer that hired me to fab up boxes so he can install a stereo system on his arctic cat side by side. I'm .063 aluminum plate and .063 aluminum tread plate. I'm using a AHP ALPHA TIG 200 ex 3/32 tungsten and a #7 cup. I had the welder set to 85 amps using a foot petal. it's ok Its a decent starter welder. I'm going to upgrade to miller dynasty 200dx or a Everlast does anybody have a Everlast AC/dc and do you like it? My ahp has pulse but only .05-10hz and AC balance is only + or - 5%. I need a better tig welder I've out grown my AHP.
- Attachments
-
- image.jpg (41.82 KiB) Viewed 2048 times
-
- image.jpg (48.06 KiB) Viewed 2048 times
- Otto Nobedder
-
Weldmonger
-
Posts:
-
Joined:Thu Jan 06, 2011 11:40 pm
-
Location:Near New Orleans
Richard, the li'l bit of 3/4" XXS was chosen for convenience. The I.D. was easy to ream to .500" I.D. and maintain a wall thickness in excess of the sch. 160 called out. The sch. 160 has an I.D. of about 5/8, and the Tee was easiest to weld with the same O.D.RichardH wrote:Steve,
What's the point behind bringing such a heavy-walled pipe out to a spot just to transition to thin-walled pipe? I.e., why not run the thinner pipe back to the last point that the heavier pipe is actually needed? Surely, it's not for pressure reasons; is it because the 160 will be packed in insulation wrap but the branch lines won't?
Curious,
Richard
The 1/2" tubing is .120 wall, yielding a nominal I.D. of .260", resulting in such reduced hoop-stress that it acutally meets the 8800 psi MAWP with a safety factor of four. Therefore, the transition from the "big" pipe to the tubing is consist with the pressure rating require.
None of this will be insulated... The purpose is a vaporizor, to gassify the hydrogen at extreme pressure.
I hope this makes sense...
Steve S
- Otto Nobedder
-
Weldmonger
-
Posts:
-
Joined:Thu Jan 06, 2011 11:40 pm
-
Location:Near New Orleans
Bholcomb87,
I was going to comment on the gate frames (nice), as I had some brief experience, but I think your diamond-plate speaker boxes are sweet. With weatherproof speakers, you could sell the hell out of those! Nice work.
Steve S
I was going to comment on the gate frames (nice), as I had some brief experience, but I think your diamond-plate speaker boxes are sweet. With weatherproof speakers, you could sell the hell out of those! Nice work.
Steve S
Makes sense - thanks for the explanation!Otto Nobedder wrote:Richard, the li'l bit of 3/4" XXS was chosen for convenience. The I.D. was easy to ream to .500" I.D. and maintain a wall thickness in excess of the sch. 160 called out. The sch. 160 has an I.D. of about 5/8, and the Tee was easiest to weld with the same O.D.
The 1/2" tubing is .120 wall, yielding a nominal I.D. of .260", resulting in such reduced hoop-stress that it acutally meets the 8800 psi MAWP with a safety factor of four. Therefore, the transition from the "big" pipe to the tubing is consist with the pressure rating require.
Cheers,
Richard
Grinding discs... still my #1 consumable!
- member closeup.jpg (49.19 KiB) Viewed 1921 times
- member.jpg (34.09 KiB) Viewed 1921 times
- Otto Nobedder
-
Weldmonger
-
Posts:
-
Joined:Thu Jan 06, 2011 11:40 pm
-
Location:Near New Orleans
SWEET, JDIGGS82,
I have zero experience with pulse-MIG, but I have enough welding experience to say, "That's tight!"
Steve S
I have zero experience with pulse-MIG, but I have enough welding experience to say, "That's tight!"
Steve S
- Otto Nobedder
-
Weldmonger
-
Posts:
-
Joined:Thu Jan 06, 2011 11:40 pm
-
Location:Near New Orleans
I've not watched videos today, and won't until the 14'th, when my usage resets.
FaceBook's new "autostart" feature for video posts ate the hell out of my "usage" without me realizing it.
Bastards.
It's fixed, now, but the damage is done, so no videos until the cycle resets in three days.
Steve S
FaceBook's new "autostart" feature for video posts ate the hell out of my "usage" without me realizing it.
Bastards.
It's fixed, now, but the damage is done, so no videos until the cycle resets in three days.
Steve S
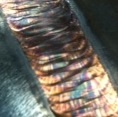
Total newb here, and this is probably my third day of practicing laying down beads. I probably have 3 hours of total torch time and I feel like I'm kinda starting to get a handle on it. It took me quite a bit of time to get the settings right so I wasn't grinding my Tungsten every bead. I quickly learned that too much AC cleaning is not a good thing. 
Anyway... here is the best I've gotten so far. I will continue to practice, practice, practice. I'm having lots of fun.
I've already learned lots from this forum and am very happy I stumbled across this place. Tons of knowledgable people who are willing to share their expertise...

Anyway... here is the best I've gotten so far. I will continue to practice, practice, practice. I'm having lots of fun.
I've already learned lots from this forum and am very happy I stumbled across this place. Tons of knowledgable people who are willing to share their expertise...
Return to “Tig Welding - Tig Welding Aluminum - Tig Welding Techniques - Aluminum Tig Welding”
Jump to
- Introductions & How to Use the Forum
- ↳ Welcome!
- ↳ Member Introductions
- ↳ How to Use the Forum
- ↳ Moderator Applications
- Welding Discussion
- ↳ Metal Cutting
- ↳ Tig Welding - Tig Welding Aluminum - Tig Welding Techniques - Aluminum Tig Welding
- ↳ Mig and Flux Core - gas metal arc welding & flux cored arc welding
- ↳ Stick Welding/Arc Welding - Shielded Metal Arc Welding
- ↳ Welding Forum General Shop Talk
- ↳ Welding Certification - Stick/Arc Welding, Tig Welding, Mig Welding Certification tests - Welding Tests of all kinds
- ↳ Welding Projects - Welding project Ideas - Welding project plans
- ↳ Product Reviews
- ↳ Fuel Gas Heating
- Welding Tips & Tricks
- ↳ Video Discussion
- ↳ Wish List
- Announcements & Feedback
- ↳ Forum News
- ↳ Suggestions, Feedback and Support
- Welding Marketplace
- ↳ Welding Jobs - Industrial Welding Jobs - Pipe Welding Jobs - Tig Welding Jobs
- ↳ Classifieds - Buy, Sell, Trade Used Welding Equipment
- Welding Resources
- ↳ Tradeshows, Seminars and Events
- ↳ The Welding Library
- ↳ Education Opportunities