I'm a student in trade school trying to cert in TIG. I've been running aluminum beads pretty well, but I've hit a wall with butt welds and I feel like I'm missing something. I've gotten three different answers from my instructors, and my TIG mentor was let go recently so I feel like I don't have someone to really help me figure out if I'm headed in the right direction. I've heard that you should do this joint with no gap, with a gap, at 85 amps, 115 amps, and 130 amps. Someone even said 180 amps. I have no idea what the correct answer is.
I watched Jody's video on this joint but I cannot replicate that penetration through the back. It either melts through the plate completely or sits on top. I've fiddled with settings, gotten as much advice as I can, and I still get the same result. I just want to know if I'm headed in the correct direction at all or if I'm screwing up somewhere.
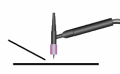
I have pictures attached below of what nearly all of my welds have been looking like. If anyone can tell me I'm on the right track and just need to keep practicing, that's great. I just need to know if I'm doing something totally wrong.
11 gauge 4043 aluminum
130 amps
3/32 4043 filler
3/32 2% lanth tungsten
20 cfh 100% ar
Balance set at 65% EN 35% EP
Tig welding tips, questions, equipment, applications, instructions, techniques, tig welding machines, troubleshooting tig welding process
CaseyCat89
- CaseyCat89
-
New Member

-
Posts:
-
Joined:Wed Oct 19, 2016 12:31 pm
- Attachments
-
- IMG_20161019_092856.jpg (51.12 KiB) Viewed 2265 times
-
- IMG_20161019_092849.jpg (55.8 KiB) Viewed 2265 times
exnailpounder
- exnailpounder
-
Weldmonger

-
Posts:
-
Joined:Thu Dec 25, 2014 9:25 am
-
Location:near Chicago
Your weld is too hot and/or your balance is off or you have crappy filler rod and you need more pedal control. If you want full penetration on an aluminum joint like what was shown, you need to bevel it or you are simply welding over a crack which will crack again. Keep practicing...you will NEVER know it all. 
Ifyoucantellmewhatthissaysiwillbuyyouabeer.
- LtBadd
-
Weldmonger
-
Posts:
-
Joined:Sun Apr 12, 2015 4:00 pm
-
Location:Clearwater FL
-
Contact:
I had to do a butt weld test some years ago, don't remember the how thick the sheet was, I'm thinking either .090" or 1/8".
At that time it was to MIL-STD 1595A which has now been replaced, still this is a very difficult test. You've got to be very consistent with heat, travel speed and filler, not very forgiving if you miss a beat.
How are you prepping (cleaning) the test plates? Not only the top side but the butted edges and bottom side as well
Richard
Website
Website
exnailpounder
- exnailpounder
-
Weldmonger
-
Posts:
-
Joined:Thu Dec 25, 2014 9:25 am
-
Location:near Chicago
You're better at this than I amLtBadd wrote:I had to do a butt weld test some years ago, don't remember the how thick the sheet was, I'm thinking either .090" or 1/8".
At that time it was to MIL-STD 1595A which has now been replaced, still this is a very difficult test. You've got to be very consistent with heat, travel speed and filler, not very forgiving if you miss a beat.
How are you prepping (cleaning) the test plates? Not only the top side but the butted edges and bottom side as well
Ifyoucantellmewhatthissaysiwillbuyyouabeer.
CaseyCat89
- CaseyCat89
-
New Member
-
Posts:
-
Joined:Wed Oct 19, 2016 12:31 pm
Thanks guys, I clean the aluminum with a dedicated SS brush and scotch brite pad before welding, including the edges. They don't allow us to use acetone or any other solvents to clean it at school. I clean the filler with the scotch brite pad too.
The way another tig student showed me today did help, but I just want to make sure that when I'm practicing I am doing it the correct way. I don't like to practice the "wrong" way. He basically keeps the torch straight up and down at 90amps and just waits for that big keyhole and shoves filler in the hole over and over. I've got a pic attached of what I did today.
I want to cert in tig, not necessarily all aluminum, so maybe I should focus on some other joints for a while before I try to master the butt weld.
- Attachments
-
- IMG_20161019_140328.jpg (62.77 KiB) Viewed 2239 times
- MinnesotaDave
-
Weldmonger
-
Posts:
-
Joined:Sun Oct 27, 2013 10:57 pm
-
Location:Big Lake/Monticello MN, U.S.A.
I would respectfully disagree on beveling 1/8" and below. Without a gap, full penetration and proper weld is possible after a ton (or metric ton) of practice.exnailpounder wrote:Your weld is too hot and/or your balance is off or you have crappy filler rod and you need more pedal control. If you want full penetration on an aluminum joint like what was shown, you need to bevel it or you are simply welding over a crack which will crack again. Keep practicing...you will NEVER know it all.
130 amps is a little low - I would be at 150 amps at the start at least.
The practice pieces are too small in my opinion. Not enough mass so the part saturates with heat too fast.
Last edited by MinnesotaDave on Wed Oct 19, 2016 10:06 pm, edited 1 time in total.
Dave J.
Beware of false knowledge; it is more dangerous than ignorance. ~George Bernard Shaw~
Syncro 350
Invertec v250-s
Thermal Arc 161 and 300
MM210
Dialarc
Tried being normal once, didn't take....I think it was a Tuesday.
Beware of false knowledge; it is more dangerous than ignorance. ~George Bernard Shaw~
Syncro 350
Invertec v250-s
Thermal Arc 161 and 300
MM210
Dialarc
Tried being normal once, didn't take....I think it was a Tuesday.
Ive done the butt test as well, it will test you for sure.. my first couple pieces made me feel like I had no clue what I was doing..lol
Do you have a backing plate on that piece (steel ??) and I assume your welding flat? The backing piece will help but it sucks heat from it as well, helps and hurts at same time. Id also set it around 180 amps, with a foot pedal, hit I hard to get it to start and stay steady controlling the heat as you move. Make sure you are getting good tacks with a few dabs of filler on each end.
Even my AWS 17.1 test was 11g plate, 3/32" gap, steel backer, vertical up...bend test. If the tacks were not strong the gap would nearly close up on you half way up, going vertical I was able to pulse the pedal a little and control where I wanted heat, hit it hard, feed rod move.
I weld stainless, stainless and more stainless...Food Industry, sanitary process piping, vessels, whatever is needed, I like to make stuff.
ASME IX, AWS 17.1, D1.1
Instagram #RNHFAB
ASME IX, AWS 17.1, D1.1
Instagram #RNHFAB
CaseyCat89
- CaseyCat89
-
New Member
-
Posts:
-
Joined:Wed Oct 19, 2016 12:31 pm
I'm starting to think that the size of the pieces may be contributing a lot to the issue. I think I'm going to pick up my own aluminum pieces to work on and see if that changes.MinnesotaDave wrote:
I would respectfully disagree on beveling 1/8" and below. Without a gap, full penetration and proper weld is possible after a ton (or metric ton) of practice.
130 amps is a little low - I would be at 150 amps at the start at least.
The practice pieces are too small in my opinion. Not enough mass so the part saturates with heat too fast.
I'm glad to know that it is a very difficult joint to do well, at least I'm not just screwing up somewhere and making it more difficult on myself! I think what I'm going to end up doing is just continue to practice stringers, start on lap and tee and edge joints, and then probably revisit the open root so that I can have a lot more practice behind me. I really appreciate all the help I've gotten here, it's been the most helpful forum so far!
exnailpounder
- exnailpounder
-
Weldmonger
-
Posts:
-
Joined:Thu Dec 25, 2014 9:25 am
-
Location:near Chicago
I know Dave disagrees with me but my answer was aimed at you as you are a student. It is very difficult to butt weld aluminum without it dropping out on you. I will agree that your coupons are too small and that may be your biggest problem so I will take back my first post. You definitely will do better with more mass so it doesn't get heat soaked so fast.
Ifyoucantellmewhatthissaysiwillbuyyouabeer.

I'm not familiar with the test, but I've done plenty of butt welds on thin 6463 aluminum recently. Are you allowed to clamp it to a backing plate? Do you have adjustable frequency?
Miller Dynasty 210dx
instagram: rsengineeringllc
instagram: rsengineeringllc

Bottom line is still the detail in viewing the puddle and arc but not much talk about the frequency on this weld type.
I've found aluminum butt welds looked prettier on my old transformer welder and balled pure tung when I first got the new one. Everything else was better, it seemed, with the newer fancy welder but this. Of course I set it at 120Hzish as suggested and left it.
So,,, now,,, I lower frequency to 50 or 60 and use a well used tung (or grind at 45 for tung prep) for butt welds and they look pretty again.
I use the frequency adjustment a lot now and have a favorite setting for different weld types as well as preference for tungsten prep. I even change balance to the ol' 50/50 if i have no time to do perfect prep or question if that is the problem. And,,, even use 80/20 if things are clinical or thin.
If you got the knobs, twist 'em and see.


You just have to get a feel for aluminum and different thicknesses and sizes behave differently.
If I recall correctly, the video that you are referring to isn't exactly a true butt weld. What Jody did was tack both ends and then bend the two pieces at roughly 5 degrees. That makes it a groove weld. I think it was 1/8" pieces of plate. 0.125" @ 1amp per thousandth plus 10% equals roughly 140amps. You need to light up slowly to get a little bit of heat saturation in the work stock and proceed slowly. You have to read the puddle because you'll have to add filler slowly at first, then speed up, then begin backing off the peddle as the heat saturation begins to reach critical mass.......else you're gonna blow through. Start your practice flat, then horizontal and graduate to vertical. You can not just jump right into vertical without frustrating the hell out of yourself.
Remember: Jody did a groove weld, not a true butt weld.
Also remember that the surface area of your parts are gonna determine the required heat much more than will the thickness when working with aluminum. I recently did a repair on a polaris RZR transmission housing. The part that i was welding up was 1" thick and I never exceeded 200 amps because the surface area was so small (1" X 2.5" X4") and the heat built up quickly.
Raymond
Everlast PowerTIG 255EXT
Everlast PowerTIG 255EXT
CaseyCat89
- CaseyCat89
-
New Member
-
Posts:
-
Joined:Wed Oct 19, 2016 12:31 pm
I'm using a Syncrowave 250 DX, and the right side of the machine has the dials blanked out, so I'm guessing I don't have full control over the frequency. I just have balance/dig control.geo wrote:Bottom line is still the detail in viewing the puddle and arc but not much talk about the frequency on this weld type.
I've found aluminum butt welds looked prettier on my old transformer welder and balled pure tung when I first got the new one. Everything else was better, it seemed, with the newer fancy welder but this. Of course I set it at 120Hzish as suggested and left it.
So,,, now,,, I lower frequency to 50 or 60 and use a well used tung (or grind at 45 for tung prep) for butt welds and they look pretty again.
I use the frequency adjustment a lot now and have a favorite setting for different weld types as well as preference for tungsten prep. I even change balance to the ol' 50/50 if i have no time to do perfect prep or question if that is the problem. And,,, even use 80/20 if things are clinical or thin.
If you got the knobs, twist 'em and see.
Thanks for that reply, that really helps. I have definitely been doing exactly what you just described with the pedal and while the weld is really ugly on top I have been getting more penetration. I just picked up some 2" 11gua 6061 flat bar for myself to give myself more surface area and more heat dissipation. Thanks for clarifying Jody's video too, I saw him do that perfect flat bead and flip the piece over to see it coming through the other side and I was just like how TF did he get it to penetrate so well? Lol. I know he's a master at all things TIG but it was like black magic watching him do that.RamboBaby wrote:You just have to get a feel for aluminum and different thicknesses and sizes behave differently.
If I recall correctly, the video that you are referring to isn't exactly a true butt weld. What Jody did was tack both ends and then bend the two pieces at roughly 5 degrees. That makes it a groove weld. I think it was 1/8" pieces of plate. 0.125" @ 1amp per thousandth plus 10% equals roughly 140amps. You need to light up slowly to get a little bit of heat saturation in the work stock and proceed slowly. You have to read the puddle because you'll have to add filler slowly at first, then speed up, then begin backing off the peddle as the heat saturation begins to reach critical mass.......else you're gonna blow through. Start your practice flat, then horizontal and graduate to vertical. You can not just jump right into vertical without frustrating the hell out of yourself.
Remember: Jody did a groove weld, not a true butt weld.
Also remember that the surface area of your parts are gonna determine the required heat much more than will the thickness when working with aluminum. I recently did a repair on a polaris RZR transmission housing. The part that i was welding up was 1" thick and I never exceeded 200 amps because the surface area was so small (1" X 2.5" X4") and the heat built up quickly.
With my new aluminum I will attempt the open root again, but I think I'm going to step back a bit and focus on my consistancy, heat control, and other joints like lap and tee before I try to tackle it again. When I was learning the other welding processes I could see myself improve over time, but with this joint I just hit a brick wall and really needed some input. Really appreciate it.

If you are forced to use small coupons for school spend the money and get yourself a copper plate, I use 1/2" thick plate about 6x12 bought off ebay for when I have to do small AL parts.
Also get a couple tacks on your piece if you cant clamp them in place. That will at least give you a little more solidity in your base material you are trying to weld together.
If you have a frequency and cleaning knobs but don't know what they are set at then you can play with them and look at both the width of the puddle (high freq smaller puddle) and the haze effect area (bigger area more cleaning).
Try to find a balance where lets say (assuming your using 3/32 tungsten) the bead is about 1/4 in width and the haze effect would be about another 1/8 inch past the puddle on both sides.
At least that would give you good penetration and cleaning which is a start.
Beyond on that like others said, size does matter for the pieces being welded along with technique.
This is an example of the plate material I was referring too
http://www.ebay.com/itm/C14500-ALLOY-14 ... xyLchRwecW
When I was in school --- I got into the habit of cutting pieces for practice that were like 1 by 3 inches--- just to keep
from wasting material and so I could do a bunch in one cutting.(was 1/8 or 3/32) What I later understood---- was that small of a part is overheated by the time you have done a single pass down it. That is why you see the 2-nd half of your bead too hot and falling through. If that was a "real" part----- you would break the weld up into about thirds.... and let it
cool a little and do it in 3 goes. So- tiny test pieces are making life harder than it has to be. Make your practice pieces
about 12 inches by 6 inches. (by 3/32 or 1/8 )
Your pictures don't really look like the etched area was due to 65% neg. It LOOKS more like 80% neg. The etched area
at 65% should reach out 1/2 inch either side of weld. It also looks slightly dirty--- like balance is about 80% neg.- or a draft of air- or not enough gas---- or even too much gas. I have found about 12-15 cfm is a sweet spot. less OR MORE
makes dirty weld.
Another thing you can practice -- which helped me a lot to tell how much penetration I was getting---- is to pay attention
to the appearance of the ripples in the bead and how perky they stand up. ( I mean in real time as you are laying it down)
If the bead is kind of semicircular- its too cold. If they are more a slight oval- slightly convex- you are in a range where you may be getting full penetration and making a (more or less) matching bead on the back. Notice that each dip makes
a dime in the stack of dimes. as you get a little hotter- you will start to notice the distinct sharp lines that separate the
dimes will start to flow together-- making the pattern less distinct. If you flip it over- you will see that the bead on the
back there is too big. If you get the bead a little hotter yet----- you will see that the weld metal you laid down is sinking
away from you and will be getting wider too from the heat runaway. So---- get hotter using pedal and/or travel speed
until you see the dime pattern starting to become indistinct---- then back off the heat a little. you should be just right
about then. Examine the toes to see whether they are wetted or you can see a crisp jump. Should be wetted. If you see
a "jump" you are a little too cool yet.
Of coarse you will have to start a little slow/hot for the first few inches and be backing off for the last 3 or 4 inches
(depending on how long the bead is)
try to keep the arc length as short as possible. I say short- I mean like 1 mm. especially at the beginning. I have found it
usefull at time on thicker material (1/8 and over) to use a backstep motion with the arc like you might do when doing a
stick weld. Dab the rod into the leading edge of the puddle when the torch is retracted. It seems to help clean the
metal just ahead of the next spot that is about to be puddled. seems to help if the material seems to be less clean than
ideal.
Practice watching the pattern in the ripples. Do several beads successively hotter and compare the rear bead with the
distinctness of the ripples on the front. See if you can see what I am talking about. If you can--- that will be able to
give you real time feedback on your penetration.
Maybe it will help you ----- it helped me.
Tim
OH- ps.....
Try fileing the edges of the aluminum with a fine file ( aluminum only file)
File them so smooth that you cant see ANY texture. should look all most polished.
your backside looks a little dirty. (like the bears on the toiletpaper commercial )
)
Any texture AT ALL left in the edges leaves a place for dirt and oxidation to hide.
The back side will look a little dirtier than the front but should be cleaner than what you show.
Overheating might cause some of it.
Tim
Try fileing the edges of the aluminum with a fine file ( aluminum only file)
File them so smooth that you cant see ANY texture. should look all most polished.
your backside looks a little dirty. (like the bears on the toiletpaper commercial
Any texture AT ALL left in the edges leaves a place for dirt and oxidation to hide.
The back side will look a little dirtier than the front but should be cleaner than what you show.
Overheating might cause some of it.
Tim
GreinTime
- GreinTime
-
Weldmonger
-
Posts:
-
Joined:Fri Nov 01, 2013 11:20 am
-
Location:Pittsburgh, PA
For the record, the max balance on a Syncrowave 250dx is 68/32 EN with the knob turned the whole way clockwise. Number 3 is 50/50. Whatever settings you used on the plates on the table behind the one you held up should do you fine. The piece in focus indicates very little to no cleaning action.
You also don't have any frequency adjustments with a SW250, so no need to fret about the blanked out knobs. Those are for Pulse control and 2T/4T controls.
Butt welds on any material are the bane of my existence. Fillets, grooves, laps, plugs, inside/outside corners I can make look awesome. Butt welds make me look like I've never welded before. I get so excited when I have one that comes out looking mint lol!
Sent from my VS995 using Tapatalk
#oneleggedproblems
-=Sam=-
-=Sam=-
Return to “Tig Welding - Tig Welding Aluminum - Tig Welding Techniques - Aluminum Tig Welding”
Jump to
- Introductions & How to Use the Forum
- ↳ Welcome!
- ↳ Member Introductions
- ↳ How to Use the Forum
- ↳ Moderator Applications
- Welding Discussion
- ↳ Metal Cutting
- ↳ Tig Welding - Tig Welding Aluminum - Tig Welding Techniques - Aluminum Tig Welding
- ↳ Mig and Flux Core - gas metal arc welding & flux cored arc welding
- ↳ Stick Welding/Arc Welding - Shielded Metal Arc Welding
- ↳ Welding Forum General Shop Talk
- ↳ Welding Certification - Stick/Arc Welding, Tig Welding, Mig Welding Certification tests - Welding Tests of all kinds
- ↳ Welding Projects - Welding project Ideas - Welding project plans
- ↳ Product Reviews
- ↳ Fuel Gas Heating
- Welding Tips & Tricks
- ↳ Video Discussion
- ↳ Wish List
- Announcements & Feedback
- ↳ Forum News
- ↳ Suggestions, Feedback and Support
- Welding Marketplace
- ↳ Welding Jobs - Industrial Welding Jobs - Pipe Welding Jobs - Tig Welding Jobs
- ↳ Classifieds - Buy, Sell, Trade Used Welding Equipment
- Welding Resources
- ↳ Tradeshows, Seminars and Events
- ↳ The Welding Library
- ↳ Education Opportunities