@ Oscar - thanks for condensing things a bit ! I can do it - just not write it !
There is no pre flow on these things so to avoid black smoke / burnt tungsten you have to initiate away from the weld then let off & use post flow - a lot of Chinese stuff is this way - same as at this price you have fixed 60hz frequency & the arc is a big fluffy wandering ball mostly I think down to the extreme number of low cost un-matched MOSFET's used ! they actually weld on DC quite well & duty cycle is amazingly good but AC is lousy - you have to remember if you shop around you can have exactly 10 units all complete with torches / pedals etc ready to weld for the price of an entry level Dynasty !
Tig welding tips, questions, equipment, applications, instructions, techniques, tig welding machines, troubleshooting tig welding process
noddybrian
- noddybrian
-
Weldmonger

-
Posts:
-
Joined:Thu Jan 24, 2013 12:13 pm
Yes - 2nd pot in on top line is main amps unless you enable foot pedal.
Still curious you apparently have only one insulator with a gas lens - you sure it's correct - not aware you can buy the 1 piece here so you could be drawing air between ceramic & torch ? anyone else agree ? maybe take close up picture ?
The material is an odd color & seems un-cleaned ? maybe just lighting in picture ? it's not coated or anodized by any chance ? - clean with stainless wire brush till wrist aches - then do it some more & wipe off with solvent - we will get to the bottom of this !
Modestas97
- Modestas97
-
New Member

-
Posts:
-
Joined:Thu Jul 07, 2016 2:41 pm
disassembled torch
torch is dressed with rubber,
and holding both sides blocked, feeling quite good gas pressure (definitely no leaks)
stock torch
- image.jpeg (83.36 KiB) Viewed 1826 times
- image.jpeg (88.86 KiB) Viewed 1826 times
- image.jpeg (81.26 KiB) Viewed 1826 times
- image.jpeg (86.54 KiB) Viewed 1826 times
- image.jpeg (69.95 KiB) Viewed 1826 times
- image.jpeg (76.1 KiB) Viewed 1826 times
- image.jpeg (71.44 KiB) Viewed 1826 times
- image.jpeg (60.36 KiB) Viewed 1826 times
- image.jpeg (73.91 KiB) Viewed 1826 times
- image.jpeg (87.95 KiB) Viewed 1826 times
- image.jpeg (83.57 KiB) Viewed 1826 times
- image.jpeg (71.66 KiB) Viewed 1826 times
- image.jpeg (89.02 KiB) Viewed 1826 times
- image.jpeg (86.2 KiB) Viewed 1826 times
- image.jpeg (67.27 KiB) Viewed 1826 times
Modestas97
- Modestas97
-
New Member

-
Posts:
-
Joined:Thu Jul 07, 2016 2:41 pm
cleaned really deep  wiped,brushed
first attempt, setup
new tungsten (2.4mm)
second attempt, foot pedal on
and boom huge difference, even sound is different
but still can't put filer in , feels like it's too much heat,
could it be too big tungsten?
which size is most common?
I thought tungsten is color coded, but yesterday try to order with 2% lanthanated, and found red or blue coded,is there any different?
thanks
- image.jpeg (62.3 KiB) Viewed 1826 times
- image.jpeg (51.8 KiB) Viewed 1826 times
- image.jpeg (56.63 KiB) Viewed 1826 times
- image.jpeg (50.4 KiB) Viewed 1826 times
- image.jpeg (56.04 KiB) Viewed 1826 times
- image.jpeg (55.04 KiB) Viewed 1826 times
- image.jpeg (54.57 KiB) Viewed 1826 times
which size is most common?
I thought tungsten is color coded, but yesterday try to order with 2% lanthanated, and found red or blue coded,is there any different?
thanks
There is enough crud on that gas lens that it needs to be replaced. It is very likely it is not flowing shielding gas the way it is supposed to. Looks thoroughly clogged. There is definitely a gas delivery issue, which is the cause of the black soot (presence of oxygen in the welding arc).
Depending on the torch-side configuration of your teflon insulator for the large gas lens, you might indeed need the original stock insulator in place for proper sealing.
Here you can see the inner "lip" on my large-gas-lens insulator.
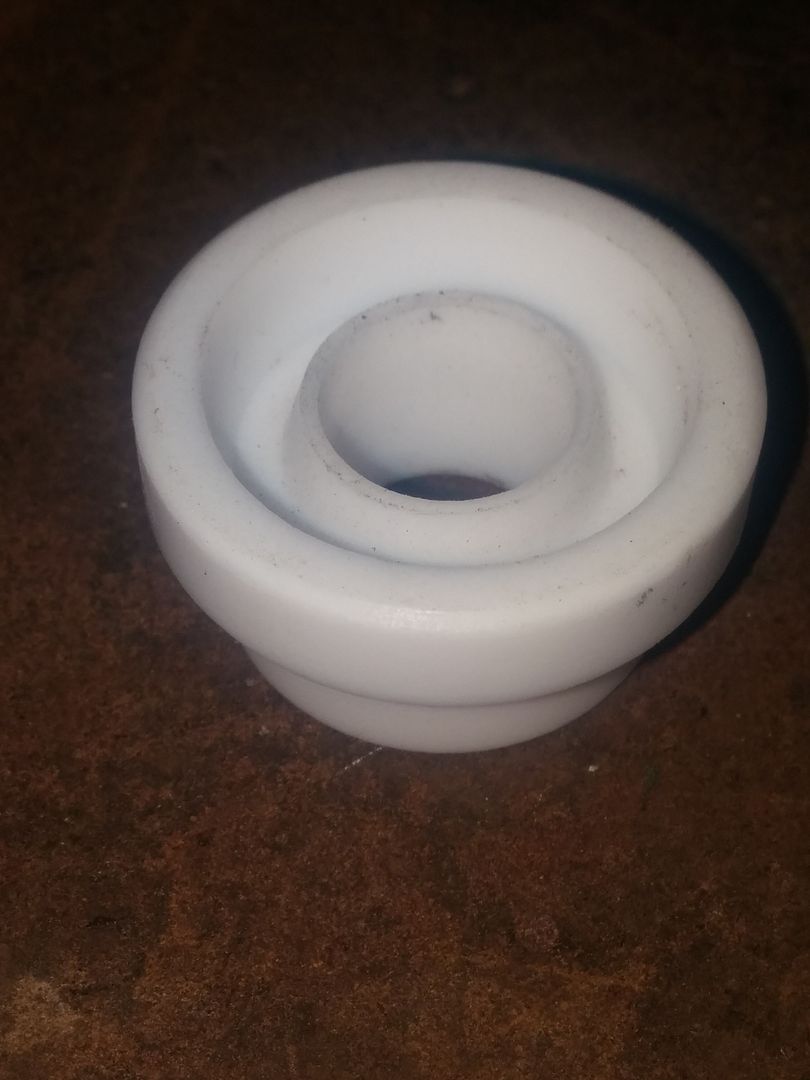
It prevents proper sealing at the torch body because it lines up with the rubber on the torch head, and does not slip nor over nor under the rubber edge.
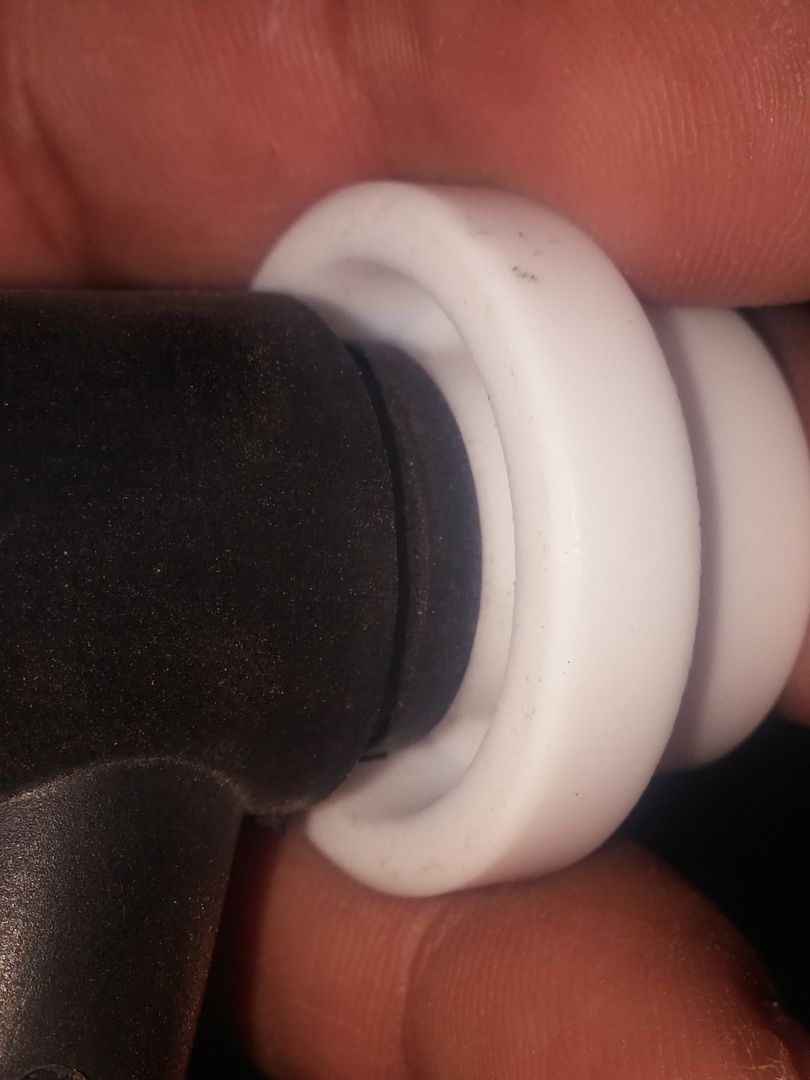
BUT, it does slip inside of the stock insulator like so...
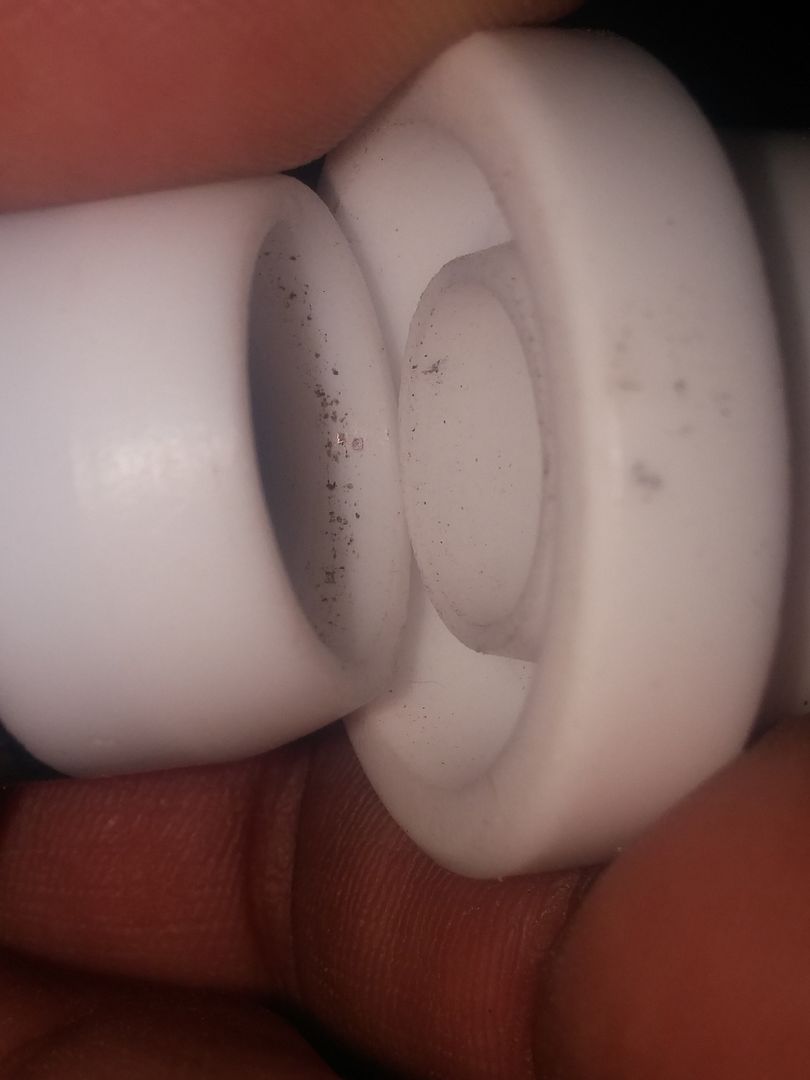
Assembled, it creates a nice tight fit that upon tightening down the cup, the insulators are pressed together and against the torch, and to the cup from having tightened it down. This is with full thread-engagement of the collet body within the torch head, as I can feel it bottom-out.
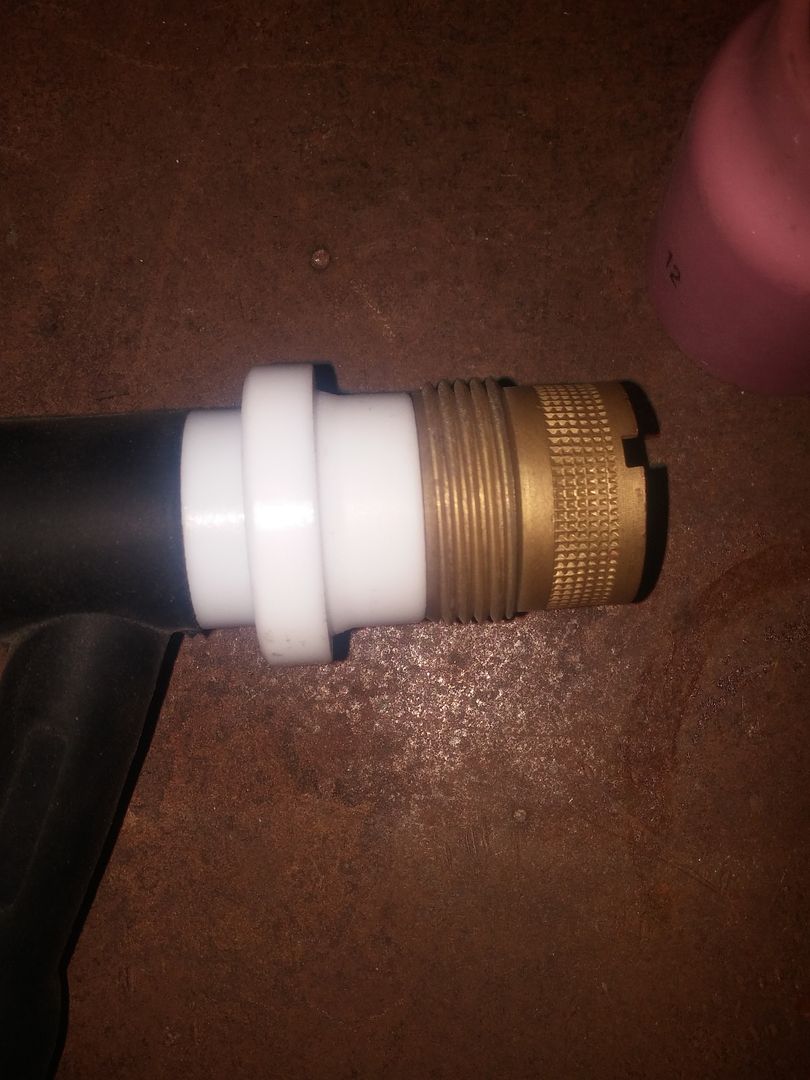
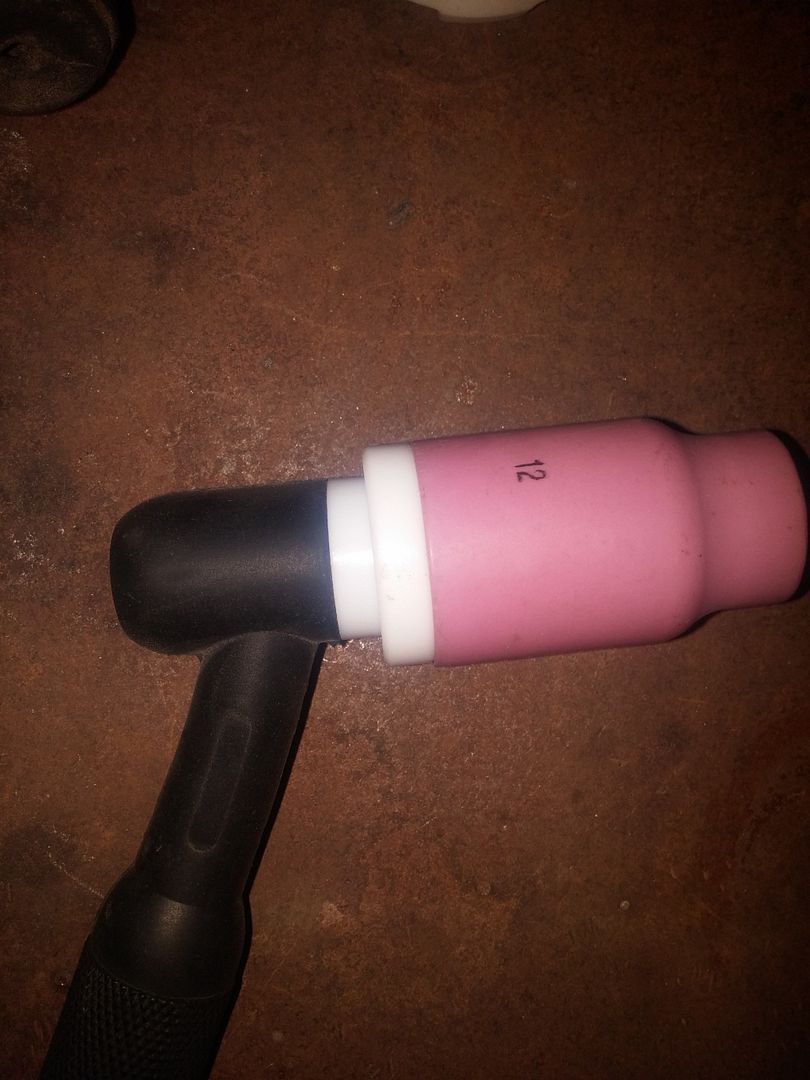
Although, now I do an issue where, from the picture, it seems like you're also getting the same results with the stock collet body/cup(?). If so, then the gas issue is elsewhere and likely not at the torch, since the single insulator is enough in that case. Are you positive you are getting an AC welding arc? I know you set it to AC, but are you getting an AC arc? Can you hear it "flutter" compared to DC welding?
Also, I just noticed you mentioned this earlier: "been welding with mig for a long time,and its looks like gas issue, ", Are you sure your supplier didn't give you a bottle of C25 used for MIG welding?
Depending on the torch-side configuration of your teflon insulator for the large gas lens, you might indeed need the original stock insulator in place for proper sealing.
Here you can see the inner "lip" on my large-gas-lens insulator.

It prevents proper sealing at the torch body because it lines up with the rubber on the torch head, and does not slip nor over nor under the rubber edge.

BUT, it does slip inside of the stock insulator like so...

Assembled, it creates a nice tight fit that upon tightening down the cup, the insulators are pressed together and against the torch, and to the cup from having tightened it down. This is with full thread-engagement of the collet body within the torch head, as I can feel it bottom-out.


Although, now I do an issue where, from the picture, it seems like you're also getting the same results with the stock collet body/cup(?). If so, then the gas issue is elsewhere and likely not at the torch, since the single insulator is enough in that case. Are you positive you are getting an AC welding arc? I know you set it to AC, but are you getting an AC arc? Can you hear it "flutter" compared to DC welding?
Also, I just noticed you mentioned this earlier: "been welding with mig for a long time,and its looks like gas issue, ", Are you sure your supplier didn't give you a bottle of C25 used for MIG welding?
noddybrian
- noddybrian
-
Weldmonger

-
Posts:
-
Joined:Thu Jan 24, 2013 12:13 pm
The gas lens is dirty - but this looks like smoke rather than anything solid & should brush off if careful - looking though the whole post I think we can assume it's new & the dirt is from about a dozen bad arc starts so not time to renew - but it still begs the question why ? also why use a large gas lens on aluminum at all ? I'd use a regular 6 or 7 for most stuff like that - in the last pics you seem to have got a clean area albeit melted using a regular collet body so I think it's safe to say there is a problem with the gas lens - I still think it's you left out one spacer - the regular one stays on the torch & you add the gas lens one unless it's a special 1piece which I don't think it is - now you don't have back smoke it should mean you have gas cover & can weld - only thing is you seem to have the machine set on 200amps on much thinner sheet so it's melted through quite quickly especially as no filler was added - also the ball on the tungsten is telling you to move up a size to 1/8" & of choice use something more suitable than Thoriated - in answer to your color question - most makes have standardized now so Thoriated is red ( if 2% - there is also 1% yellow ) dark(ish) blue is 2% Lanthanated - ( there is also 1.5% gold - nowhere near as good ) - if your looking on Ebay the picture is often a library picture - not the actual item your buying so color can be anything - some listing are multiple so if you select a tungsten from the drop down box the picture will update to match what your buying.
gas lens etc are considered consumables.
Everlast 250EX
Miller 250 syncrowave
Sharp LMV Vertical Mill
Takisawa TSL-800-D Lathe
Coupla Bandsaws,Grinders,surface grinder,tool/cutter grinder
and more stuff than I deserve(Thanks Significant Other)
Miller 250 syncrowave
Sharp LMV Vertical Mill
Takisawa TSL-800-D Lathe
Coupla Bandsaws,Grinders,surface grinder,tool/cutter grinder
and more stuff than I deserve(Thanks Significant Other)
@Southpaw
Would you have a make and part number for that middle heat shield please?soutthpaw wrote:Most gas lens collets are assembled like this0226161259a.jpgSent from my VK815 using Tapatalk
Flat out like a lizard drinkin'
Kevin_Holbrook
- Kevin_Holbrook
-
Active Member

-
Posts:
-
Joined:Wed Oct 15, 2014 1:02 am
i believe it's this oneColdman wrote:@SouthpawWould you have a make and part number for that middle heat shield please?soutthpaw wrote:Most gas lens collets are assembled like this0226161259a.jpgSent from my VK815 using Tapatalk
genuine Weldcraft TIG torch replacement Gas Lens Gasket Insulator. Suitable for all 17, 18 and 26 series TIG torches.
http://store.cyberweld.com/wegaslegain5.html
I just wanna add, that is an insulator for a medium gas lens, not a large gas lens. Not that it was implied any other way, just saying.Kevin_Holbrook wrote:i believe it's this oneColdman wrote:@SouthpawWould you have a make and part number for that middle heat shield please?soutthpaw wrote:Most gas lens collets are assembled like this0226161259a.jpgSent from my VK815 using Tapatalk
genuine Weldcraft TIG torch replacement Gas Lens Gasket Insulator. Suitable for all 17, 18 and 26 series TIG torches.
http://store.cyberweld.com/wegaslegain5.html
HTP sells a 1pc insulator for medium gas lens for 17/18/26 torches, as well. I like it.
That one for the medium gas lens setup, I know I got mine when I ordered my gas lens kit for my wp17 torch. I'm pretty sure they can order this stuff in bulk and package it up. I think it might be worth calling and asking. Perhaps tack it along with more things to get free shipping.Coldman wrote:Thanks Kev, I will give them a go.
Thanks Oscar. Haven't been able to identify the HTP 1 piece from my end yet.
Thanks Oscar.
Coming from down under (the backside of the world) I'm unlikely to get free freight from Uncle Sam.
I did order some 54N01's from riverweldstore in PRC and got free postage for about a buck each to try. Sang choi bow for dinner tonight in celebration. Yay.
Coming from down under (the backside of the world) I'm unlikely to get free freight from Uncle Sam.
I did order some 54N01's from riverweldstore in PRC and got free postage for about a buck each to try. Sang choi bow for dinner tonight in celebration. Yay.
Flat out like a lizard drinkin'
noddybrian
- noddybrian
-
Weldmonger

-
Posts:
-
Joined:Thu Jan 24, 2013 12:13 pm
While we've slightly got off topic on insulators does anyone know what is the white plastic materials correct name ? and can it be bought online - I was looking into the 1piece insulator but so far not had much luck when it occurred to me it is far simpler just to make them on a lathe but not sure out of what - I don't have much stock of plastics - couple I know are low temp plus " Delrin " did wonder if " Delrin " would work or if it would melt .
noddybrian wrote:While we've slightly got off topic on insulators does anyone know what is the white plastic materials correct name ? and can it be bought online - I was looking into the 1piece insulator but so far not had much luck when it occurred to me it is far simpler just to make them on a lathe but not sure out of what - I don't have much stock of plastics - couple I know are low temp plus " Delrin " did wonder if " Delrin " would work or if it would melt .
If I'm not mistaken, it's made out of Teflon, or a teflon like material. The more correct search term is "tig torch teflon insulator". Turns out to be the very first one once you go to Google Images, from Arc Zone. Looks like it is a CK exclusive product, which doesn't surprise me because HTP deals with CK Worldwide:
https://www.arc-zone.com/insulator-3ghs
Also good to know that CK makes a similar one for large-diameter gas lens collet bodies. I might give it a shot. Only $10.
https://www.arc-zone.com/insulator-3ghsld
noddybrian
- noddybrian
-
Weldmonger

-
Posts:
-
Joined:Thu Jan 24, 2013 12:13 pm
Thanks for the links Oscar - I did eventually find them over here - there is one place that keeps some CK stuff but after trying to deal with them in the past I might just order some round stock from Ebay & make some - it will be way easier & I can make them a good fit for the torch.
Modestas97
- Modestas97
-
New Member

-
Posts:
-
Joined:Thu Jul 07, 2016 2:41 pm
so finally got my tungstens posted,
first attempt,
why it started cracking ??? ( it didn't cool down to quickly )
so after all frustration, I pull all levelers down and finally got really nice melting process.
what you guys think, which levelers I need to try adjust more,and which I don't need at all??
and I did try with extra insulator, didn't make any difference...
first attempt,
- image.jpeg (59.9 KiB) Viewed 1867 times
- image.jpeg (58.03 KiB) Viewed 1867 times
so after all frustration, I pull all levelers down and finally got really nice melting process.
- image.jpeg (48.96 KiB) Viewed 1867 times
- image.jpeg (79.92 KiB) Viewed 1867 times
- image.jpeg (65.21 KiB) Viewed 1867 times
and I did try with extra insulator, didn't make any difference...
- image.jpeg (64.32 KiB) Viewed 1867 times
How thick is that aluminum ? And do you know what kind it is? if it is leftover scrap material where did it come from. That may help figuring out what kind of aluminum it is and if it's contaminated. If you shut off your gas tank how long does it take for the gauge to read zero pressure?
I have more questions than answers
Josh
Josh
noddybrian
- noddybrian
-
Weldmonger

-
Posts:
-
Joined:Thu Jan 24, 2013 12:13 pm
Front panel is basically OK except AC balance is set on 50 /50 again so your going to fry tungsten - average setting - 2-1/2
without knowing material thickness cannot comment much on amps except if it takes more than around 3 >4 seconds to puddle it's too low & if if does then your trying to learn on way thin material which is very hard especially without using the pedal that is just complicating matters - as I think was previously mentioned get something like 1/8" & start around 130amps till you see how your machine behaves also as Poland308 mentioned try to get a known clean sample to try out on
insulators look correct now but lack of etch zone & slight smoke residue still suggests gas cover issues - but on the bright side you have a quite clean looking weld on the last few tries so you have virtually cracked it - only thing that would help is to find someone close enough to you that would give you some tuition & maybe try it on their gas to rule out that variable - I'm fairly sure there are at least a couple of fellow Paddy's on here - maybe look them up ?
The cracks I would think are on the backside burn through of a run without filler which is normal - aluminum does not autogenous weld any sense.
Good luck - hope to see further improvement.
To me it still appears to be a gas coverage issue. If I try and figure out what is happening, in my mind I can "see" the wind blowing your shielding gas away, then the wind stopped and you finally got to lay a few good beads in that last pictures. The bead suddenly started looking decent so I know you couldn't have reached over and messed with the setting while you were welding---so that says that something else was at play. I don't remember if I have asked this before: Are you welding outdoors where there are wind drafts (even the slightest)??
noddybrian
- noddybrian
-
Weldmonger

-
Posts:
-
Joined:Thu Jan 24, 2013 12:13 pm
All things do point to gas - that model has no pre-flow so maybe that's what happens if you don't use the post flow to get gas cover before starting - initial arc / puddle has momentary lack of gas & oxidizes / contaminates - this floats along for a short distance then gradually cleans up ? - hard to really judge without seeing what 's going on - a video might get to the bottom of it - seems odd there is no noticeable etch zone despite him using 50/50 AC balance - or we're all missing something .
Where's that milky looking smoke coming from? The only times I see anything do that is when welding galvanized or when I welded that cast aluminum a couple of days ago.
Raymond
Everlast PowerTIG 255EXT
Everlast PowerTIG 255EXT
Kevin_Holbrook
- Kevin_Holbrook
-
Active Member

-
Posts:
-
Joined:Wed Oct 15, 2014 1:02 am
that's the magnesium burning from lack of shielding gasRamboBaby wrote:Where's that milky looking smoke coming from? The only times I see anything do that is when welding galvanized or when I welded that cast aluminum a couple of days ago.
most likely the cup was too far away from the puddle
Return to “Tig Welding - Tig Welding Aluminum - Tig Welding Techniques - Aluminum Tig Welding”
Jump to
- Introductions & How to Use the Forum
- ↳ Welcome!
- ↳ Member Introductions
- ↳ How to Use the Forum
- ↳ Moderator Applications
- Welding Discussion
- ↳ Metal Cutting
- ↳ Tig Welding - Tig Welding Aluminum - Tig Welding Techniques - Aluminum Tig Welding
- ↳ Mig and Flux Core - gas metal arc welding & flux cored arc welding
- ↳ Stick Welding/Arc Welding - Shielded Metal Arc Welding
- ↳ Welding Forum General Shop Talk
- ↳ Welding Certification - Stick/Arc Welding, Tig Welding, Mig Welding Certification tests - Welding Tests of all kinds
- ↳ Welding Projects - Welding project Ideas - Welding project plans
- ↳ Product Reviews
- ↳ Fuel Gas Heating
- Welding Tips & Tricks
- ↳ Video Discussion
- ↳ Wish List
- Announcements & Feedback
- ↳ Forum News
- ↳ Suggestions, Feedback and Support
- Welding Marketplace
- ↳ Welding Jobs - Industrial Welding Jobs - Pipe Welding Jobs - Tig Welding Jobs
- ↳ Classifieds - Buy, Sell, Trade Used Welding Equipment
- Welding Resources
- ↳ Tradeshows, Seminars and Events
- ↳ The Welding Library
- ↳ Education Opportunities

