Tig welding tips, questions, equipment, applications, instructions, techniques, tig welding machines, troubleshooting tig welding process
Gordian79
  • Posts:
  • Joined:
    Thu Aug 20, 2015 11:28 pm

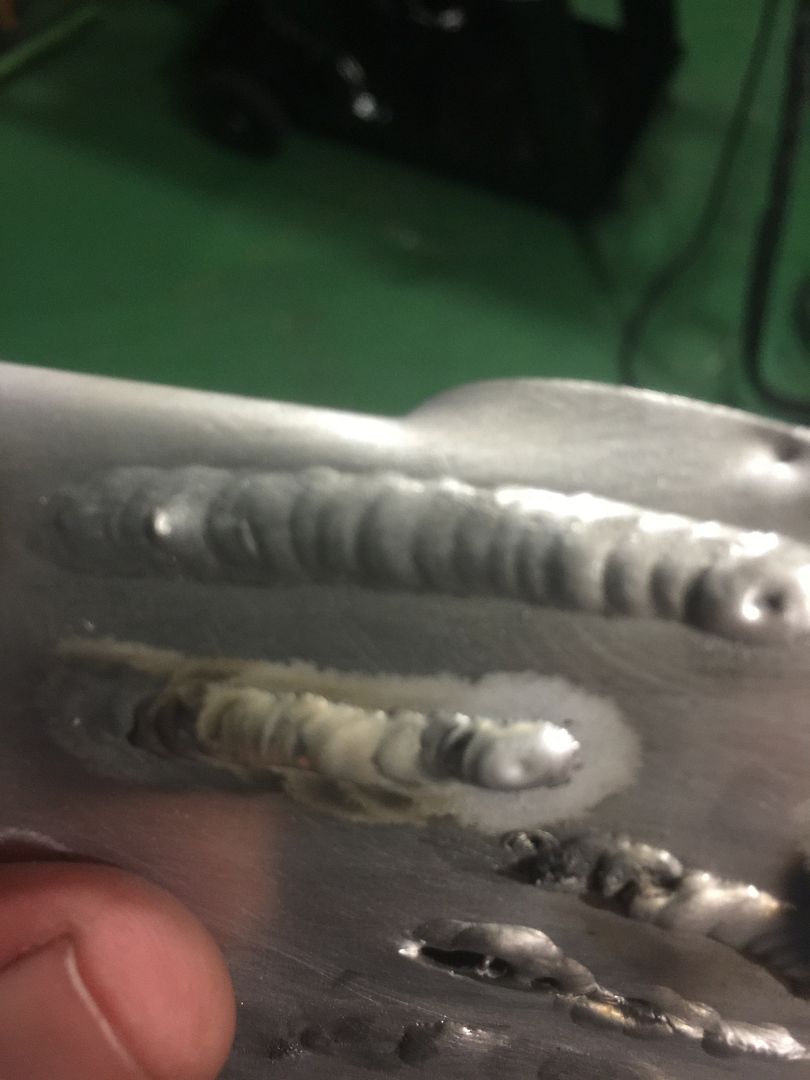
I just picked up a Miller Diversion 180.Ive never welded before.Im trying to weld aluminum tubing.When I try to weld two pieces I blow holes into tubing.When I weld on tubing surface itself I do ok for first timer.
Here's my settings
2mm thick aluminum tubing not sure what type
1/16 ER5356 filler
Gas lens #8 cup
3/32 2% Ceriated Tungsten
Argon 20cfh
60amps
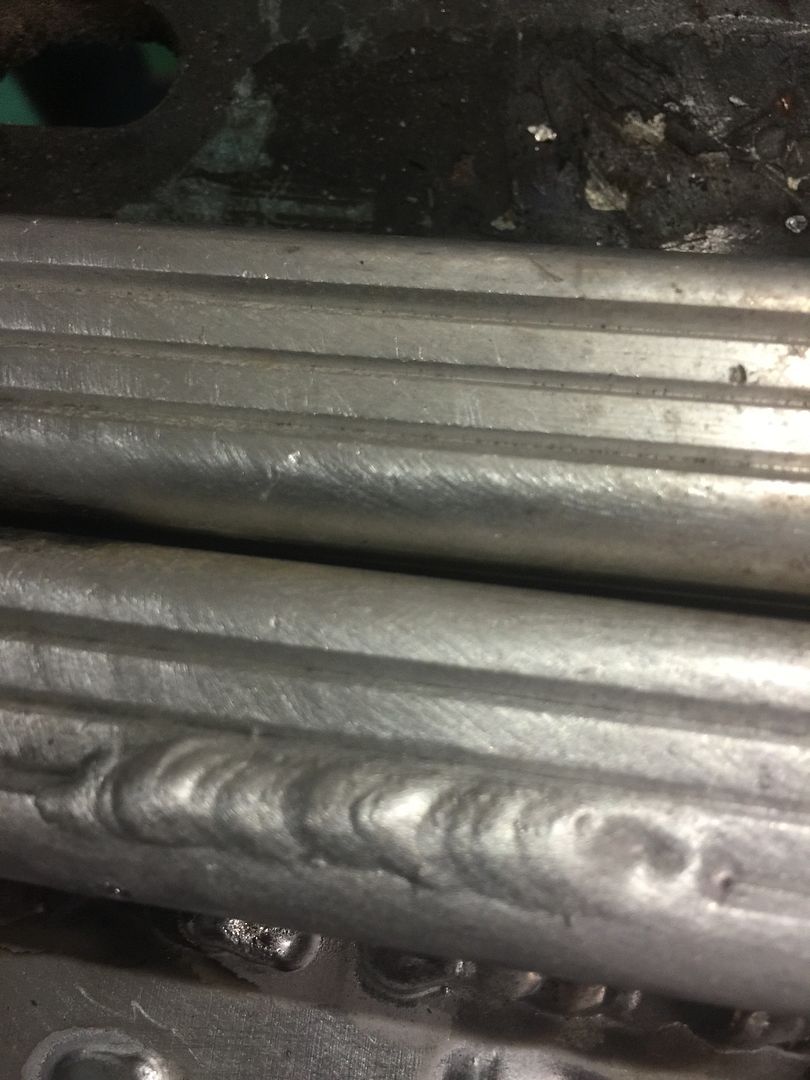
Below are some pics of how I did on the surface of tubing.
Image

Image
exnailpounder
  • Posts:
  • Joined:
    Thu Dec 25, 2014 9:25 am
  • Location:
    near Chicago

Welcome aboard! If you have never welded before, starting on Aluminum is going to drive you insane. I would get some mild steel and practice there for awhile before tackling Alum. You need to practice pedal (amps) control, arc length, settings, tungsten prep, and a bunch of things first before setting out on Alum. Your taking the hard road uphill. I know tigging Aluminum is cool but trust me, the world will not beat a path to your door because you can weld aluminum. Watch Jodys videos, and practice, practice, practice and youll get where you want to be. Good luck and let us know how it goes.
Ifyoucantellmewhatthissaysiwillbuyyouabeer.
  • Posts:
  • Joined:
    Thu May 07, 2015 11:46 am
  • Location:
    KY.

I don't know exactly what you are doing, but I would guess that you are not getting the 2 pieces to join. You need to get a puddle started on the edges and stab the wire in the puddle to get them both joined. Then keep the arc on the leading edge of the puddle and use the wire to make the 2 pieces flow together as you move forward. Keep the arc length as short as possible without sticking the tungsten in the puddle, and don't lean the torch. Thy to keep the torch angle as straight as possible. If you lean the torch you are going to melt the end of the wire before it gets to the puddle.
Freddie
aeroplain
  • Posts:
  • Joined:
    Tue Jun 03, 2014 10:15 pm
  • Location:
    Minnesota

Welcome to the forum!

Better suggestions will come soon from others, but from where I sit:
Use 3/32 filler
turn up the amps to about125
get a puddle fast and start moving. This is easier said than done when you have no muscle memory yet.
When I started to TIG it was on Alum. Learning curve was very shallow as I learned from the worst, Me.:)
It also appears to be rail stock from a boat you are practicing on and those grooves can give you fits in the
cleaning aspect of things. I strongly suggest watching Jody's videos and sit at the bench welding on flat
sheet til you get in the groove; at least til you're happy.

Kent
Boomer63
  • Posts:
  • Joined:
    Fri Sep 12, 2014 11:52 am
  • Location:
    Indiana near Chicago

All great comments so far, and here is my two cents!
Clean your metal. Stainless steel wire brush. Make darn sure your angles for your TIG torch and your filler rod are correct. Don't keep moving the filler rod out of the gas envelope. Remember, Jody makes it look a whole lot easier than it is!

There is a lot, lot more to being a welder than knowing a bit about welding. I do trainings at companies where I teach a few employees to do a single process, on a single metal, in a single position. Being able to do those things does NOT make you a welder! Multiprocess, multiple position, understating of basic metallurgy, metal fab and fit up skills and a whole lot of experience makes you a welder! Remember, all of us are always on the journey! No one knows it all, has done it all or is the ultimate authority. Never look down at someone because of their skill level; help them, encourage them and support them. We are a community of highly diverse people and skills; which is what makes welders such interesting people!
User avatar
  • Posts:
  • Joined:
    Sat Mar 30, 2013 11:49 am
  • Location:
    Sweden

Superior welding challenged me to do an aluminum welding drill by starting with a plate and just lay bead after bead.
My practise plate have been built up 35 mm and it have certainly improved my alu weld.

I can recomend this drill to learn how to manipulate the pool with heat, filler rod and torch movement.
IMG_20150821_50586.jpg
IMG_20150821_50586.jpg (42.56 KiB) Viewed 1956 times
User avatar
  • Posts:
  • Joined:
    Wed Aug 19, 2015 11:19 pm
  • Location:
    Alaska

So I am a Newbie too; so this is like a 2nd grader explaining Algebra to a 1st grader but here are some things that I have done that helped.
1. Keep a journal and write down settings, what your welding and results. Really nice to have when something works and you want to repeat it a week later.
2. Get a small piece of filler rod and practice feeding it through your hand until it is second nature. This is one of the single best things I did to improve my TIG welding. It also makes long and boring meetings more bearable.
3. Start with some thicker Aluminum, I used 3/16 flat and 1/8 for joints.
4. Get a 10" x 10" sheet and do the welding drill, I got a scrap piece at my local weld shop where I buy all the stuff to support my addiction. For practice, you will probably use around 110 amps on flat metal as a start point. I think I got down to 80 amps at one point when the metal got hot. The TIG Fingers do work very well.
5. Start by using about 85% EN for practice. It's clean aluminum and scrap anyways and the better penetration makes practice easier. Also, when you touch the tungsten, which you will, the aluminum doesn't jump to the tungsten so bad. When practicing, unless I touched the tungsten bad enough to affected the arc significantly, I just kept welding.
6. Practice welding to music or count seconds so you get a rhythm for moving forward and adding filler.
7. As a gauge for practice, with a torch switch if your puddle doesn't form within about 3 seconds, you don't have enough amps, if it forms much faster than 2 seconds your too hot. With a foot pedal you have more control but I used a torch switch to start practicing and have just started with a foot pedal. Have trouble doing three things at once.
Here are the settings I used on my last project for an 1/8"x1/8" outside corner joint just for an example. Preflow-0.5s, Start Amps-50, Upslope-3s, Weld Amps-130, Freq-130, DCEN-85%, Downslope-5s, End Amps-5, Postflow-5s, Argon 18cfm, #6 cup, 3/32" 5356 rod, 3/32" 2% Lanthanated Tungsten. Used torch switch and upslope / downslope to control heat.
Attachments
Boatbox1.jpg
Boatbox1.jpg (128.71 KiB) Viewed 1941 times
Jim S.
Miller 211 Autoset
Everlast 255EXT
Everlast Water Cooler (2)
Everlast PowerPlasma 80S
Longevity 250MP
Lincoln 350MP Aluminum
Hypertherm 30Air
Everlast 350EXT
User avatar
  • Posts:
  • Joined:
    Thu Jan 06, 2011 11:40 pm
  • Location:
    Near New Orleans

Jim, that's a boatload of sound advice.

You underestimated yourself in the algebra analogy.

Steve S
Bill Beauregard
  • Posts:
  • Joined:
    Thu Jan 24, 2013 9:32 pm
  • Location:
    Green Mountains of Vermont

You're stuck at 72% Electrode negative, meaning you must clean very well. Frequency adjustment would help you, but 120 is where you live. Helium inclusion with your argon would help. Mostly it's technique. You will have issues welding over gaps for now. The magic is to soak the pieces with heat letting the cleaning action of the EP drive away oxide and contaminants, Puddle each side, then wash, or dab filler to form a bridge. Soak enough heat to flow liquid filler to the bottom of the gap, then move ahead. Keep your arc at about 80 degrees focused on the edge of the "lava flow" Allowing the arc to blow between the half's being joined can cause shielding issues. A very short arc can be attained with an OVE GLOVE. Protecting your hand from heat and steadying close can improve arc length. Find a filler size that works for you. I'd try 3/32". Either dab filler quickly, or find a way to come from a direction the torch arc won't heat the filler. It is critical that the heat that melts the filler be conducted from the puddle, not the torch.
Bill Beauregard
  • Posts:
  • Joined:
    Thu Jan 24, 2013 9:32 pm
  • Location:
    Green Mountains of Vermont

Maxal 4943 is great filler. Its wetting action will improve the looks of your weld.
User avatar
  • Posts:
  • Joined:
    Wed Aug 19, 2015 11:19 pm
  • Location:
    Alaska

The other thing I do is watch a video and then try to emulate it the best I can. It seems to help to see the technique and then practice it while it is fresh. Thanks Steve.
Jim
Attachments
IMG_3590.JPG
IMG_3590.JPG (54.82 KiB) Viewed 1113 times
Jim S.
Miller 211 Autoset
Everlast 255EXT
Everlast Water Cooler (2)
Everlast PowerPlasma 80S
Longevity 250MP
Lincoln 350MP Aluminum
Hypertherm 30Air
Everlast 350EXT
Boomer63
  • Posts:
  • Joined:
    Fri Sep 12, 2014 11:52 am
  • Location:
    Indiana near Chicago

shipj0 wrote:So I am a Newbie too; so this is like a 2nd grader explaining Algebra to a 1st grader but here are some things that I have done that helped.
1. Keep a journal and write down settings, what your welding and results. Really nice to have when something works and you want to repeat it a week later.
2. Get a small piece of filler rod and practice feeding it through your hand until it is second nature. This is one of the single best things I did to improve my TIG welding. It also makes long and boring meetings more bearable.
3. Start with some thicker Aluminum, I used 3/16 flat and 1/8 for joints.
4. Get a 10" x 10" sheet and do the welding drill, I got a scrap piece at my local weld shop where I buy all the stuff to support my addiction. For practice, you will probably use around 110 amps on flat metal as a start point. I think I got down to 80 amps at one point when the metal got hot. The TIG Fingers do work very well.
5. Start by using about 85% EN for practice. It's clean aluminum and scrap anyways and the better penetration makes practice easier. Also, when you touch the tungsten, which you will, the aluminum doesn't jump to the tungsten so bad. When practicing, unless I touched the tungsten bad enough to affected the arc significantly, I just kept welding.
6. Practice welding to music or count seconds so you get a rhythm for moving forward and adding filler.
7. As a gauge for practice, with a torch switch if your puddle doesn't form within about 3 seconds, you don't have enough amps, if it forms much faster than 2 seconds your too hot. With a foot pedal you have more control but I used a torch switch to start practicing and have just started with a foot pedal. Have trouble doing three things at once.
Here are the settings I used on my last project for an 1/8"x1/8" outside corner joint just for an example. Preflow-0.5s, Start Amps-50, Upslope-3s, Weld Amps-130, Freq-130, DCEN-85%, Downslope-5s, End Amps-5, Postflow-5s, Argon 18cfm, #6 cup, 3/32" 5356 rod, 3/32" 2% Lanthanated Tungsten. Used torch switch and upslope / downslope to control heat.
Thank you, Shipj0 for posting these comments! I really like when students interact with each other and share stories and experiences. For my part, I learned to weld so darn long ago that I don't remember the struggles and issues that noobs face. It is one thing to watch video of Jody doing it, then quite another thing to actually go and get the same result. This is a problem that more experienced guys have; they don't recall what it is like to be a noob. Also, being a noob is not just lacking the welding skills, it is learning all of the other things that go along with the welding skills. Just learning the language or being in the environment is a challenge!

As I am keying this in, I have an idea for a new thread ...!
  • Posts:
  • Joined:
    Thu May 07, 2015 11:46 am
  • Location:
    KY.

Gordian, you didn't mention a foot pedal. Are you using one? If not then that's going to make it harder for you to learn.

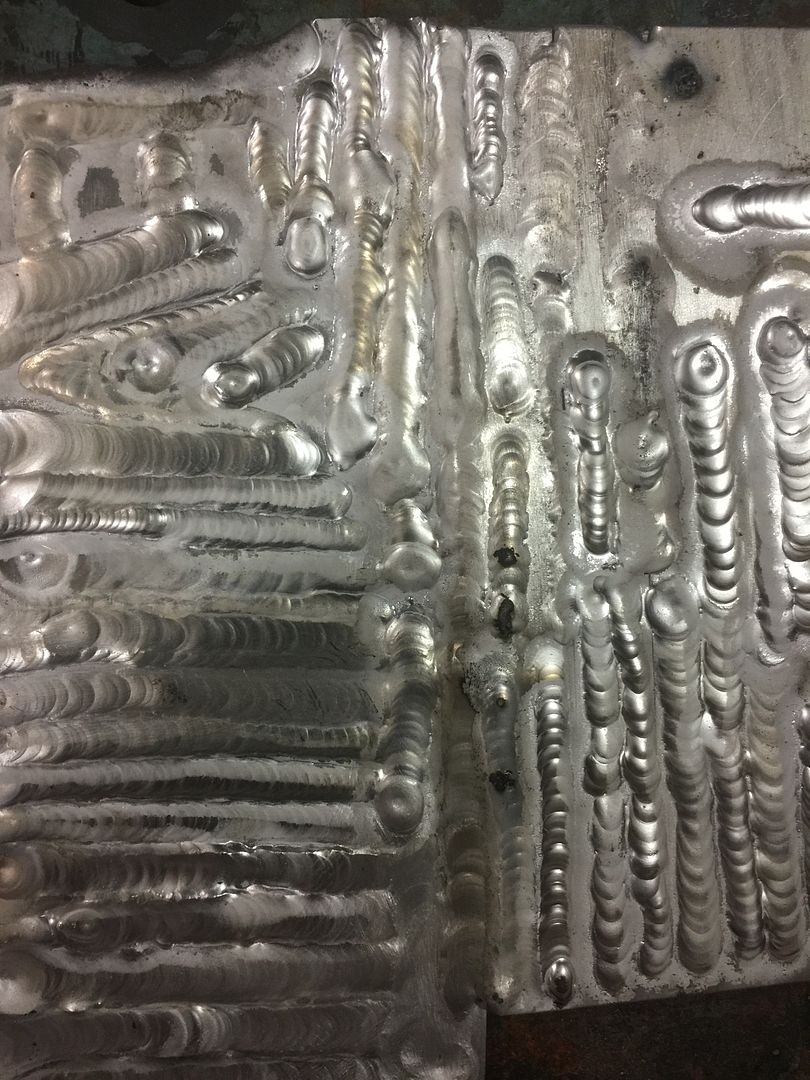
Practice will make you better. You can't practice too much. I know that argon is expensive, but weld as much as you can afford. I've been TIG welding for 30 years, but I still practice when I have time. I just get some scrap pieces and start welding in every direction.
Attachments
20150807_132400.jpg
20150807_132400.jpg (32.43 KiB) Viewed 1106 times
Freddie
Gordian79
  • Posts:
  • Joined:
    Thu Aug 20, 2015 11:28 pm

big gear head wrote:Gordian, you didn't mention a foot pedal. Are you using one? If not then that's going to make it harder for you to learn.

Practice will make you better. You can't practice too much. I know that argon is expensive, but weld as much as you can afford. I've been TIG welding for 30 years, but I still practice when I have time. I just get some scrap pieces and start welding in every direction.
Yes I am using a foot pedal.I kind of have a hook up for argon through my job.

Here's an update I'm just laying beads down and getting a better feel as to where puddle is going and getting a rhythm when dabbing in puddle.One thing I'm still trying to figure out is how not to melt material when I'm on the edge what do I have to do?

Here's update with what I did today.
Image
Gordian79
  • Posts:
  • Joined:
    Thu Aug 20, 2015 11:28 pm

shipj0 wrote:So I am a Newbie too; so this is like a 2nd grader explaining Algebra to a 1st grader but here are some things that I have done that helped.
1. Keep a journal and write down settings, what your welding and results. Really nice to have when something works and you want to repeat it a week later.
2. Get a small piece of filler rod and practice feeding it through your hand until it is second nature. This is one of the single best things I did to improve my TIG welding. It also makes long and boring meetings more bearable.
3. Start with some thicker Aluminum, I used 3/16 flat and 1/8 for joints.
4. Get a 10" x 10" sheet and do the welding drill, I got a scrap piece at my local weld shop where I buy all the stuff to support my addiction. For practice, you will probably use around 110 amps on flat metal as a start point. I think I got down to 80 amps at one point when the metal got hot. The TIG Fingers do work very well.
5. Start by using about 85% EN for practice. It's clean aluminum and scrap anyways and the better penetration makes practice easier. Also, when you touch the tungsten, which you will, the aluminum doesn't jump to the tungsten so bad. When practicing, unless I touched the tungsten bad enough to affected the arc significantly, I just kept welding.
6. Practice welding to music or count seconds so you get a rhythm for moving forward and adding filler.
7. As a gauge for practice, with a torch switch if your puddle doesn't form within about 3 seconds, you don't have enough amps, if it forms much faster than 2 seconds your too hot. With a foot pedal you have more control but I used a torch switch to start practicing and have just started with a foot pedal. Have trouble doing three things at once.
Here are the settings I used on my last project for an 1/8"x1/8" outside corner joint just for an example. Preflow-0.5s, Start Amps-50, Upslope-3s, Weld Amps-130, Freq-130, DCEN-85%, Downslope-5s, End Amps-5, Postflow-5s, Argon 18cfm, #6 cup, 3/32" 5356 rod, 3/32" 2% Lanthanated Tungsten. Used torch switch and upslope / downslope to control heat.
Thanks for your advice.I have been laying beads down and will continue to until it because second nature and I know exactly what torch is going to do.i need to practice edges as I keep blowing out material.i have a diversion 180 so I'm limited on settings.
User avatar
  • Posts:
  • Joined:
    Wed Aug 19, 2015 11:19 pm
  • Location:
    Alaska

Gordian79 wrote:Thanks for your advice.I have been laying beads down and will continue to until it because second nature and I know exactly what torch is going to do.i need to practice edges as I keep blowing out material.i have a diversion 180 so I'm limited on settings.
First, I would pat myself on the back, have a shot of Jameson, and enjoy a little success - that group of beads looks quite improved. There are plenty of frustrations still to come but that is part of the fun of succeeding so don't forget to celebrate.

Second, Hope one of the highly qualified folks on the website will chime in and give you some real advise, remember I am only a second grader. That said, I will tell you what I have done and maybe it will help or we will both get some advise to help us.

Disclaimer: You said that you are using a foot pedal and I have only started using mine so some of this is really based on using the torch switch. Also, I am not sure if you are talking about welding along an edge or towards an edge so I will share what I have learned so far on both. I use primarily 5XXX, 0.125" aluminum so the numbers I am giving are based on that material

I think that when welding towards the edge a lot of heat is being pushed in front of the weld as you approach, especially if your not moving along very quickly. What I do is start tapering off the amperage about 1/2" to 1" prior to the edge and add a little more filler rod while watching the puddle. If the puddle starts to shrink, I come back on the amperage a little, but not much, just enough to carry me to the end. It's kind of a timing thing. In the beginning when I was doing a little project and not just practicing, I would just stop the weld about an inch or two prior to the edge and let it cool a few seconds and then light back up on the last bead and finish out. Kind of cheating but it worked. Since I have been using a torch switch with 5s downslope and 3s upslope, I will come off the switch and let the machine taper down trying to get to the edge with just a couple seconds left so I guess you could use a 5 count as a starting point with a foot pedal. Right at the edge, I try to make sure that I am dabbing a little bit of rod in to help fill and cool the weld. I concluded one day that the torch heats the puddle and the filler rod cools the puddle, or at least that is my current idea (no pun intended). If I got a little extra hook from the filler on the edge, I just light back up on it and melt it in real quickly. It happens a little less these days but it still happens.

When welding along an edge on flat plate, like your practice piece, less amperage. I would guess if your using an 0.125" plate that about 80 to 100 amps max to start the bead and taper off a bit from there. Cold close to 100 amps and hot closer to 80. There is not much material on the edge of a sheet and it will melt away fast. I would try setting the max amps to 80 and hitting full power on the foot pedal then see how fast the edge wets out. If it wets out in under 2 seconds, come down 5 or so amps, if it takes longer than 3ish, come up 5 or so amps. After the edge wets out, taper off the power just to maintain the puddle. I don't know how much that would be but also add enough filler to keep it cool. If the Aluminum is already hot from earlier practice, it may take even less to get started. I try to start off with less amps and if it doesn't wet, I add amperage. When practicing, I don't like to sit on the metal and let it heat a lot before I get a puddle and start moving or the heat gets away from me. I know there is some technique to do that for cleaning the metal, but at my level, I just like to get a puddle formed within about 3 seconds and start moving.

I had a real quirky time with joints. I have found that I don't use a lot more amps for a butt joint than an edge, maybe 110amps I think on 0.125". I don't have my book with me. L Joints and T Joints (Fillet Welds?), I crank the amps up to get started, 130 to 140 amps to get that 3 second puddle start that I like. I had real trouble with trying to add rod before the puddle got started and the torch melted the rod instead of the puddle melting the rod. I just ended up with a big nasty ball of not quite melted aluminum instead of a nice clean puddle. When this happens, I first make sure I have a good torch angle and then add amperage if needed.

A couple other odd things I did on the practice piece that helped.

I ran several "beads" (maybe 20 or 30 mostly on the flat surface but some on the edges) with no filler and concentrated on keeping the tungsten close to the metal and the "puddle" a consistent size without burning through or melting out the edge. I still do this sometimes to warm up prior to welding.

I overlapped my beads by about half on the practice plate because I thought that this was a little more like welding a joint.

The latest thing I just learned is to relax my grip on the torch, that might have come from watching one of Jody's videos. I think before I was holding it like a 10 Caret diamond in a Pirate's Bar. Really made me tired, had less control of the torch and hard to slide my hand along the metal when I am tensed to the shoulder. Once I focused on relaxing my grip ... probably second best thing I did to improve my TIG welding.

Drank whiskey to celebrate or drown my sorrows after I was done; if it was the evening and I didn't have to drive. Maybe that was actually the best thing I did to improve my TIG welding. Only a little though, haven't gotten good enough for a big celebration...maybe in 20 years or so. Now I think you actually know everything I have learned so far. Cheers and keep on welding.
Jim S.
Miller 211 Autoset
Everlast 255EXT
Everlast Water Cooler (2)
Everlast PowerPlasma 80S
Longevity 250MP
Lincoln 350MP Aluminum
Hypertherm 30Air
Everlast 350EXT
User avatar
  • Posts:
  • Joined:
    Wed Aug 19, 2015 11:19 pm
  • Location:
    Alaska

big gear head wrote:Gordian, you didn't mention a foot pedal. Are you using one? If not then that's going to make it harder for you to learn.

Practice will make you better. You can't practice too much. I know that argon is expensive, but weld as much as you can afford. I've been TIG welding for 30 years, but I still practice when I have time. I just get some scrap pieces and start welding in every direction.
Like that practice plate. Looks like a cityscape. Think I may try something like that.
Jim S.
Miller 211 Autoset
Everlast 255EXT
Everlast Water Cooler (2)
Everlast PowerPlasma 80S
Longevity 250MP
Lincoln 350MP Aluminum
Hypertherm 30Air
Everlast 350EXT
User avatar
  • Posts:
  • Joined:
    Sat Jul 06, 2013 11:16 am
  • Location:
    Near Pittsburgh,Pennsylvania. Steel Buckle of the Rust Belt

It's been a very long time since I learned to Tig weld so I have to try and remember what made it easier when I was learning. The biggest thing that comes to mind is to go to a bigger rod. Feeding a 1/16 rod will give you fits until you learn how to control the puddle. I still find it easier to use a bigger rod and let the puddle take in what it needs to wet out and give me the width I need. Buy a pound of 4043 1/8" and a pound of 5356 1/8" and see which one you like better.

Using the same settings as your Diversion has I've welded a little practice pad and it seemed to weld very well so I don't think that your machine is the limiting factor here. Practice is usually what's in order, all the adjustments that are available on these machines are really not necessary to get good welds.

When your puddle starts to get grainy and flat it's overheated, so either back off on the pedal or add more rod. You can also pump the pedal and add rod and back off as you advance to limit the heat input into the parent metal. Kind like a manual pulse. It helps learn timing and gives you a chance to see how the filler rod cools the puddle.

Another thing that helps is to start in from the corner when trying to establish your initial puddle then just back up to the corner and weld right on through where you started.

Len
Now go melt something.
Instagram @lenny_gforce

Len
Bill Beauregard
  • Posts:
  • Joined:
    Thu Jan 24, 2013 9:32 pm
  • Location:
    Green Mountains of Vermont

One revelation for me was learning that like my handwriting, freehand wasn't gonna work for me. Find a way to steady your torch hand. Short welds, almost anything works. I stumbled on some copper blocks. They are various sizes including 5x3.5x2, 2x3x1-1/2, and 1.5" square x various length. Laying them on the table often gives me something to rest my hand in a comfortable place parallel to the weld bead. Other times bar clamps, pipe clamps, or for repetitive welds, a piece of stock erected parallel. With a good rest, you can shorten arc length, that's a good thing! Not dipping your tungsten as often is a bonus too.

Then heat must be considered. If you are burning your hand, you aren't very steady. I use OVE GLOVES. I get them at CVS Pharmacy, or a kitchen store. Jody sells TIG FINGER, get both standard and big.
  • Posts:
  • Joined:
    Thu May 07, 2015 11:46 am
  • Location:
    KY.

When you get close to an edge you need to back off on the pedal. Pay close attention to the width of the bead and when it starts getting wider back off on the heat. Pulsing works very well and is something that you should practice. Push the pedal down and get a puddle started, dip the rod and let it melt in, then back off of the pedal without loosing the arc. Then move forward just a little and do the same thing again. It's kind of like making a bunch of tack welds connected together. This works very well around edges. Also there is nothing wrong with making short welds, repositioning your hands and starting back where you stopped.
Freddie
Gordian79
  • Posts:
  • Joined:
    Thu Aug 20, 2015 11:28 pm

big gear head wrote:When you get close to an edge you need to back off on the pedal. Pay close attention to the width of the bead and when it starts getting wider back off on the heat. Pulsing works very well and is something that you should practice. Push the pedal down and get a puddle started, dip the rod and let it melt in, then back off of the pedal without loosing the arc. Then move forward just a little and do the same thing again. It's kind of like making a bunch of tack welds connected together. This works very well around edges. Also there is nothing wrong with making short welds, repositioning your hands and starting back where you stopped.
I'm going to try that I figure that happens because as I'm welding the piece gets hotter so I won't need as much heat.
  • Posts:
  • Joined:
    Thu May 07, 2015 11:46 am
  • Location:
    KY.

Another problem that I have with aluminum, and most other metals too, is when I get to an edge air will come up over the edge and contaminate the end of the weld. Sometimes I stop short of the edge and turn around and start on the edge and run back toward where I stopped. Sometimes it's hard to turn the torch so that you can get coverage at the edge of something. If you notice that your weld gets nasty looking when you get to the edge then you need to try some method to stop air from coming over the edge and getting into your weld. Some people use a scrap piece for a run off tab, so that they just continue the weld right onto the scrap. You can also build a dam at the edge with aluminum foil or something else.
Freddie
Post Reply