Tig welding tips, questions, equipment, applications, instructions, techniques, tig welding machines, troubleshooting tig welding process
Bill Beauregard
- Bill Beauregard
-
Weldmonger

-
Posts:
-
Joined:Thu Jan 24, 2013 9:32 pm
-
Location:Green Mountains of Vermont
I went from a Diversion 180 inverter to a Dialarc 250 (310 amps 50/50 but sine wave) to a Dynasty 280DX. It is amazing what I can weld through with the square wave even at 70%! Cleaning action is so much more effective with square wave!
Dragster Guy
- Dragster Guy
-
Active Member

-
Posts:
-
Joined:Wed Jun 11, 2014 7:19 am
-
Location:Pasadena MD
This is what i did today.
- Attachments
-
- 20140924_140958.jpg (49.89 KiB) Viewed 2614 times
Performance Metal Works
Pasadena MD
Pasadena MD
dirtmidget33
- dirtmidget33
-
Heavy Hitter

-
Posts:
-
Joined:Tue May 13, 2014 5:22 pm
@Zank
Got a question about your back purge set up if you wouldn't mind. I am planning to do some frames not bikes but am looking for ideas for sealing and doing the back purge. Does you jig just use the taper of the mounts that hold it to seal the tubing up or do you have some type of seal on them. Also where your argon comes in for the back purge do you have a diffuser inside or just vent it straight into tubing.
Very nice bikes to bad my body can no longer handle riding I think I would have to have you build me one. I used to ride a Gary klein and a Gary Fisher aluminum frame mountain bikes. I still have them will never get rid of them just limited on my riding. Ride like a 80 year old now
why use standard nozzles after gas lens where invented. Kinda of like starting fires by rubbing sticks together.


- Superiorwelding
-
Weldmonger
-
Posts:
-
Joined:Thu Jan 24, 2013 10:13 pm
-
Location:Eddy, TX
Jonty_B,
Looks excellent!!
-Jonathan
Looks excellent!!
-Jonathan
Instagram- @superiorwelding/@learntotig
Twitter- @_JonathanLewis
https://www.learntotig.com
https://www.superiorweldandfab.com
https://www.youtube.com/+SuperiorWeldin ... ATHANLEWIS
Twitter- @_JonathanLewis
https://www.learntotig.com
https://www.superiorweldandfab.com
https://www.youtube.com/+SuperiorWeldin ... ATHANLEWIS

- TRACKRANGER
-
Weldmonger
-
Posts:
-
Joined:Wed Aug 06, 2014 12:48 am
-
Location:Melbourne, Australia
@ Jonty_B
very impressive!. Thanks for sharing.
very impressive!. Thanks for sharing.
EWM Phonenix 355 Pulse MIG set mainly for Aluminum, CIGWeld 300Amp AC/DC TIG, TRANSMIG S3C 300 Amp MIG, etc, etc

My neighbor decided he needed an engine stand for his 6BTA that is being rebuilt.
I got the dimensions of the motor and designed a cradle that will hold the motor while allowing him to rotate it while working on it.
He insisted it be built from 1/4" material, I talked him down from that cliff and instead it was build from .125 wall material.
2x4 box tubing

This was my first project using such heavy material, getting the welds around the tubing was a bitch due to position.
The solid tub you see will be cut and an inner tube passed through it which will be attached to the engine, think of it like an axle and a housing.
Happy with some of the welds...not so much with others.

I fully welded the tubing on both side 360 degrees and then got about a 2" bead on the inside.

That sucker is going nowhere.
What I did not expect was the heat of the uprights and supports causing the base to bow slightly.


Live and learn, the wheels will accommodate the bow of the base which is about 1/4" over the entire span of the base (6')
This is what it will be supporting.

I got the dimensions of the motor and designed a cradle that will hold the motor while allowing him to rotate it while working on it.
He insisted it be built from 1/4" material, I talked him down from that cliff and instead it was build from .125 wall material.
2x4 box tubing
This was my first project using such heavy material, getting the welds around the tubing was a bitch due to position.
The solid tub you see will be cut and an inner tube passed through it which will be attached to the engine, think of it like an axle and a housing.
Happy with some of the welds...not so much with others.
I fully welded the tubing on both side 360 degrees and then got about a 2" bead on the inside.
That sucker is going nowhere.
What I did not expect was the heat of the uprights and supports causing the base to bow slightly.
Live and learn, the wheels will accommodate the bow of the base which is about 1/4" over the entire span of the base (6')
This is what it will be supporting.
Love the pointed tungsten.
 Pointed tungsten by Zanconato Custom Cycles, on Flickr
 Untitled by Zanconato Custom Cycles, on Flickr
 Untitled by Zanconato Custom Cycles, on Flickr
 Untitled by Zanconato Custom Cycles, on Flickr
Pointed tungsten by Zanconato Custom Cycles, on FlickrUntitled by Zanconato Custom Cycles, on FlickrUntitled by Zanconato Custom Cycles, on FlickrUntitled by Zanconato Custom Cycles, on Flickr
- Otto Nobedder
-
Weldmonger
-
Posts:
-
Joined:Thu Jan 06, 2011 11:40 pm
-
Location:Near New Orleans
Zank,
It looks like it took you about a minute and a half to sort out welding aluminum.
Well done, and great examples!
Steve S
It looks like it took you about a minute and a half to sort out welding aluminum.
Well done, and great examples!
Steve S
Ha. Thanks, Steve. I filled up a lot of 6061 sheet and went through a lot of rod running beads like Jody suggests in his aluminum drill video. That is one of the best practice techniques going. It gets boring, but that's when it really starts to sink in.
- MinnesotaDave
-
Weldmonger
-
Posts:
-
Joined:Sun Oct 27, 2013 10:57 pm
-
Location:Big Lake/Monticello MN, U.S.A.
I completely agree.zank wrote:Ha. Thanks, Steve. I filled up a lot of 6061 sheet and went through a lot of rod running beads like Jody suggests in his aluminum drill video. That is one of the best practice techniques going. It gets boring, but that's when it really starts to sink in.
Excellent welding as always
Dave J.
Beware of false knowledge; it is more dangerous than ignorance. ~George Bernard Shaw~
Syncro 350
Invertec v250-s
Thermal Arc 161 and 300
MM210
Dialarc
Tried being normal once, didn't take....I think it was a Tuesday.
Beware of false knowledge; it is more dangerous than ignorance. ~George Bernard Shaw~
Syncro 350
Invertec v250-s
Thermal Arc 161 and 300
MM210
Dialarc
Tried being normal once, didn't take....I think it was a Tuesday.
You could be forgiven for thinking I've been making rollerskates for the Hulk. Linear casters required and specifically ordered to be overengineered to the extreme. The trolleys that these will go on (4, 1 per corner as you'd imagine) is required to take 6,500lbs in weight; for a guess each one of these will take double that on it's own! 
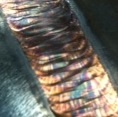
TIG root with a hot pass over it. I know it looks uneven but the parts came to me with a vaguely uneven prep on them so I levelled it out in the wire run, this was all done on very tight time constraints.
MIG capping run over the top as demanded by the instructed process. (for the record I disagreed with the whole weld process for this job but was overruled) A point to notice is the horrible quality of the MIG wire we're provided, look at all that silica.
BIIIIIIG centre pin going through the bearing assembly which was extremely tight, perfect interference fit.
Which then gets a quick TIG run around it for permanence. (?Yeah, I'm still trying to master going around the outside of circular parts.
Despite the issues, actually quite a fun job; I find that I like multipass work.
TIG root with a hot pass over it. I know it looks uneven but the parts came to me with a vaguely uneven prep on them so I levelled it out in the wire run, this was all done on very tight time constraints.
- 022.JPG (210.47 KiB) Viewed 2409 times
- 023.JPG (212.63 KiB) Viewed 2409 times
- 029.JPG (169.6 KiB) Viewed 2409 times
Despite the issues, actually quite a fun job; I find that I like multipass work.
- Attachments
-
- 027.JPG (51.98 KiB) Viewed 2409 times
Dragster Guy
- Dragster Guy
-
Active Member
-
Posts:
-
Joined:Wed Jun 11, 2014 7:19 am
-
Location:Pasadena MD
My first on site job for my new business. Stainless exhaust duct for an MRI machine. Its a start. 
All done with my AHP alpha tig 200.
All done with my AHP alpha tig 200.
- Attachments
-
- 20141009_085404.jpg (29.29 KiB) Viewed 2364 times
-
- 20141009_080051.jpg (38.92 KiB) Viewed 2364 times
-
- 20141009_080040.jpg (25.93 KiB) Viewed 2364 times
Performance Metal Works
Pasadena MD
Pasadena MD
- Otto Nobedder
-
Weldmonger
-
Posts:
-
Joined:Thu Jan 06, 2011 11:40 pm
-
Location:Near New Orleans
My best weld of the day... Schd 10 304SS in a socket-weld configuration, 5F...
Set at 150A, using less than half that, 3/32 thoriated.
Here's the context:
All in all, a good day.
Steve S
Set at 150A, using less than half that, 3/32 thoriated.
- GEDC1549.JPG (179.07 KiB) Viewed 2329 times
- GEDC1550.JPG (162.73 KiB) Viewed 2329 times
Steve S
- Otto Nobedder
-
Weldmonger
-
Posts:
-
Joined:Thu Jan 06, 2011 11:40 pm
-
Location:Near New Orleans
And then, today I completed it, and tested it, and discovered that the "bench tested as requested" bellows leaked like a sieve, and I get to cut every bit of it back apart. Sure it all pays the same (as I keep telling myself), but 14-16 hours of rework because a vendor couldn't perform? That pisses me off.Otto Nobedder wrote:...All in all, a good day.
Steve S
Steve S
Not necessarily just today, but some days. I don't even know how many. I have been doing multiple projects at the same time. Some really awkward welding positions on this deal. As many left handed welds as right handed being I mirrored everything from one half to the other. Nobody but another welder would likely notice. I keep promising myself I am not going to bother with such anal details on the next one, but then I forget and since I start it that way, I am somewhat committed to that detail throughout.
It's a radar arch/shade thing for a cigarette style boat. Upside down for the time being. Will try to remember to get one of it installed. Somehow, I end up procrastinating that, and they sneak the boats away before I can get a photo.

Showing a bit of the frame work. The front bill is graduated curves, so they all have to be formed by hand in the hip bender. Forming the actual arches themselves is another thing entirely. One arch started out as a 208" piece of pipe, the second one was 214". I got lucky and nailed those on the first try. They have to be crowned differently so that they all line up across the top when leaning at different angles to each other.

Then all the plates in the top. If I fit them perfectly, I will not have to weld the undersides. They will show no gaps where they contact the adjoining pipes.

It's a radar arch/shade thing for a cigarette style boat. Upside down for the time being. Will try to remember to get one of it installed. Somehow, I end up procrastinating that, and they sneak the boats away before I can get a photo.
Showing a bit of the frame work. The front bill is graduated curves, so they all have to be formed by hand in the hip bender. Forming the actual arches themselves is another thing entirely. One arch started out as a 208" piece of pipe, the second one was 214". I got lucky and nailed those on the first try. They have to be crowned differently so that they all line up across the top when leaning at different angles to each other.
Then all the plates in the top. If I fit them perfectly, I will not have to weld the undersides. They will show no gaps where they contact the adjoining pipes.
Miller ABP 330, Syncrowave 250, Dynasty 300 DX.
Honorary member of the Fraternity of Faded Tee Shirts.
Honorary member of the Fraternity of Faded Tee Shirts.
- Superiorwelding
-
Weldmonger
-
Posts:
-
Joined:Thu Jan 24, 2013 10:13 pm
-
Location:Eddy, TX
TamJeff,
Speechless!
-Jonathan
Speechless!
-Jonathan
Instagram- @superiorwelding/@learntotig
Twitter- @_JonathanLewis
https://www.learntotig.com
https://www.superiorweldandfab.com
https://www.youtube.com/+SuperiorWeldin ... ATHANLEWIS
Twitter- @_JonathanLewis
https://www.learntotig.com
https://www.superiorweldandfab.com
https://www.youtube.com/+SuperiorWeldin ... ATHANLEWIS

- AKweldshop
-
Weldmonger
-
Posts:
-
Joined:Wed Oct 23, 2013 3:30 pm
-
Location:Palmer AK
As always....Superiorwelding wrote:TamJeff,
Speechless!
-Jonathan
Just a couple welders and a couple of big hammers and torches.
Men in dirty jeans built this country, while men in clean suits have destroyed it.
Trump/Carson 2016-2024
Men in dirty jeans built this country, while men in clean suits have destroyed it.
Trump/Carson 2016-2024
Thanks y'all. I am the only fab'r at our shop so I don't get to bounce these projects off of too many people so this is a good place to drop them among like minds.
Here's how it starts. I set the rungs on the forward arch first, which allows me to work all of it by myself, provided the math is right. It's so nice when it just fits naturally, with no persuasion. I fine tune it with the way I place my tacks, and how much of a tack I put there and when.

You can see the size of the tacks I use. There is a smaller tack on the open (I call it the toe) side of this cope. It pulled the rung that direction. I counteracted it with this fatter tack on the closed (the heel) side in the photo. I have gotten to where I can lift my hood and watch/feel it settle back to my intended angle, 99% of the time. If not, I can heat the tack again and help it with my hand

If that fails. . .there's always the whapper.
It's a most perfect piece of really dense, white oak heartwood. I have been wailing on things with that chunk of wood for 15 years since I rescued it from a discarded pallet. Something like this project only needs a 'bump' from it at most. I recall someone telling me I ought to shape a handle on it and refine it. The whole thing is a handle, as much as the whole thing is a mallet or a battering ram if need be. Every fabricator ought to have one. It has a dead blow action to it, and a feel like when you hit a baseball just right, if that makes any sense. I have not found a mallet that works as well.

Here's how it starts. I set the rungs on the forward arch first, which allows me to work all of it by myself, provided the math is right. It's so nice when it just fits naturally, with no persuasion. I fine tune it with the way I place my tacks, and how much of a tack I put there and when.
You can see the size of the tacks I use. There is a smaller tack on the open (I call it the toe) side of this cope. It pulled the rung that direction. I counteracted it with this fatter tack on the closed (the heel) side in the photo. I have gotten to where I can lift my hood and watch/feel it settle back to my intended angle, 99% of the time. If not, I can heat the tack again and help it with my hand
If that fails. . .there's always the whapper.
It's a most perfect piece of really dense, white oak heartwood. I have been wailing on things with that chunk of wood for 15 years since I rescued it from a discarded pallet. Something like this project only needs a 'bump' from it at most. I recall someone telling me I ought to shape a handle on it and refine it. The whole thing is a handle, as much as the whole thing is a mallet or a battering ram if need be. Every fabricator ought to have one. It has a dead blow action to it, and a feel like when you hit a baseball just right, if that makes any sense. I have not found a mallet that works as well.
Miller ABP 330, Syncrowave 250, Dynasty 300 DX.
Honorary member of the Fraternity of Faded Tee Shirts.
Honorary member of the Fraternity of Faded Tee Shirts.
- TRACKRANGER
-
Weldmonger
-
Posts:
-
Joined:Wed Aug 06, 2014 12:48 am
-
Location:Melbourne, Australia
@TamJeff
You, my friend are an accomplished Artisan. Thanks for sharing. Skill and Quality go hand-in-hand at your shop.
Trev
You, my friend are an accomplished Artisan. Thanks for sharing. Skill and Quality go hand-in-hand at your shop.
Trev
EWM Phonenix 355 Pulse MIG set mainly for Aluminum, CIGWeld 300Amp AC/DC TIG, TRANSMIG S3C 300 Amp MIG, etc, etc
the fit ups are incredible
not to say the least for the welds.
i have made several tubing projects
and the cuts are more of and art
then science. beautiful work.
thanks for sharing.
not to say the least for the welds.
i have made several tubing projects
and the cuts are more of and art
then science. beautiful work.
thanks for sharing.
htp invertig 221
syncrowave 250
miller 140 mig
hypertherm plasma
morse 14 metal devil
syncrowave 250
miller 140 mig
hypertherm plasma
morse 14 metal devil
Artie F. Emm
- Artie F. Emm
-
Weldmonger
-
Posts:
-
Joined:Thu Jul 24, 2014 7:53 am
I can just imagine the briefing for a new guy at TamJeff's shop: "That blue plastic bin has blocks we use for shims. See this piece here? WHATEVER YOU DO, do NOT use this chunk of wood. EVER. For ANYTHING. Got it?"
Kidding of course. TamJeff if you ever need an apprentice, I will sign on, sir.
Kidding of course. TamJeff if you ever need an apprentice, I will sign on, sir.
Dave
aka "RTFM"
aka "RTFM"
- Superiorwelding
-
Weldmonger
-
Posts:
-
Joined:Thu Jan 24, 2013 10:13 pm
-
Location:Eddy, TX
I just have one question TamJeff, you hiring??
-Jonathan
-Jonathan
Instagram- @superiorwelding/@learntotig
Twitter- @_JonathanLewis
https://www.learntotig.com
https://www.superiorweldandfab.com
https://www.youtube.com/+SuperiorWeldin ... ATHANLEWIS
Twitter- @_JonathanLewis
https://www.learntotig.com
https://www.superiorweldandfab.com
https://www.youtube.com/+SuperiorWeldin ... ATHANLEWIS
Return to “Tig Welding - Tig Welding Aluminum - Tig Welding Techniques - Aluminum Tig Welding”
Jump to
- Introductions & How to Use the Forum
- ↳ Welcome!
- ↳ Member Introductions
- ↳ How to Use the Forum
- ↳ Moderator Applications
- Welding Discussion
- ↳ Metal Cutting
- ↳ Tig Welding - Tig Welding Aluminum - Tig Welding Techniques - Aluminum Tig Welding
- ↳ Mig and Flux Core - gas metal arc welding & flux cored arc welding
- ↳ Stick Welding/Arc Welding - Shielded Metal Arc Welding
- ↳ Welding Forum General Shop Talk
- ↳ Welding Certification - Stick/Arc Welding, Tig Welding, Mig Welding Certification tests - Welding Tests of all kinds
- ↳ Welding Projects - Welding project Ideas - Welding project plans
- ↳ Product Reviews
- ↳ Fuel Gas Heating
- Welding Tips & Tricks
- ↳ Video Discussion
- ↳ Wish List
- Announcements & Feedback
- ↳ Forum News
- ↳ Suggestions, Feedback and Support
- Welding Marketplace
- ↳ Welding Jobs - Industrial Welding Jobs - Pipe Welding Jobs - Tig Welding Jobs
- ↳ Classifieds - Buy, Sell, Trade Used Welding Equipment
- Welding Resources
- ↳ Tradeshows, Seminars and Events
- ↳ The Welding Library
- ↳ Education Opportunities