mlevinson,
Welcome to the family!! Your tig welds are looking great, keep up the good work and practice!
-Jonathan
Tig welding tips, questions, equipment, applications, instructions, techniques, tig welding machines, troubleshooting tig welding process
- Superiorwelding
-
Weldmonger

-
Posts:
-
Joined:Thu Jan 24, 2013 10:13 pm
-
Location:Eddy, TX
Instagram- @superiorwelding/@learntotig
Twitter- @_JonathanLewis
https://www.learntotig.com
https://www.superiorweldandfab.com
https://www.youtube.com/+SuperiorWeldin ... ATHANLEWIS
Twitter- @_JonathanLewis
https://www.learntotig.com
https://www.superiorweldandfab.com
https://www.youtube.com/+SuperiorWeldin ... ATHANLEWIS
Bholcomb87
- Bholcomb87
-
New Member

-
Posts:
-
Joined:Mon Jul 07, 2014 10:41 pm
-
Location:Warner Robins, GA
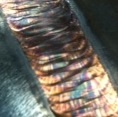
More work on the side by side stereo system. I'm use .065 aluminum plate and tread plate. Using a ahp alpha tig 200 ex. 3/32 2%Lanthanated tungsten electrode sharped to a point. I use a CK flex loc torch with the 3 series torch head on it. argon & helium mix today about a 50/50 mix it welded nice. The speaker boxes I used straight argon. Just trying stuff. Next I've got the fab a box to hold two 12" subwoofers that will most likely be Tuesday. I'll be sure let u guys know how that turns out.
These are by far some of my best tig welds and I've got to give must of the credit to Jody and what he does here at welding tips and tricks.
Thanks everybody on your help so far. I really like it here.
Brian/ bholcomb
These are by far some of my best tig welds and I've got to give must of the credit to Jody and what he does here at welding tips and tricks.
Thanks everybody on your help so far. I really like it here.
Brian/ bholcomb
- Attachments
-
- image.jpg (35.11 KiB) Viewed 2010 times
-
- image.jpg (29.23 KiB) Viewed 2010 times
-
- image.jpg (48.6 KiB) Viewed 2010 times
-
- By far some of my best tig welds.
- image.jpg (32.13 KiB) Viewed 2010 times
-
- image.jpg (33.99 KiB) Viewed 2010 times
-
- I'm proud of the some of these welds.
- image.jpg (53.82 KiB) Viewed 2010 times


What you have to remember on that AHP is that the AC balance of -5 to +5 is not a percentage, it is just a dial number. It's range is 20% to 80% electrode positive, so if you have it on +5 your at 80% electrode positive and will melt that tungsten all the way back to China where it was made...Bholcomb87 wrote:? My ahp has pulse but only .05-10hz and AC balance is only + or - 5%. I need a better tig welder I've out grown my AHP.
Dave
Bholcomb87
- Bholcomb87
-
New Member
-
Posts:
-
Joined:Mon Jul 07, 2014 10:41 pm
-
Location:Warner Robins, GA
I never knew that about the AHPs AC balance I just got a feel for the welded so now I no depending on the condition of the aluminum where to set the AC balance. Thanks for the info.

- backside.jpg (59.44 KiB) Viewed 1951 times
- cover.jpg (172.62 KiB) Viewed 1951 times
- root.jpg (56.78 KiB) Viewed 1951 times
- Superiorwelding
-
Weldmonger
-
Posts:
-
Joined:Thu Jan 24, 2013 10:13 pm
-
Location:Eddy, TX
Justin,
I see good improvement on the root. Keep up the practice and don't rush. Testing in a hurry might not be your thing. I personally prefer to blow through a test but not if I am rushed.
-Jonathan
I see good improvement on the root. Keep up the practice and don't rush. Testing in a hurry might not be your thing. I personally prefer to blow through a test but not if I am rushed.
-Jonathan
Instagram- @superiorwelding/@learntotig
Twitter- @_JonathanLewis
https://www.learntotig.com
https://www.superiorweldandfab.com
https://www.youtube.com/+SuperiorWeldin ... ATHANLEWIS
Twitter- @_JonathanLewis
https://www.learntotig.com
https://www.superiorweldandfab.com
https://www.youtube.com/+SuperiorWeldin ... ATHANLEWIS


Brian, those boxes look great.
I'd be interested in how they sound vs a wooden box. (I know the reasons they wanted metal, just curious)
Were those speakers/head unit just for mockup, or the actual?
Sent from my SM-G900R4 using Tapatalk
I'd be interested in how they sound vs a wooden box. (I know the reasons they wanted metal, just curious)
Were those speakers/head unit just for mockup, or the actual?
Sent from my SM-G900R4 using Tapatalk

Just welded an O2 sensor bung for a wideband. A little undercut on the bung, but no big deal as they aren't structural.  Of course it probably didn't help that I use $2.95 O2 bungs from ebay. Probably that free-machining mild steel crap that caused it!
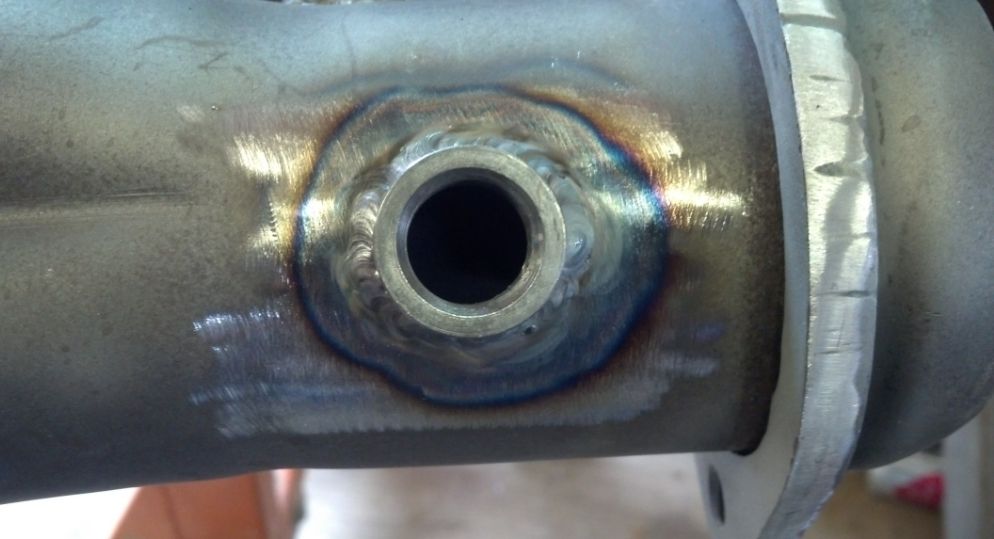
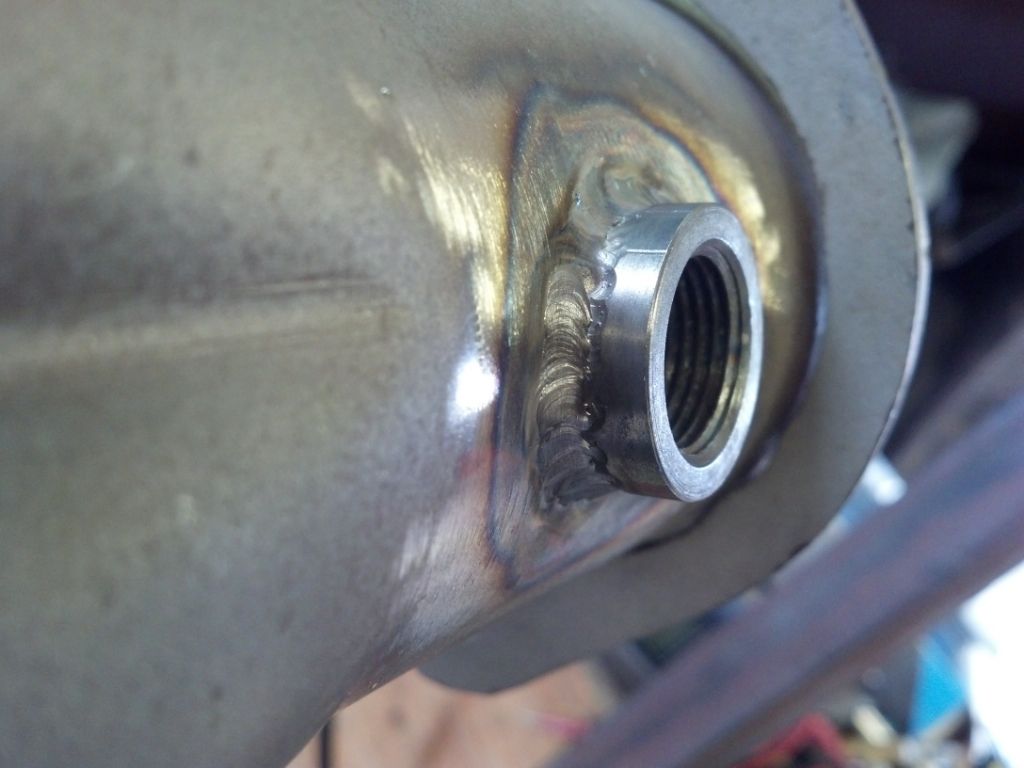
Now I just need to wait for the other O2 bung to arrive for the passenger side wideband since I thought I had another one but I was wrong.
Now I just need to wait for the other O2 bung to arrive for the passenger side wideband since I thought I had another one but I was wrong.
- T JOINT VERT 1.jpg (87.1 KiB) Viewed 1862 times
- VERTICAL T JOINT.jpg (104.75 KiB) Viewed 1862 times
- COVER GOOD.jpg (37.34 KiB) Viewed 1862 times

I learned to tig weld in late November or early December on aluminum. I had no tig experience before that. I bought my machine in February and started welding steel for the first time. i have been tig welding steel for about 4 months now and I have finally got to the point that I am not dipping the tungsten and am staying pretty consistent. I am very happy with these welds on a goat milking stand. I almost cried having to sand them off for a flat flush surface. My wife said you will do more like them suck it up and get out of my way (she had the grinder). I don't usually post pics of my welds so I figured this is a good time to start.
- Attachments
-
- 10559133_10152605517786528_664919287_n.jpg (12.45 KiB) Viewed 1927 times
-
- 10555013_10152605518621528_147222147_n.jpg (11.8 KiB) Viewed 1927 times
-
- 10551886_10152605517701528_882982306_n.jpg (11.36 KiB) Viewed 1927 times
It's always best to build your own, especially when it comes to hitches!!!
Matt
Matt
- Superiorwelding
-
Weldmonger
-
Posts:
-
Joined:Thu Jan 24, 2013 10:13 pm
-
Location:Eddy, TX
Looks good. I like your wife sounds like mine.
-Jonathan
-Jonathan
Instagram- @superiorwelding/@learntotig
Twitter- @_JonathanLewis
https://www.learntotig.com
https://www.superiorweldandfab.com
https://www.youtube.com/+SuperiorWeldin ... ATHANLEWIS
Twitter- @_JonathanLewis
https://www.learntotig.com
https://www.superiorweldandfab.com
https://www.youtube.com/+SuperiorWeldin ... ATHANLEWIS
She gives me a hard time. I have to warm up before I do my best. I grab a piece of scrap and run a couple beads and I am good to go. Same when shooting my bow I have to shoot a few times before I go hunting. I have always been like that. She is the opposite. She can start right in and do her best then start tapering off. She always challenges me to a welding contest as soon as we get to the shop to see who has to do the cooking or cleaning  Gotta love her.
It's always best to build your own, especially when it comes to hitches!!!
Matt
Matt

- Superiorwelding
-
Weldmonger
-
Posts:
-
Joined:Thu Jan 24, 2013 10:13 pm
-
Location:Eddy, TX
aeroplain,
For a first attempt that looks good. It appears that you are holding the electrode at a angle and not perpendicular to the material. See how one side is undercut and the other is not? Try holding the rod straight on to the joint or plate with a slight push angle. Either this or you are moving faster on one side than the other. Even counts of 2 or 3 on each side. The rest is just hood time. Keep up the good work.
-Jonathan
Instagram- @superiorwelding/@learntotig
Twitter- @_JonathanLewis
https://www.learntotig.com
https://www.superiorweldandfab.com
https://www.youtube.com/+SuperiorWeldin ... ATHANLEWIS
Twitter- @_JonathanLewis
https://www.learntotig.com
https://www.superiorweldandfab.com
https://www.youtube.com/+SuperiorWeldin ... ATHANLEWIS
Thanks Jonathan, torch straight down. This was on 1/4" so I assumed that I wasn't pushing enough rod into the puddle(1/16) 150 amps, 3/23 2%lanth, hotter than the hubs of Hell, but more likely lack of hood time.
- Superiorwelding
-
Weldmonger
-
Posts:
-
Joined:Thu Jan 24, 2013 10:13 pm
-
Location:Eddy, TX
Man I look like a idiot now, I thought I was looking at a stick weldaeroplain wrote:Thanks Jonathan, torch straight down. This was on 1/4" so I assumed that I wasn't pushing enough rod into the puddle(1/16) 150 amps, 3/23 2%lanth, hotter than the hubs of Hell, but more likely lack of hood time.
-Jonathan
Instagram- @superiorwelding/@learntotig
Twitter- @_JonathanLewis
https://www.learntotig.com
https://www.superiorweldandfab.com
https://www.youtube.com/+SuperiorWeldin ... ATHANLEWIS
Twitter- @_JonathanLewis
https://www.learntotig.com
https://www.superiorweldandfab.com
https://www.youtube.com/+SuperiorWeldin ... ATHANLEWIS
- Braehill
-
Weldmonger
-
Posts:
-
Joined:Sat Jul 06, 2013 11:16 am
-
Location:Near Pittsburgh,Pennsylvania. Steel Buckle of the Rust Belt
@areoplain,
By the looks of your weave, you're right handed. You seem to be holding your torch at almost 90* at the right and tilting the torch to the left, therefore increasing the torch angle on the left side of your weld. This increased angle causes the undercut and lack of fill on the left. If you try and start your weld in the center of the joint and keep your angle consistent from side to side your weave will fill out better without drawing base metal from the sides.
Easier to show than to type out, so I hope this makes sense.
Len
Now go melt something.
Instagram @lenny_gforce
Len
Instagram @lenny_gforce
Len
+1 on that one.Braehill wrote:@areoplain,
By the looks of your weave, you're right handed. You seem to be holding your torch at almost 90* at the right and tilting the torch to the left, therefore increasing the torch angle on the left side of your weld. This increased angle causes the undercut and lack of fill on the left. If you try and start your weld in the center of the joint and keep your angle consistent from side to side your weave will fill out better without drawing base metal from the sides.
Easier to show than to type out, so I hope this makes sense.
Len
It's always best to build your own, especially when it comes to hitches!!!
Matt
Matt
- Superiorwelding
-
Weldmonger
-
Posts:
-
Joined:Thu Jan 24, 2013 10:13 pm
-
Location:Eddy, TX
Yea, what he saidBraehill wrote:@areoplain,
By the looks of your weave, you're right handed. You seem to be holding your torch at almost 90* at the right and tilting the torch to the left, therefore increasing the torch angle on the left side of your weld. This increased angle causes the undercut and lack of fill on the left. If you try and start your weld in the center of the joint and keep your angle consistent from side to side your weave will fill out better without drawing base metal from the sides.
Easier to show than to type out, so I hope this makes sense.
Len
-Jonathan
Instagram- @superiorwelding/@learntotig
Twitter- @_JonathanLewis
https://www.learntotig.com
https://www.superiorweldandfab.com
https://www.youtube.com/+SuperiorWeldin ... ATHANLEWIS
Twitter- @_JonathanLewis
https://www.learntotig.com
https://www.superiorweldandfab.com
https://www.youtube.com/+SuperiorWeldin ... ATHANLEWIS
- Superiorwelding
-
Weldmonger
-
Posts:
-
Joined:Thu Jan 24, 2013 10:13 pm
-
Location:Eddy, TX
As my daughter says "I try" (in that cute 3 year old voice)mcoe wrote:Way to be original Jonathan!
-Jonathan
Instagram- @superiorwelding/@learntotig
Twitter- @_JonathanLewis
https://www.learntotig.com
https://www.superiorweldandfab.com
https://www.youtube.com/+SuperiorWeldin ... ATHANLEWIS
Twitter- @_JonathanLewis
https://www.learntotig.com
https://www.superiorweldandfab.com
https://www.youtube.com/+SuperiorWeldin ... ATHANLEWIS
Makes perfect sense to me, and yes I am right handed. I tried to stay as steady as I could and think with more hood time things would improve. This is an addition to a winch stand with 4" added. There was about a 1/2" gap to fill, so there are a few passes under the weave. (glad you can't see them anymoe  )The fill underneath was lower on the undercut side so that is where my assumption that the filler was to small. Since filler size has not been a criticism, it's clear my technique sucks.
Braehill wrote:@areoplain,
By the looks of your weave, you're right handed. You seem to be holding your torch at almost 90* at the right and tilting the torch to the left, therefore increasing the torch angle on the left side of your weld. This increased angle causes the undercut and lack of fill on the left. If you try and start your weld in the center of the joint and keep your angle consistent from side to side your weave will fill out better without drawing base metal from the sides.
Easier to show than to type out, so I hope this makes sense.
Len
Last edited by aeroplain on Thu Jul 17, 2014 10:16 pm, edited 1 time in total.
- Braehill
-
Weldmonger
-
Posts:
-
Joined:Sat Jul 06, 2013 11:16 am
-
Location:Near Pittsburgh,Pennsylvania. Steel Buckle of the Rust Belt
areoplain,
I was in no way saying that your technique sucked. If you find yourself in a place where you can't weave without getting undercut you can always stagger from side to side moving forward in half your normal amount. It ends up looking quite good once you get the hang of it.
If all you have is a small filler wire you can slow down and let the puddle take more wire if it needs it. It's one of the benefits of Tig welding.
You're doing fine, keep after it .
Len
Now go melt something.
Instagram @lenny_gforce
Len
Instagram @lenny_gforce
Len
Return to “Tig Welding - Tig Welding Aluminum - Tig Welding Techniques - Aluminum Tig Welding”
Jump to
- Introductions & How to Use the Forum
- ↳ Welcome!
- ↳ Member Introductions
- ↳ How to Use the Forum
- ↳ Moderator Applications
- Welding Discussion
- ↳ Metal Cutting
- ↳ Tig Welding - Tig Welding Aluminum - Tig Welding Techniques - Aluminum Tig Welding
- ↳ Mig and Flux Core - gas metal arc welding & flux cored arc welding
- ↳ Stick Welding/Arc Welding - Shielded Metal Arc Welding
- ↳ Welding Forum General Shop Talk
- ↳ Welding Certification - Stick/Arc Welding, Tig Welding, Mig Welding Certification tests - Welding Tests of all kinds
- ↳ Welding Projects - Welding project Ideas - Welding project plans
- ↳ Product Reviews
- ↳ Fuel Gas Heating
- Welding Tips & Tricks
- ↳ Video Discussion
- ↳ Wish List
- Announcements & Feedback
- ↳ Forum News
- ↳ Suggestions, Feedback and Support
- Welding Marketplace
- ↳ Welding Jobs - Industrial Welding Jobs - Pipe Welding Jobs - Tig Welding Jobs
- ↳ Classifieds - Buy, Sell, Trade Used Welding Equipment
- Welding Resources
- ↳ Tradeshows, Seminars and Events
- ↳ The Welding Library
- ↳ Education Opportunities