Hi Guys,
As I've stated before, I'm so "fresh" to TIG that you guys will prob roll your eyes at half the things i do and say but if i get one productive bit of abuse hurled at me ill be happy so here it goes;
So I've had my Kempii 2300 TIG for a couple years now and I've always been meaning to put my head down and really get good at it but i just keep putting it on the back burner time and time again.
I made the mistake of beginning on aluminium and obviously made a mess of it and thought i was doomed to never TIG again.
So to date i have dabbled in mild steel,SS, and alloy and there are times when i stand back and think "wow that looks professional" and theres times when i think i could do a better job holding the torch between my buttcheeks!!!
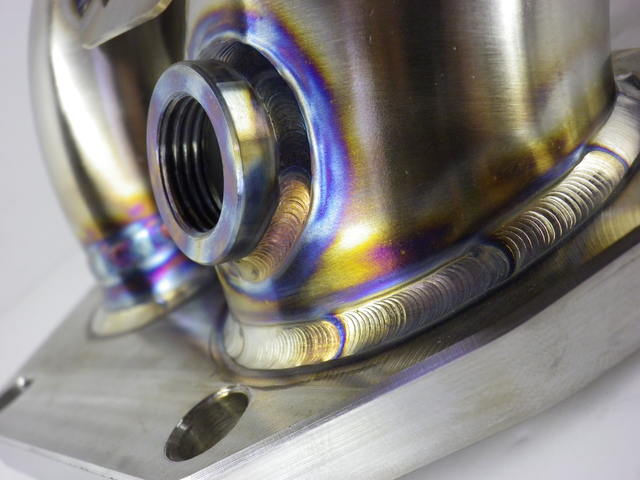
If i may, i would like to post up my latest job, a Stainless 304 exhaust pipe and maybe get people to critic it- who knows you guys might look at it and see something obvious
its 16guage 4" 304 stainless, I'm using 316 filler(i think its 316-but its what the welding supplier said to use)
i run about 65amps on the high side and 20 amps on the low setting, i have about 3 seconds of post flow of pure argon
i chose not to back purge after taking the welding suppliers advise although i now wish i did as there is a little bit of sugar protruding inside the pipe.
I clean each section before welding with acetone
Am i correct in thinking a major part if my problem is the fact that in some sections i could not get the pipe to butt up perfectly so there was sometime a couple inches of perfectly butted pipe that i just fused with no filler rod and then i would get to bits that required roller rod to not only weld but sometimes even fill a 2mm gap between pipe?
is that cup right for the application? i don't really understand when and where to change cups and collars
should i be using pulse? if so i find it impossible to add filler when using pulse.....is there any hope for me ?
thanks
Tig welding tips, questions, equipment, applications, instructions, techniques, tig welding machines, troubleshooting tig welding process
- Attachments
-
- photo 6.JPG (32.13 KiB) Viewed 3227 times
-
- photo 5.JPG (54.92 KiB) Viewed 3227 times
-
- photo 4.JPG (27.88 KiB) Viewed 3227 times
-
- this is the torch set up, sorry i don't know the terminology of cup sizes etc. but the electrode had a red/maroon coloured tip on the end, i use maroon for steel and white tipped electrodes for alloy
- photo 3.JPG (20.9 KiB) Viewed 3227 times
-
- flange is mild steel, i could i had to really turn the amps up to pool the mild steel(85amps) and the arc seemed to wander especially close to the bolt holes....how do i get the arch to not wander?
- photo 2.JPG (24.81 KiB) Viewed 3227 times
-
- this was a lap joint, if thats what you would call it because there was a outer sleeve welded to the inner pipe, i found that if i got a pool going on the pipe as soon as i pulled the arc over to the flange it would very easily melt the flange, i assume because there is less material on the flange and it absorbs the heat much faster?
- photo 1.JPG (40.88 KiB) Viewed 3227 times
Rubbin' is racin' son
this is the finished part, as they say, good from far but far from good.
excuse the calendar its the only pic i had at the moment
like i said feel free to hurl abuse at me, any suggestions appreciated
excuse the calendar its the only pic i had at the moment
like i said feel free to hurl abuse at me, any suggestions appreciated
- Attachments
-
- photo 7.JPG (36.67 KiB) Viewed 3226 times
Rubbin' is racin' son
noddybrian
- noddybrian
-
Weldmonger

-
Posts:
-
Joined:Thu Jan 24, 2013 12:13 pm
Welcome to the forum ONDGAS.
No one is going to be overly critical or rude to you here - the fact you have the finished exhaust & it looks perfectly useable ( actually pretty good ) says you have the basics down & ability to set the machine - if all your worried about is appearance don't ! only hours of doing the same work will improve this & many of us will never achieve what we see as perfection especially as we age ! if you look at the bicycle guys welds & think this is easily achievable don't - it should'nt make us angry that he can do such work but most of us will never achieve close to it's appearance !
Comments.
as you are welding 304 with the odd mild steel flange surely 309 is the obvious filler - because you have the heat set for autogenous welds adding filler will create a cooling effect & give a large build up unless it's very small diameter - so get the smallest rod you can find.
I admit the size of the exhaust would be costly as a hobbyist to back purge so maybe take others advise on if solar flux type B is a suitable substitute to that.
Fit up is everything for an autogenous weld so take the time to make it as perfect as you can - don't rush the prep - this makes or breaks the overall appearance when complete
If build in sections in 4" consider if it's possible to clamp a backing block of copper inside to help with heat - if not then try welding in small runs & allow to cool before continuing
Consider using a Tig finger or other device to prop on the tube to achieve the shortest possible consistent arc gap without contamination - I have seen a roller guide intended for a plasma torch modified to fit a Tig torch to achieve this on larger pipe
Pulse can help - but only if you can set it up effectively - have you tried Jodies rule of 33 ( I can't as the machine is retarded & only goes to like 10PPS )
Consider a few hours practice before attempting an actual job - stainless in that thickness is quite tricky - heat builds so quickly so you need to have your eye / hand control sorted & the machine set right.
The No.6 cup your using is fine - unless the bulk of the torch won't somewhere that covers most jobs - the more cover the better on stainless so a No. 7 or 8 would be great - I tend to leave a gas lens 7 or 8 on all the time - only exception is cluster joints or other limited access jobs.
Good luck with future projects & I'm sure other more experienced members will post encouraging replies soon.
thanks noddybrian,
i never thought of welding it in short sections......so your saying this would halt the sugar?
I didn't purge because of the cost factor and because i didn't think it would cause that much of a restriction to flow inside the pipe.And i tack a few sections at a time and so using copper wouldn't work.
and yes i think a tig finger is high on my shopping list.
would a gas lens be something i should be using on a job like this?
ti get into a tight spot, can i pull the electrode out for a inch worth of weld or is that a big no no
thanks again
Rubbin' is racin' son
- Braehill
-
Weldmonger
-
Posts:
-
Joined:Sat Jul 06, 2013 11:16 am
-
Location:Near Pittsburgh,Pennsylvania. Steel Buckle of the Rust Belt
Ondgas,
I appears that you're already using a gas lens by the shape of your cup. I would bump up to at least an eight or ten (cup sizes are in 1/16 of an inch i.e. 8/16-10/16) cup for stainless. That way you can use up to about an inch of stick out without worry. Brian's right about using 309 rod on the flange if it's carbon steel, it's best for dissimilar metals.
Fit up is very important but it will not stop the sugaring. A back purge or Solar B flux will stop it but there are plenty of so called professional exhaust systems out there that are not back purged.
Face time is the only thing that makes consistent sized welds. Practice on your scraps so you learn what works for the type of material you're using. Thin filler rod (.045 -1/16) should be all you need and try and time when you add filler so your weld bead remains consistent. You're on the right track, you just need practice.
By the way, I for one don't mind the calendar at all, nothing wrong with a beautiful girl looking over your shoulder while you practice, unless that's why you can't focus of course.
Len
Now go melt something.
Instagram @lenny_gforce
Len
Instagram @lenny_gforce
Len


need more gas coverage. go 4-5 dips per "run", stop after 4-5 dips and let the gas coverage continue. wait a sec or 2 then repeat until the weld it complete.
find the sweet spot amp wise to use the minimum amount of amps possible. then once its set, go full pedal and your bead width will be very consistent.
noddybrian
- noddybrian
-
Weldmonger
-
Posts:
-
Joined:Thu Jan 24, 2013 12:13 pm
I hate it when people post pictures of welds like that - it makes me feel slightly inadequate ! - I bet you do more than the odd 30mins of Tig weld a month ! I should'nt be jealous or blame 50 year old eyesight - Grrrrr !
You see. The thing I don't understand is on that picture you posted above, you can clearly see how you have started and stopped, but it's still very uniform, how does that happen? Obviously once you stop the material cools and wen you start again it changes again..... Yet how is there a uniform puddle and even heat marks?
I found I got heaps of difference in heat marks especially where I had a gap between two pipes I had to fill.
If this purely because I had a gap or is it down to technique ?
Surely you guys don't always get your materials to but up perfect?
I found I got heaps of difference in heat marks especially where I had a gap between two pipes I had to fill.
If this purely because I had a gap or is it down to technique ?
Surely you guys don't always get your materials to but up perfect?
Rubbin' is racin' son
GreinTime
- GreinTime
-
Weldmonger
-
Posts:
-
Joined:Fri Nov 01, 2013 11:20 am
-
Location:Pittsburgh, PA
I find that the more time you take to achieve perfect fit up the less you struggle welding, and the better the finished product looks. It's a little different repairing parts. Sometimes you have no choice to weld a gap. Its also different if you don't have another 65 dollars for a new 321ss Ubend that you just cut a little askew. Sometimes you just have to deal with the gaps.
As far as your question about the stops and starts, it comes down to hood time. The more time you spend under a hood, the better you will become with figuring out the little idiosyncracies involved with puddle and heat control.
As far as your question about the stops and starts, it comes down to hood time. The more time you spend under a hood, the better you will become with figuring out the little idiosyncracies involved with puddle and heat control.
#oneleggedproblems
-=Sam=-
-=Sam=-

First, stop getting advice from your welding shop, as they likely know nothing of welding stainless based from the advice that you say they have given you. Stainless always requires protection of the backside of the weld puddle to avoid "sugaring", assuming that you intend to have half-way decent penetration.ONDGAS wrote:You see. The thing I don't understand is on that picture you posted above, you can clearly see how you have started and stopped, but it's still very uniform, how does that happen? Obviously once you stop the material cools and wen you start again it changes again..... Yet how is there a uniform puddle and even heat marks?
I found I got heaps of difference in heat marks especially where I had a gap between two pipes I had to fill.
If this purely because I had a gap or is it down to technique ?
Surely you guys don't always get your materials to but up perfect?
When it comes to stainless steel, you better bet your arse that 10x the time spent welding is taken to assure as best fit-up as possible! That's how the pro's get those welds. It's one of those "little things" that add up in the end in terms of managing the entire welding process.
I just practiced some stainless steel a few hours ago. Uniformity only comes with practice time. The even heat marks (Heat Affected Zone) next to the weld bead is consistent in width and color because he has his technique down good---the technique of managing heat input via several channels: machine settings (amperage), arc length, travel speed, torch angle, filler addition.
When you have gaps, you necessarily had to linger around that area to add lots of filler with undoubtedly extra amperage to get the two sides to fuse----big NO NO when it comes to stainless. That is how the HAZ grows uncontrollably. The minimization of heat input is of paramount importance when it comes to stainless, and poor fit up handicaps you from the very beginning because gaps usually require extra heat due to the extra amount of filler needed. If you're OK with bad fit-up's then you can't complain about not getting nice color and uniformity in the weld because you're shooting yourself in the foot then you complain that you're bleeding. Well of course.
A #6 cup can be used to successfully weld stainless, but if I were you, I'd be using a MUCH larger gas lens setup. Minimum of #12 with about 15-25 CFH of argon flow if you can manage a relatively short stickout yet maintain a much greater coverage area for the argon to protect the bead from gray'ing out on you. Welding tube is inherently more difficult to control gas coverage because the surface curves away from the cup at all times, and the argon has no chance of naturally lingering around to help protect the red-hot weld bead before the atmosphere makes its way to it. It helps cover up my lack of technique that's for sure! I'm getting better each time, but the gas lens and large cup help make up for some of it. Who cares where the improvement comes from; if it's there I'll take it! Also 3 seconds of post flow is no where near sufficient for stainless, especially with round tubing because the argon leaves as soon as it exits the cup---has no where to get trapped to displace the evil air that is awaiting with oxygen to dull your weld. Think more like 8-12 seconds---maybe even longer. Try it. You'll like the difference. Yes it costs a lot of gas to help get good color if you are not actively pulling the heat out of the joint with other means. It's part of the game.
thanks for your time and reply Oscar and GreinTime,
how do you guys determine what size cup/lens to use and when to use a gas lens and when not?
Am i right in thinking its best to use the biggest gas lens possible given the room?
when is big too big?
how do you guys determine what size cup/lens to use and when to use a gas lens and when not?
Am i right in thinking its best to use the biggest gas lens possible given the room?
when is big too big?
Rubbin' is racin' son
Gas lens vs standard collet bodies/cups: always use a gas lens if the situation permits. Once you can manage a very short tungten stick-out, you can drop the argon flow VERY low to really save some argon.ONDGAS wrote:thanks for your time and reply Oscar and GreinTime,
how do you guys determine what size cup/lens to use and when to use a gas lens and when not?
Am i right in thinking its best to use the biggest gas lens possible given the room?
when is big too big?
gas lens cup size: for stainless use as big as you need to prevent oxidation (gray'ing/dull'ing) of the bead surface as much as possible. For me even with a jumbo gas lens, I can still only manage to get pinkish/goldish tint at the weld bead, as I have not yet perfected my technique to manage all golden straw color which would be ideal. Once you can manage an acceptable level of "color" with a large lens, then drop down a size and see if you can better your technique to get the same result with the lower flow rate that normally accompanies the use of a smaller cup size.

Armchair quarterbacking on my part here...SPENG wrote:
Do you find that cup takes unusually more gas? Not just because of its size, but because the ScotchBrite is right up to the lip.
Normally the idea to get laminar flow is first to remove turbulence (the screen's role), then shape the flow uniformly in the new direction (which the remainder of the cup would do). I would think this cup sprays out in all directions and requires a lot higher flow because of it, but perhaps that's the idea?
Just curious. Clearly can't argue with the results you're getting with it.
Cheers,
Richard
Grinding discs... still my #1 consumable!
I can see how spreading out the argon beyond the diameter of the cup would help, which seems to be the point with those scotchbrite type diffusers. I think the idea behind those, is that even through they promote some turbulence, it's a form of "controlled" turbulence since the presence of the diffuser media reduces the actual open area, the same way a mesh screen reduces the open area between adjacent wires in the mesh, typically down to 30% of the enclosed area.
tell the LWS's here to give me that pricingSPENG wrote:gas is so cheap...big lens, run 30cfm, set your amps correct, and have funDont worry about the increased gas.....do some shopping, here in arizona I pay $32 per LARGE bottle of argon
Where? I'm getting $50 for a 200 or 300cf at Allied Gases, at hobbyist volumes, and that was after some shopping around. Mind you, as infrequently as I refill the $18 gap isn't going to hurt much, but I'm always on the lookout for deals.SPENG wrote:gas is so cheap...big lens, run 30cfm, set your amps correct, and have fun
And yeah, I wasn't worried so much about gas consumption... More, just curious how much you had to turn it up to get enough coverage.
Cheers,
Richard
Grinding discs... still my #1 consumable!
newschoppafowah
- newschoppafowah
-
Workhorse

-
Posts:
-
Joined:Wed Feb 19, 2014 11:54 pm
Allied Gases?
Phoenix metro area?
Try Praxair or PWS, if Allied has anything to do with airgas, stay away or get out that wallet. Airgas makes their childrens' BMW payments off of hobbyists.
Not trying to cop a 'tude, just sayin'.. also, Matheson might work for ya too if you're west valley.
Phoenix metro area?
Try Praxair or PWS, if Allied has anything to do with airgas, stay away or get out that wallet. Airgas makes their childrens' BMW payments off of hobbyists.
Not trying to cop a 'tude, just sayin'.. also, Matheson might work for ya too if you're west valley.
Sent from an earthen ditch outside Needles, CA using an awful lot of low voltage single strand wire.
It's a matter of flour and water and then there's the seasonings, which is a matter of salt and so forth and then you h-we interrupt this for the announc
It's a matter of flour and water and then there's the seasonings, which is a matter of salt and so forth and then you h-we interrupt this for the announc
Return to “Tig Welding - Tig Welding Aluminum - Tig Welding Techniques - Aluminum Tig Welding”
Jump to
- Introductions & How to Use the Forum
- ↳ Welcome!
- ↳ Member Introductions
- ↳ How to Use the Forum
- ↳ Moderator Applications
- Welding Discussion
- ↳ Metal Cutting
- ↳ Tig Welding - Tig Welding Aluminum - Tig Welding Techniques - Aluminum Tig Welding
- ↳ Mig and Flux Core - gas metal arc welding & flux cored arc welding
- ↳ Stick Welding/Arc Welding - Shielded Metal Arc Welding
- ↳ Welding Forum General Shop Talk
- ↳ Welding Certification - Stick/Arc Welding, Tig Welding, Mig Welding Certification tests - Welding Tests of all kinds
- ↳ Welding Projects - Welding project Ideas - Welding project plans
- ↳ Product Reviews
- ↳ Fuel Gas Heating
- Welding Tips & Tricks
- ↳ Video Discussion
- ↳ Wish List
- Announcements & Feedback
- ↳ Forum News
- ↳ Suggestions, Feedback and Support
- Welding Marketplace
- ↳ Welding Jobs - Industrial Welding Jobs - Pipe Welding Jobs - Tig Welding Jobs
- ↳ Classifieds - Buy, Sell, Trade Used Welding Equipment
- Welding Resources
- ↳ Tradeshows, Seminars and Events
- ↳ The Welding Library
- ↳ Education Opportunities