
Hi guys,
I know its been touched on before but i can't seem to find a answer i "like"
Im going to be cutting 4" stainless 304 pipe 1.6mm thick and i have a whole bunch of 90degree bends that i then cut down to make 45s etc.
I find I'm having problems TIG welding because, well because I'm part retarded =), and namely because the pipe cuts don't always but up perfectly.
When cutting a 90 in half, if the angle is not perfect, the 45 tuns out slightly "oval" and doesn't meet up with a straight pipe that is a perfect circle.
Ive heard the o'ring, cable tie, and hose clamp story but i feel they are not exactly suited on bends.... i guess they work great on straight pipe but not bends.
i have resorted to not using my drop saw (i think yanks call it a cut off saw?) because its hard to clamp down a 4" 90degree pipe because half of it hangs off the edge of the saw
I don't own a band saw so thats out of the question
I guess my problem is not "how to cut it" but how to find and mark a perfectly square section of pipe.
Dont laugh but i have been getting better results with a set square and a laser level and protractor, i shoot the laser into the pipe while it sits square on my bench, i then transfer the laser mark with a sharpie and then using that sharpie mark(2inches long) i roll the pipe over, line the laser up as good as possible and continue all the way around, i then use a angle grinder with a thin stainless blade and its usually pretty good. BUT NOT PERFECT GODDAMMMMMIT
i think i can improve by running the cut pipe over the linisher to try and take out any high spots.
Problem#1 cutting the pipe straight
Problem#2 making sure the cut is Square
Problem#3 why can't anything be easy?
What do you guys think?
Metal cutting - oxyfuel cutting, plasma cutting, machining, grinding, and other preparatory work.

Hi
Here's a danish tool (link is to an aussie company though):
http://sfiaust.com.au/product_range/pip ... rking-tool
I assume you are scandinavian too so you might be able to find it somewhere closer.
Here's a danish tool (link is to an aussie company though):
http://sfiaust.com.au/product_range/pip ... rking-tool
I assume you are scandinavian too so you might be able to find it somewhere closer.
Pictures from my scrap collection:
http://forum.weldingtipsandtricks.com/v ... f=9&t=5677
http://forum.weldingtipsandtricks.com/v ... f=9&t=5677
thanks for that,
I am Australian so thats convenient!!!
what i don't get is what happens if one leg of the bend is longer than the other? As you guys know mandrel bends are not always made to the highest tolerances which would basically mean that that tool-as good as it is-is pretty much useless, although ill be stealing the idea and making something like that at home =)
Rubbin' is racin' son
noddybrian
- noddybrian
-
Weldmonger

-
Posts:
-
Joined:Thu Jan 24, 2013 12:13 pm
I can relate to this - I have from time to time needed to do similar jobs - but they are very sporadic & form such a small % of paying jobs I cannot justify very expensive gear specific to pipe - good news is I have had very good results cutting the pieces by any means convenient without worrying too much about precision & then done final fit up on a linisher - these can be found very cheaply at most tool outlets with 4" or 6" belt widths - the very cheapest have pressed tables - the better ones can be cast iron or plate - even if you can only afford a cheap one it's not that big a deal to replace the flat table part with some decent thickness cold rolled or bright drawn steel of adequate thickness - finish all your pipe ends gently with a fine grit belt & you should achieve a good fit - it's also useful for fine tuning angles on pipe ends - sadly the out of round issue is just a fact of how the bends are formed - they are very rarely true round & I don't have an easy solution other than buy a 45 if that's what you need - while it may not be the look your after by far the easiest way to tackle this sort of welding is to roll up rings that are welded over the pipes forming a slip joint effect - or if you can find them at a fair price get an expander to bell the end of one pipe until it slips over original diameter - care is needed though on this thin a wall - they are really intended for much thicker material.
Sorry for that, I made a wrong assumption based on your other posts, you use a Kemppi and your user name translates to "Evil Gas" in my languageONDGAS wrote: I am Australian so thats convenient!!!
Love Australia by the way, have many good memories from down under.
Here's another cool tool made by another aussie (lives in Europe now):
http://108.163.194.210/~dbbpcom/dbbp/tech-tips/aad.html
Go to part 40
I remember some more pictures of it on that site that also showed hoe the angle are measured
Pictures from my scrap collection:
http://forum.weldingtipsandtricks.com/v ... f=9&t=5677
http://forum.weldingtipsandtricks.com/v ... f=9&t=5677

- Otto Nobedder
-
Weldmonger
-
Posts:
-
Joined:Thu Jan 06, 2011 11:40 pm
-
Location:Near New Orleans
One issue you will always face when cutting a mandrel-bent profile, is stress-relief made by the cut. This is what makes the "oval" when you try to fit that cut end to a square-cut piece of pipe. There are natural stresses imparted on the metal in the bend, and the cut tends to relive part of them. You'll notice the "oval" occurs in the same way for each similar cut, with the diameter "growing" between the inner and outer radii, and shrinking in the cross section 90* opposed.
The best option may not be practical for you, that is to normalize the metal. This requires an oven capable of bringing the metal to a "transition temperature" and cooling it slowly. This will still not make it perfect, but will relieve enough stress to make "pushing" the metal where it needs to be far more comfortable than with stressed metal.
You're basically stuck with some fit-up trouble anytime you cut a mandrel bend. I have no opportunity to normalize, so I attack a mis-fit like this with clamps, force, and occasionaly "rage".
Steve S
Oh I now see the confusion haha. ONDGAS is my number plate on my race car...it's a Propane powered turbo six cylinder, and makes it easy to remember the million different sites that require a username.
Thanks Otto, seems I'm screwed then!
Being a beginner I'm finding fit up to be messing up my welds as I posted in the tig section.
I guess i will have to accept the way it is, I was hoping to be able to blame my below average welds on something other than my skills
Thanks Otto, seems I'm screwed then!
Being a beginner I'm finding fit up to be messing up my welds as I posted in the tig section.
I guess i will have to accept the way it is, I was hoping to be able to blame my below average welds on something other than my skills
Rubbin' is racin' son
- Otto Nobedder
-
Weldmonger
-
Posts:
-
Joined:Thu Jan 06, 2011 11:40 pm
-
Location:Near New Orleans
Naah, you're not screwed. Some force carefully applied with vice-grips or small speed-clamps will take care of half the problem, and hood time will take care of the other half. With some practice, welds with hi-lo can pass any of the NDT/NDE tests, including x-ray.ONDGAS wrote:Oh I now see the confusion haha. ONDGAS is my number plate on my race car...it's a Propane powered turbo six cylinder, and makes it easy to remember the million different sites that require a username.
Thanks Otto, seems I'm screwed then!
Being a beginner I'm finding fit up to be messing up my welds as I posted in the tig section.
I guess i will have to accept the way it is, I was hoping to be able to blame my below average welds on something other than my skills
Be patient with yourself, and it'll come.
Steve S
look at this cool tool, Ive been eyeing one up for awhile..
http://www.coneeng.com/tech_assist.html look at the u bend cutting fixture
http://www.coneeng.com/tech_assist.html look at the u bend cutting fixture
I weld stainless, stainless and more stainless...Food Industry, sanitary process piping, vessels, whatever is needed, I like to make stuff.
ASME IX, AWS 17.1, D1.1
Instagram #RNHFAB
ASME IX, AWS 17.1, D1.1
Instagram #RNHFAB
GreinTime
- GreinTime
-
Weldmonger
-
Posts:
-
Joined:Fri Nov 01, 2013 11:20 am
-
Location:Pittsburgh, PA
Its a lot cheaper than the ICEngineWorks cutting fixture!
I like trolling around on Cone Engineering! They have some cool shit, and their oval race mufflers are cheap as hell if you build them yourself!
I like trolling around on Cone Engineering! They have some cool shit, and their oval race mufflers are cheap as hell if you build them yourself!
#oneleggedproblems
-=Sam=-
-=Sam=-


I downloaded the PDF instructions for that "tool."Rick_H wrote:look at this cool tool, Ive been eyeing one up for awhile..
http://www.coneeng.com/tech_assist.html look at the u bend cutting fixture
Easy fix to avoid losing the "miter tool" just attach it with some small chain or that bead chain necklace/ceiling fan pull chain stuff.
But definitely seems like a good tool for the job.
Sent from my SM-G900R4 using Tapatalk

Part of your issue is the width of the kerf being even for both the long and short sides of the bend. If you are cutting a straight piece of pipe, a 1/16" kerf is no big deal. When you cut through the middle of a bend, the kerf really needs to be slightly narrower on the inside compared to the outside. Like a pie shaped wedge. It seems minimal, but this could be causing what you are experiencing.
Anyone that works with tube and pipe, the first fixture you need to build for yourself is a 3-D pipe "square." I made mine out of aluminum angle. Use the appropriate size angle that will contain two of at least your common smaller tube sizes of bends stacked on top of each other so that you can pattern and duplicate your parts.
From that square, a few basic layout tools and some essential math skills, you can cut and duplicate just about anything with bends in it. It is one of the most used tools in my kit.
From that square, a few basic layout tools and some essential math skills, you can cut and duplicate just about anything with bends in it. It is one of the most used tools in my kit.
Miller ABP 330, Syncrowave 250, Dynasty 300 DX.
Honorary member of the Fraternity of Faded Tee Shirts.
Honorary member of the Fraternity of Faded Tee Shirts.
I will see if I can (remember) take one today. What it amounts to is two pieces of angle welded together to make a basic framing square of sorts. It's main function is to read under(spring back), or over bend in 90's. It's secondary function is to align and capture the walls of two bends stacked so that you can pattern off of a bend that has been cut successfully to fit already. It just happens to work for other layout tasks as well when combined with other tools, such as a speed, or bevel square. I've used it to mark cuts in bends alot.
Probably not exactly what is needed for the task in this thread after viewing some of the more elaborate jigs in the links, but I end up using it for that at times.
Probably not exactly what is needed for the task in this thread after viewing some of the more elaborate jigs in the links, but I end up using it for that at times.
Miller ABP 330, Syncrowave 250, Dynasty 300 DX.
Honorary member of the Fraternity of Faded Tee Shirts.
Honorary member of the Fraternity of Faded Tee Shirts.
Here's what I am talking about. It may be a little crude for others needs, but I do a lot of layout and mirroring of parts off of this one square. There's a protractor arm that rides on the rails as well but I could not find it right away and today was a crunch day for a one day only project.
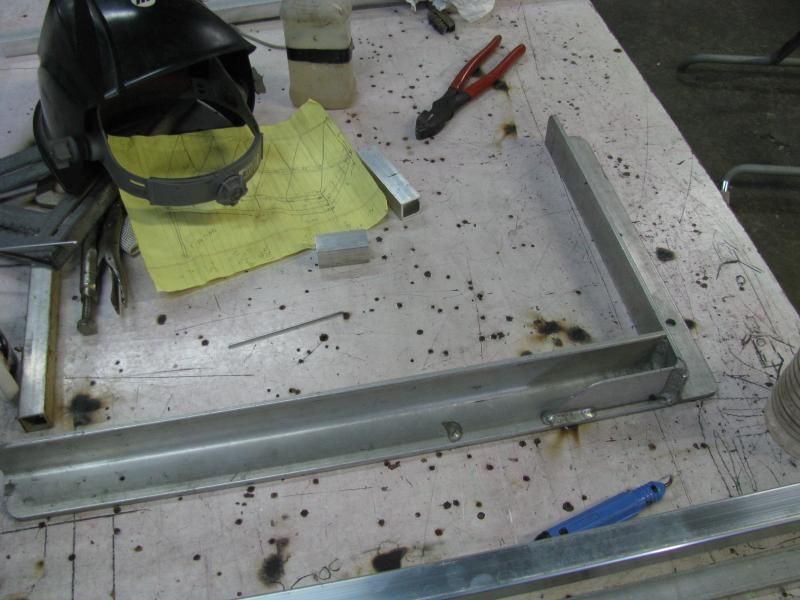
I just set the speed square up there to show another way it can be used. I know these aren't mandrel bends, but I do have to cut sections out of bends a lot.
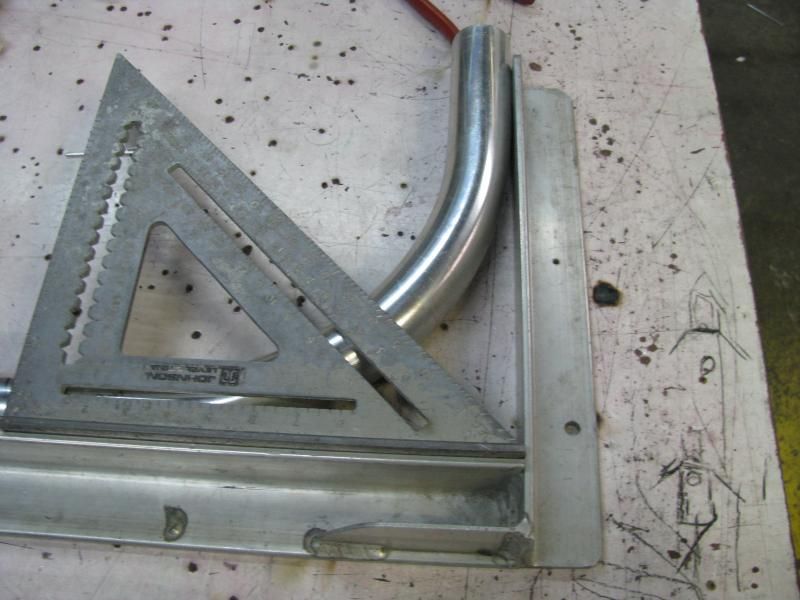
This was the very first jig I built when I walked into this shop 15 years ago, and this was the only piece of angle in captivity at the time. I can mark and measure on it, etc. Split my included angles, set my protractor or bevel finder accordingly and away I go.
I have been meaning to make a more elaborate one with more capacity and functions, but just never got to it.
I just set the speed square up there to show another way it can be used. I know these aren't mandrel bends, but I do have to cut sections out of bends a lot.
This was the very first jig I built when I walked into this shop 15 years ago, and this was the only piece of angle in captivity at the time. I can mark and measure on it, etc. Split my included angles, set my protractor or bevel finder accordingly and away I go.
I have been meaning to make a more elaborate one with more capacity and functions, but just never got to it.
Miller ABP 330, Syncrowave 250, Dynasty 300 DX.
Honorary member of the Fraternity of Faded Tee Shirts.
Honorary member of the Fraternity of Faded Tee Shirts.
Jump to
- Introductions & How to Use the Forum
- ↳ Welcome!
- ↳ Member Introductions
- ↳ How to Use the Forum
- ↳ Moderator Applications
- Welding Discussion
- ↳ Metal Cutting
- ↳ Tig Welding - Tig Welding Aluminum - Tig Welding Techniques - Aluminum Tig Welding
- ↳ Mig and Flux Core - gas metal arc welding & flux cored arc welding
- ↳ Stick Welding/Arc Welding - Shielded Metal Arc Welding
- ↳ Welding Forum General Shop Talk
- ↳ Welding Certification - Stick/Arc Welding, Tig Welding, Mig Welding Certification tests - Welding Tests of all kinds
- ↳ Welding Projects - Welding project Ideas - Welding project plans
- ↳ Product Reviews
- ↳ Fuel Gas Heating
- Welding Tips & Tricks
- ↳ Video Discussion
- ↳ Wish List
- Announcements & Feedback
- ↳ Forum News
- ↳ Suggestions, Feedback and Support
- Welding Marketplace
- ↳ Welding Jobs - Industrial Welding Jobs - Pipe Welding Jobs - Tig Welding Jobs
- ↳ Classifieds - Buy, Sell, Trade Used Welding Equipment
- Welding Resources
- ↳ Tradeshows, Seminars and Events
- ↳ The Welding Library
- ↳ Education Opportunities